Brother International Innov-ís 80 Users Manual - English - Page 14
Operation panel
 |
View all Brother International Innov-ís 80 manuals
Add to My Manuals
Save this manual to your list of manuals |
Page 14 highlights
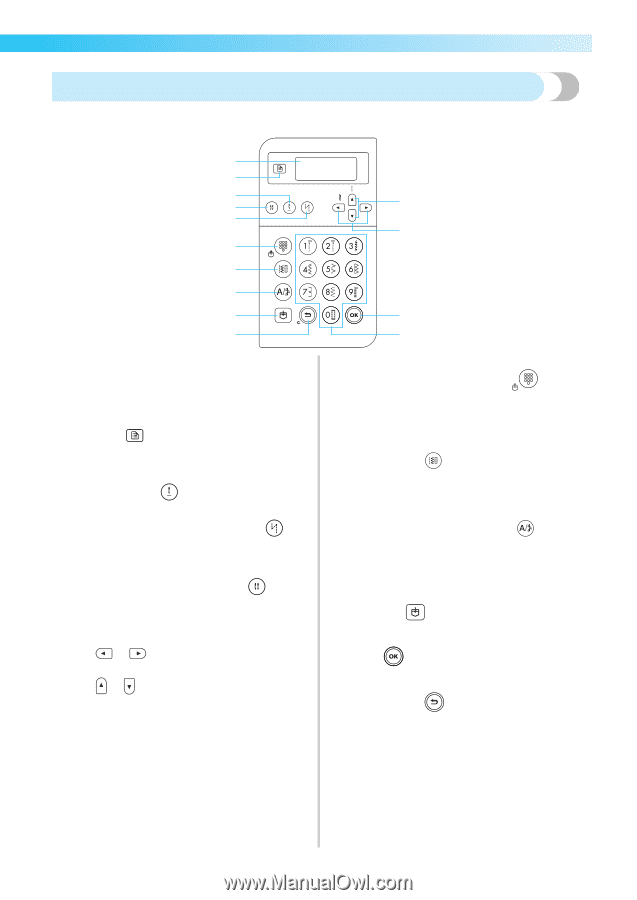
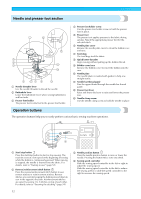
Operation panel The operation panel, located on the front at the right of the sewing machine, consists of the LCD (liquid crystal display) and keys for specifying various sewing settings. 1 2 3 5 4 8 9 @ A C a LCD (liquid crystal display) Settings for the selected stitch and error messages for incorrect operations appear in the LCD. Use keys b and f through n, described below, to display various items and select the settings. For details, refer to "Understanding the LCD Screens" (page 18). b Settings key Press this key to select sewing settings, such as for left/ right mirror imaging, or other settings such as the operation beep. c Needle position key Press this key to raise or lower the needle. d Automatic reverse/reinforcement stitch key Press this key to select the automatic reverse/ reinforcement stitching setting. Press this key again to cancel the setting. e Needle mode selection key (single/twin) Press this key to select the twin needle sewing setting. Each time this key is pressed, the setting switches between single needle sewing and twin needle sewing. f Stitch width keys Press or to adjust the stitch width setting. g Stitch length keys Press or to adjust the stitch length setting. 7 6 B D ■ Stitch mode keys (h-j) h Preset utility stitch/saved pattern key Press this key to select the utility stitch assigned to a numeric key or to retrieve a pattern that has been saved. Each time this key is pressed, the machine switches between the preset utility stitch mode and the saved pattern mode. i Utility stitch key Press this key to select a straight stitch, zigzag stitch, buttonhole, blind hem stitch, decorative stitch, satin stitch, or cross-stitch. Use the numeric keys to type in the number of the desired stitch. j Character/utility decorative stitch key Press this key to select character stitch mode or utility decorative stitch mode, where patterns can be combined. Each time this key is pressed, the machine switches between utility decorative stitch mode and character stitch mode. k Memory key Press this key to save stitch patterns, such as combined patterns, in the sewing machine's memory. l OK key Press this key to apply the selection or perform the operation. m Cancel/clear key Press this key to cancel the operation and return to the previous screen. In addition, pressing this key removes the last pattern added when combining characters or decorative stitches. n Numeric keys Use these keys to quickly select one of the ten most often used stitches. When selecting other stitches, use these keys to type in the number of the desired stitch. Names of Machine Parts and Their Functions 13
-
 1
1 -
2
-
3
-
4
-
5
-
6
-
7
-
8
-
 9
9 -
 10
10 -
 11
11 -
 12
12 -
 13
13 -
 14
14 -
 15
15 -
 16
16 -
 17
17 -
 18
18 -
 19
19 -
20
-
21
-
22
-
23
-
24
-
25
-
26
-
27
-
28
-
29
-
30
-
31
-
32
-
33
-
34
-
35
-
36
-
37
-
38
-
39
-
40
-
41
-
42
-
43
-
44
-
45
-
46
-
47
-
48
-
49
-
50
-
51
-
52
-
53
-
54
-
55
-
56
-
57
-
58
-
59
-
60
-
61
-
62
-
63
-
64
-
65
-
66
-
67
-
68
-
69
-
70
-
71
-
72
-
73
-
74
-
75
-
76
-
77
-
78
-
79
-
80
-
81
-
82
-
83
-
84
-
85
-
86
-
87
-
88
-
89
-
90
-
91
-
92
-
93
-
94
-
95
-
96
-
97
-
98
-
99
-
100
-
101
-
102
-
103
-
104
-
105
-
106
-
107
-
108
-
109
-
110
-
111
-
112
-
113
-
114
-
115
-
116
-
117
-
118
-
119
-
120
-
121
-
122
-
123
-
124
-
125
-
126
-
127
-
128
-
129
-
130
-
131
-
132
-
133
-
134
-
135
-
136
-
137
-
138
-
139
-
140
 |
 |