Brother International Innov-ís 80 Users Manual - English - Page 68
Selecting stitching
 |
View all Brother International Innov-ís 80 manuals
Add to My Manuals
Save this manual to your list of manuals |
Page 68 highlights
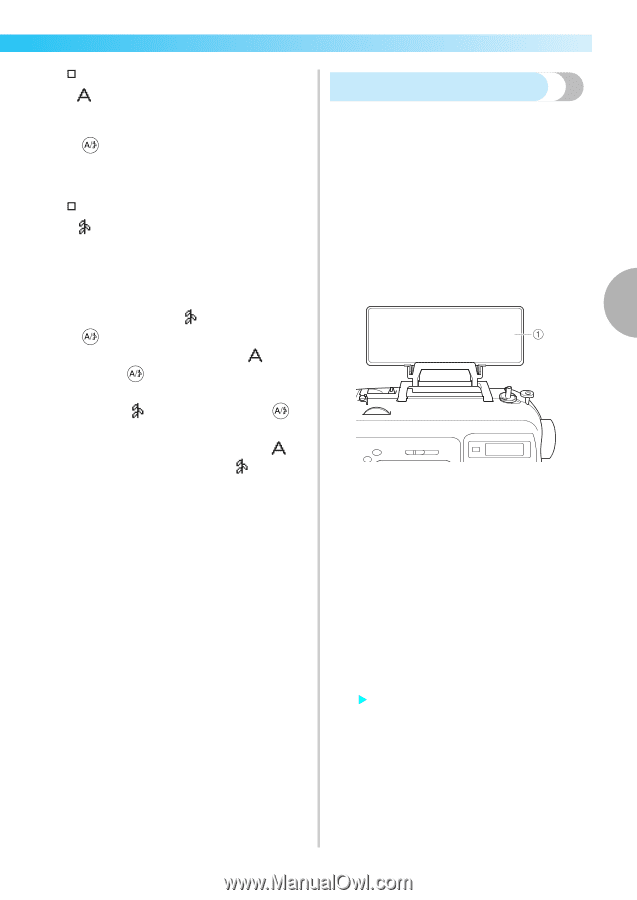
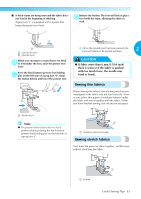
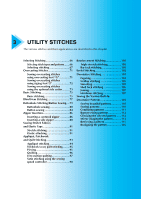
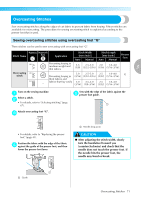
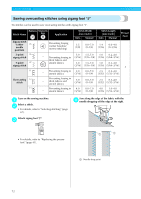
† Character stitches (No.01-55) There are 55 characters, including letters, symbols and numbers, in the Gothic font. If (Character/utility decorative stitch key) is pressed once, character stitch mode is selected. Character stitches are sewn in the Gothic font. † Utility decorative stitches (No.01-62) Some utility stitches can be used as Selecting stitching Using the operation panel keys, select the desired stitch. Ten of the most often used utility stitches can quickly be selected with the numeric keys. Right after turning the power on, the straight stitch (left needle position) is selected. The machine can also be set to select the straight stitch (center needle position). For details, refer to "Changing the settings" (page 19). decorative stitches. There are 62 of these stitches. Determine the stitch that you wish to use. a • For the numbers of the various stitches, refer to the stitch pattern plate and "Stitch Settings" (page 120). Multiple patterns can be combined in the utility 3 decorative stitch mode . If (Character/utility decorative stitch key) is pressed once, character stitch mode is selected. If (Character/utility decorative stitch key) is pressed twice, utility decorative stitch mode is selected. Each press of (Utility decorative/character stitch key) switches the mode between character stitch mode and utility decorative stitch mode . a Stitch pattern plate Determine which presser foot should be used b with the selected stitch. The presser feet are stored in the accessory compartment. • For details on the stitches that can be sewn with the twin needle, refer to "Stitch Settings" (page 120). Attach the presser foot. c • For details, refer to "Replacing the presser foot" (page 41). Turn on the sewing machine. d X The straight stitch (left needle position) is shown selected in the LCD. After selecting the stitch mode, select the e stitch pattern. Selecting Stitching 67
-
 1
1 -
2
-
3
-
4
-
5
-
6
-
7
-
8
-
9
-
10
-
11
-
12
-
13
-
14
-
15
-
16
-
17
-
18
-
19
-
20
-
21
-
22
-
23
-
24
-
25
-
26
-
27
-
28
-
29
-
30
-
31
-
32
-
33
-
34
-
35
-
36
-
37
-
38
-
39
-
40
-
41
-
42
-
43
-
44
-
45
-
46
-
47
-
48
-
49
-
50
-
51
-
52
-
53
-
54
-
55
-
56
-
57
-
58
-
59
-
60
-
61
-
62
-
 63
63 -
 64
64 -
 65
65 -
 66
66 -
 67
67 -
 68
68 -
 69
69 -
 70
70 -
 71
71 -
 72
72 -
 73
73 -
74
-
75
-
76
-
77
-
78
-
79
-
80
-
81
-
82
-
83
-
84
-
85
-
86
-
87
-
88
-
89
-
90
-
91
-
92
-
93
-
94
-
95
-
96
-
97
-
98
-
99
-
100
-
101
-
102
-
103
-
104
-
105
-
106
-
107
-
108
-
109
-
110
-
111
-
112
-
113
-
114
-
115
-
116
-
117
-
118
-
119
-
120
-
121
-
122
-
123
-
124
-
125
-
126
-
127
-
128
-
129
-
130
-
131
-
132
-
133
-
134
-
135
-
136
-
137
-
138
-
139
-
140
 |
 |