Brother International Innov-ís 80 Users Manual - English - Page 60
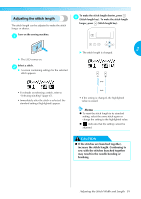
Adjusting the stitch length
 |
View all Brother International Innov-ís 80 manuals
Add to My Manuals
Save this manual to your list of manuals |
Page 60 highlights
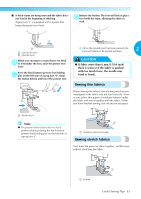
Adjusting the stitch length The stitch length can be adjusted to make the stitch longer or shorter. Turn on the sewing machine. a To make the stitch length shorter, press c (Stitch length key). To make the stitch length longer, press (Stitch length key). 2 X The stitch length is changed. X The LCD comes on. Select a stitch. b X A screen containing settings for the selected stitch appears. -+ • For details on selecting a stitch, refer to "Selecting stitching" (page 67). • Immediately after the stitch is selected, the standard settings (highlighted) appear. • If the setting is changed, the highlighted value is erased. Memo z To reset the stitch length to its standard setting, select the same stitch again or change the setting to the highlighted value. z indicates that the setting cannot be adjusted. CAUTION ● If the stitches are bunched together, increase the stitch length. Continuing to sew with the stitches bunched together may result in the needle bending or breaking. Adjusting the Stitch Width and Length 59
-
 1
1 -
2
-
3
-
4
-
5
-
6
-
7
-
8
-
9
-
10
-
11
-
12
-
13
-
14
-
15
-
16
-
17
-
18
-
19
-
20
-
21
-
22
-
23
-
24
-
25
-
26
-
27
-
28
-
29
-
30
-
31
-
32
-
33
-
34
-
35
-
36
-
37
-
38
-
39
-
40
-
41
-
42
-
43
-
44
-
45
-
46
-
47
-
48
-
49
-
50
-
51
-
52
-
53
-
54
-
 55
55 -
 56
56 -
 57
57 -
 58
58 -
 59
59 -
 60
60 -
 61
61 -
 62
62 -
 63
63 -
 64
64 -
 65
65 -
66
-
67
-
68
-
69
-
70
-
71
-
72
-
73
-
74
-
75
-
76
-
77
-
78
-
79
-
80
-
81
-
82
-
83
-
84
-
85
-
86
-
87
-
88
-
89
-
90
-
91
-
92
-
93
-
94
-
95
-
96
-
97
-
98
-
99
-
100
-
101
-
102
-
103
-
104
-
105
-
106
-
107
-
108
-
109
-
110
-
111
-
112
-
113
-
114
-
115
-
116
-
117
-
118
-
119
-
120
-
121
-
122
-
123
-
124
-
125
-
126
-
127
-
128
-
129
-
130
-
131
-
132
-
133
-
134
-
135
-
136
-
137
-
138
-
139
-
140
 |
 |