Canon BJC 6000 Service Manual - Page 122
DISASSEMBLY AND REASSEMBLY, 2.1 Unlocking the carriage
 |
View all Canon BJC 6000 manuals
Add to My Manuals
Save this manual to your list of manuals |
Page 122 highlights
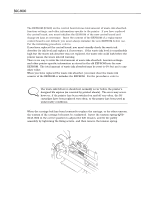
Part 5: Maintenance BJC-6000 4. DISASSEMBLY AND REASSEMBLY 4.1 Disassembly and Reassembly When disassembling or reassembling the printer, refer to the parts catalog. The numbers in the parts catalog illustrations indicate the disassembly sequence. The parts catalog also contains close-up diagrams for parts requiring special care during disassembly or reassembly. 4.2 Notes on Disassembly and Reassembly Note the following when disassembling or reassembling the printer (also refer to the parts catalog for additional information). 4.2.1 Unlocking the carriage When the printer is shipped from the factory (or when the cartridges are installed and the power has been turned off normally), the carriage is locked in the capping position to secure the cartridges during transportation. When the printer is powered on properly, the carriage locking is disabled automatically. If the printer cannot be powered on normally, it will be necessary to manually unlock the carriage. This can be done by turning the paper eject roller gear half a turn (5 indented notches) in the direction of arrow 2 with a flat-blade screwdriver while gently pressing the carriage in the direction of arrow 1. You can also use the carriage key to turn the paper eject roller gear. 2 1 Paper Eject Roller Gear Figure 5-2 Unlocking the Carriage 5-4
-
 1
1 -
2
-
3
-
4
-
5
-
6
-
7
-
8
-
9
-
10
-
11
-
12
-
13
-
14
-
15
-
16
-
17
-
18
-
19
-
20
-
21
-
22
-
23
-
24
-
25
-
26
-
27
-
28
-
29
-
30
-
31
-
32
-
33
-
34
-
35
-
36
-
37
-
38
-
39
-
40
-
41
-
42
-
43
-
44
-
45
-
46
-
47
-
48
-
49
-
50
-
51
-
52
-
53
-
54
-
55
-
56
-
57
-
58
-
59
-
60
-
61
-
62
-
63
-
64
-
65
-
66
-
67
-
68
-
69
-
70
-
71
-
72
-
73
-
74
-
75
-
76
-
77
-
78
-
79
-
80
-
81
-
82
-
83
-
84
-
85
-
86
-
87
-
88
-
89
-
90
-
91
-
92
-
93
-
94
-
95
-
96
-
97
-
98
-
99
-
100
-
101
-
102
-
103
-
104
-
105
-
106
-
107
-
108
-
109
-
110
-
111
-
112
-
113
-
114
-
115
-
116
-
 117
117 -
 118
118 -
 119
119 -
 120
120 -
 121
121 -
 122
122 -
 123
123 -
 124
124 -
 125
125 -
 126
126 -
 127
127 -
128
-
129
-
130
-
131
-
132
-
133
-
134
-
135
-
136
-
137
-
138
-
139
-
140
-
141
-
142
-
143
-
144
-
145
-
146
-
147
-
148
-
149
-
150
-
151
-
152
-
153
-
154
-
155
-
156
-
157
-
158
-
159
-
160
-
161
-
162
-
163
-
164
-
165
-
166
-
167
-
168
-
169
-
170
-
171
-
172
-
173
-
174
 |
 |
