Canon BJC 6000 Service Manual - Page 55
Replacing an Ink Tank, Unlock Tab - printer problems
 |
View all Canon BJC 6000 manuals
Add to My Manuals
Save this manual to your list of manuals |
Page 55 highlights
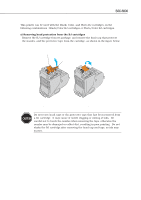
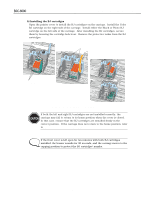
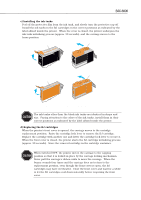
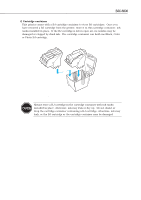
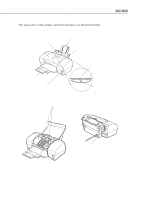
BJC-6000 Part 3: Operating Instructions e) Replacing the ink tanks For the Black, Color and Photo BJ cartridges, each ink tank can be individually replaced. 1) When to replace the ink tank Replace the ink tank with a new one if no ink can be seen inside, or as indicated by the ink-out alarm, or if it was unpackaged for more than six months and printing quality does not improve even after several cleanings. If printing quality still does not improve, even with a new ink tank NOTE installed, perform cleaning operations 1-5 times. If this does not solve the problem, replace the BJ cartridge. 2) Removing an ink tank Open the printer's front cover to have the carriage move to the cartridge replacement position. Press the unlock tab of the ink tank, and remove the ink tank. Unlock Tab Figure 3-8 Replacing an Ink Tank CAUTION The ink supply pieces and nearby areas of the ink tank may be stained with ink. Be careful not to get your hands or clothing stained with ink when replacing the ink tank. 3-7
-
 1
1 -
2
-
3
-
4
-
5
-
6
-
7
-
8
-
9
-
10
-
11
-
12
-
13
-
14
-
15
-
16
-
17
-
18
-
19
-
20
-
21
-
22
-
23
-
24
-
25
-
26
-
27
-
28
-
29
-
30
-
31
-
32
-
33
-
34
-
35
-
36
-
37
-
38
-
39
-
40
-
41
-
42
-
43
-
44
-
45
-
46
-
47
-
48
-
49
-
 50
50 -
 51
51 -
 52
52 -
 53
53 -
 54
54 -
 55
55 -
 56
56 -
 57
57 -
 58
58 -
 59
59 -
 60
60 -
61
-
62
-
63
-
64
-
65
-
66
-
67
-
68
-
69
-
70
-
71
-
72
-
73
-
74
-
75
-
76
-
77
-
78
-
79
-
80
-
81
-
82
-
83
-
84
-
85
-
86
-
87
-
88
-
89
-
90
-
91
-
92
-
93
-
94
-
95
-
96
-
97
-
98
-
99
-
100
-
101
-
102
-
103
-
104
-
105
-
106
-
107
-
108
-
109
-
110
-
111
-
112
-
113
-
114
-
115
-
116
-
117
-
118
-
119
-
120
-
121
-
122
-
123
-
124
-
125
-
126
-
127
-
128
-
129
-
130
-
131
-
132
-
133
-
134
-
135
-
136
-
137
-
138
-
139
-
140
-
141
-
142
-
143
-
144
-
145
-
146
-
147
-
148
-
149
-
150
-
151
-
152
-
153
-
154
-
155
-
156
-
157
-
158
-
159
-
160
-
161
-
162
-
163
-
164
-
165
-
166
-
167
-
168
-
169
-
170
-
171
-
172
-
173
-
174
 |
 |
