Canon BJC 6000 Service Manual - Page 128
ASF Gear Position Adjustment
 |
View all Canon BJC 6000 manuals
Add to My Manuals
Save this manual to your list of manuals |
Page 128 highlights
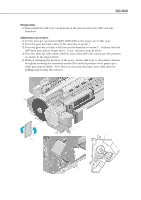
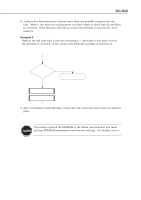
Part 5: Maintenance BJC-6000 5.2.3 ASF gear position adjustment Preparation: 1) Reassemble the ASF unit components to the level as when the ASF unit was detached. Adjustment procedure: 1) Set the gear key special tool (QY9-0038-000) to the paper eject roller gear. 2) Turn the gear key half a turn in the direction of arrow 1. 3) Turn the gear key at least a full turn in the direction of arrow 2. Confirm that the ASF drive gear will no longer move. If not, return to step 2) above. 4) Turn the pick-up roller shaft until the cam of the ASF unit comes into the position as shown in the figure below. 5) Without changing the position of the gears, fix the ASF unit to the printer chassis by tightly screwing the assembly screws (The toothed portion of the paper eject roller gear may be held). Note that you can turn the paper eject roller gear by holding and turning the notches. Notches 2 1 Gear Key Paper Eject Roller Gear Cam ASF Drive Gear Figure 5-8 ASF Gear Position Adjustment 5-10
-
 1
1 -
2
-
3
-
4
-
5
-
6
-
7
-
8
-
9
-
10
-
11
-
12
-
13
-
14
-
15
-
16
-
17
-
18
-
19
-
20
-
21
-
22
-
23
-
24
-
25
-
26
-
27
-
28
-
29
-
30
-
31
-
32
-
33
-
34
-
35
-
36
-
37
-
38
-
39
-
40
-
41
-
42
-
43
-
44
-
45
-
46
-
47
-
48
-
49
-
50
-
51
-
52
-
53
-
54
-
55
-
56
-
57
-
58
-
59
-
60
-
61
-
62
-
63
-
64
-
65
-
66
-
67
-
68
-
69
-
70
-
71
-
72
-
73
-
74
-
75
-
76
-
77
-
78
-
79
-
80
-
81
-
82
-
83
-
84
-
85
-
86
-
87
-
88
-
89
-
90
-
91
-
92
-
93
-
94
-
95
-
96
-
97
-
98
-
99
-
100
-
101
-
102
-
103
-
104
-
105
-
106
-
107
-
108
-
109
-
110
-
111
-
112
-
113
-
114
-
115
-
116
-
117
-
118
-
119
-
120
-
121
-
122
-
 123
123 -
 124
124 -
 125
125 -
 126
126 -
 127
127 -
 128
128 -
 129
129 -
 130
130 -
 131
131 -
 132
132 -
 133
133 -
134
-
135
-
136
-
137
-
138
-
139
-
140
-
141
-
142
-
143
-
144
-
145
-
146
-
147
-
148
-
149
-
150
-
151
-
152
-
153
-
154
-
155
-
156
-
157
-
158
-
159
-
160
-
161
-
162
-
163
-
164
-
165
-
166
-
167
-
168
-
169
-
170
-
171
-
172
-
173
-
174
 |
 |
