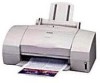
Canon BJC 6000 Service Manual - Page 21
Unpacking the Ink Tank, 2 Ink Tanks, 2.2 Ink tank handling - cartridge
 |
View all Canon BJC 6000 manuals
Add to My Manuals
Save this manual to your list of manuals |
Page 21 highlights
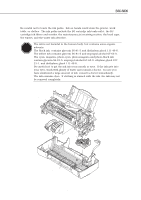
BJC-6000 Part 1: Safety and Precautions 2.2 Ink Tanks 2.2.1 Unpacking the ink tank Do not unpack the ink tank until you are ready to use it. When installing it in the BJ cartridge, unpack the ink tank, peel off the vinyl lamination, and remove the cap from the ink outlets. Figure 1-6 Unpacking the Ink Tank 2.2.2 Ink tank handling If the joint of the BJ cartridge connecting to the ink tank supply piece is contaminated, suction of ink into the BJ cartridge could fail. Therefore, never touch the ink tank's ink supply piece. After removing the cap from the ink tank supply piece, promptly install the ink tank in the BJ cartridge to prevent the nozzles from clogging due to dried-ink. Do not remove the ink tank from the BJ cartridge unless you are replacing it. Figure 1-7 Installing the Ink Tank NOTE If a nozzle clogs, or otherwise ink fails to be fed normally, print quality degrades, and typically a fine horizontal blank line appears in printed images. If cleaning operations do not solve the problem, replace the BJ cartridge with a new one. 1-7
-
 1
1 -
2
-
3
-
4
-
5
-
6
-
7
-
8
-
9
-
10
-
11
-
12
-
13
-
14
-
15
-
 16
16 -
 17
17 -
 18
18 -
 19
19 -
 20
20 -
 21
21 -
 22
22 -
 23
23 -
 24
24 -
 25
25 -
 26
26 -
27
-
28
-
29
-
30
-
31
-
32
-
33
-
34
-
35
-
36
-
37
-
38
-
39
-
40
-
41
-
42
-
43
-
44
-
45
-
46
-
47
-
48
-
49
-
50
-
51
-
52
-
53
-
54
-
55
-
56
-
57
-
58
-
59
-
60
-
61
-
62
-
63
-
64
-
65
-
66
-
67
-
68
-
69
-
70
-
71
-
72
-
73
-
74
-
75
-
76
-
77
-
78
-
79
-
80
-
81
-
82
-
83
-
84
-
85
-
86
-
87
-
88
-
89
-
90
-
91
-
92
-
93
-
94
-
95
-
96
-
97
-
98
-
99
-
100
-
101
-
102
-
103
-
104
-
105
-
106
-
107
-
108
-
109
-
110
-
111
-
112
-
113
-
114
-
115
-
116
-
117
-
118
-
119
-
120
-
121
-
122
-
123
-
124
-
125
-
126
-
127
-
128
-
129
-
130
-
131
-
132
-
133
-
134
-
135
-
136
-
137
-
138
-
139
-
140
-
141
-
142
-
143
-
144
-
145
-
146
-
147
-
148
-
149
-
150
-
151
-
152
-
153
-
154
-
155
-
156
-
157
-
158
-
159
-
160
-
161
-
162
-
163
-
164
-
165
-
166
-
167
-
168
-
169
-
170
-
171
-
172
-
173
-
174
 |
 |
