Canon BJC 6000 Service Manual - Page 130
Head Gap Adjustment 2, Remove the Black BJ cartridge.
 |
View all Canon BJC 6000 manuals
Add to My Manuals
Save this manual to your list of manuals |
Page 130 highlights
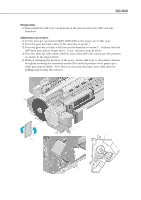
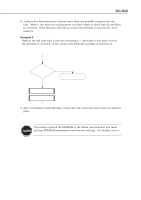
Part 5: Maintenance BJC-6000 Adjustment procedure: 1) Set the 1.9-mm gap gauge (QY9-0038) in position A. 2) Move the carriage into position C by moving the carriage belt by hand. 3) Install the Black BJ cartridge on the left side of the carriage. 4) Slowly loosen, by half a turn, the fixing screw that secures the left adjustable bearing supporting the carriage shaft, and move the paper thickness lever up and down two or three times, and tighten the fixing screw. 5) Remove the Black BJ cartridge. 6) Put the 0.5mm gap gauge (QY9-0001) and the 1.9mm gap gauge (QY9-0038) stacked together in position B. 7) Set the paper thickness lever to the lowest position (thick paper position). 8) Move the carriage into position D by moving the carriage belt by hand. 9) Install the Black BJ cartridge on the left side of the carriage. 10) Slowly loosen, by half a turn, the fixing screw that secures the right adjustable bearing supporting the carriage shaft, and move the paper thickness selector up and down two or three times, and tighten the fixing screw. 11) Remove the Black BJ cartridge. 12) Repeat steps 1) to 11) again. 13) Firmly tighten the right and left fixing screws. 14) Reinstall the right and left shaft clips in place. Position A Position B QY9-0038 QY9-0001 QY9-0038 Black BJ Cartrige Carriage Position C Position D Figure 5-10 Head Gap Adjustment (2) 5-12
-
 1
1 -
2
-
3
-
4
-
5
-
6
-
7
-
8
-
9
-
10
-
11
-
12
-
13
-
14
-
15
-
16
-
17
-
18
-
19
-
20
-
21
-
22
-
23
-
24
-
25
-
26
-
27
-
28
-
29
-
30
-
31
-
32
-
33
-
34
-
35
-
36
-
37
-
38
-
39
-
40
-
41
-
42
-
43
-
44
-
45
-
46
-
47
-
48
-
49
-
50
-
51
-
52
-
53
-
54
-
55
-
56
-
57
-
58
-
59
-
60
-
61
-
62
-
63
-
64
-
65
-
66
-
67
-
68
-
69
-
70
-
71
-
72
-
73
-
74
-
75
-
76
-
77
-
78
-
79
-
80
-
81
-
82
-
83
-
84
-
85
-
86
-
87
-
88
-
89
-
90
-
91
-
92
-
93
-
94
-
95
-
96
-
97
-
98
-
99
-
100
-
101
-
102
-
103
-
104
-
105
-
106
-
107
-
108
-
109
-
110
-
111
-
112
-
113
-
114
-
115
-
116
-
117
-
118
-
119
-
120
-
121
-
122
-
123
-
124
-
 125
125 -
 126
126 -
 127
127 -
 128
128 -
 129
129 -
 130
130 -
 131
131 -
 132
132 -
 133
133 -
 134
134 -
 135
135 -
136
-
137
-
138
-
139
-
140
-
141
-
142
-
143
-
144
-
145
-
146
-
147
-
148
-
149
-
150
-
151
-
152
-
153
-
154
-
155
-
156
-
157
-
158
-
159
-
160
-
161
-
162
-
163
-
164
-
165
-
166
-
167
-
168
-
169
-
170
-
171
-
172
-
173
-
174
 |
 |
