Canon BJC 6000 Service Manual - Page 124
Adjustable Bearings Supporting the Carriage Shaft, Removing the ASF Unit
 |
View all Canon BJC 6000 manuals
Add to My Manuals
Save this manual to your list of manuals |
Page 124 highlights
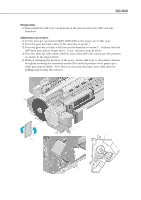
Part 5: Maintenance BJC-6000 4.2.3 Removing the ASF unit The ASF unit is attached to the printer unit such that the ASF driving gear and the pick-up roller are matched in phase. Once you removed the assembly screws, painted red to protect against careless removal, which fasten the ASF unit to the printer frame, you must readjust the position of the ASF gear with respect to that of the pickup roller. For the procedure of the ASF gear position adjustment, refer to Part 5: 5.2.3 ASF gear position adjustment (page 5-10). Assembly Screw (Red) ASF Unit Assembly Screws (Red) Figure 5-4 Removing the ASF Unit 4.2.4 Removing the adjustable bearings supporting the carriage shaft The adjustable bearings supporting the carriage shaft are adjusted and secured to the printer frame so that the ideal head-to-paper gap is maintained for best print quality. Once you have loosened the screws, painted red to protect against careless removal, which fasten the adjustable bearings to the printer frame, you must readjust the position of the bearings for head gap adjustment. For the procedure of the head gap adjustment, refer to Part 5: 5.2.4 Head gap adjustment (page 5-11). Adjustable Bearing Supporting the Carriage Shaft Adjustable Bearing Supporting the Carriage Shaft Figure 5-5 Adjustable Bearings Supporting the Carriage Shaft 5-6
-
 1
1 -
2
-
3
-
4
-
5
-
6
-
7
-
8
-
9
-
10
-
11
-
12
-
13
-
14
-
15
-
16
-
17
-
18
-
19
-
20
-
21
-
22
-
23
-
24
-
25
-
26
-
27
-
28
-
29
-
30
-
31
-
32
-
33
-
34
-
35
-
36
-
37
-
38
-
39
-
40
-
41
-
42
-
43
-
44
-
45
-
46
-
47
-
48
-
49
-
50
-
51
-
52
-
53
-
54
-
55
-
56
-
57
-
58
-
59
-
60
-
61
-
62
-
63
-
64
-
65
-
66
-
67
-
68
-
69
-
70
-
71
-
72
-
73
-
74
-
75
-
76
-
77
-
78
-
79
-
80
-
81
-
82
-
83
-
84
-
85
-
86
-
87
-
88
-
89
-
90
-
91
-
92
-
93
-
94
-
95
-
96
-
97
-
98
-
99
-
100
-
101
-
102
-
103
-
104
-
105
-
106
-
107
-
108
-
109
-
110
-
111
-
112
-
113
-
114
-
115
-
116
-
117
-
118
-
 119
119 -
 120
120 -
 121
121 -
 122
122 -
 123
123 -
 124
124 -
 125
125 -
 126
126 -
 127
127 -
 128
128 -
 129
129 -
130
-
131
-
132
-
133
-
134
-
135
-
136
-
137
-
138
-
139
-
140
-
141
-
142
-
143
-
144
-
145
-
146
-
147
-
148
-
149
-
150
-
151
-
152
-
153
-
154
-
155
-
156
-
157
-
158
-
159
-
160
-
161
-
162
-
163
-
164
-
165
-
166
-
167
-
168
-
169
-
170
-
171
-
172
-
173
-
174
 |
 |
