Canon BJC 6000 Service Manual - Page 54
Installing the Ink Tanks, d Replacing the BJ cartridges
 |
View all Canon BJC 6000 manuals
Add to My Manuals
Save this manual to your list of manuals |
Page 54 highlights
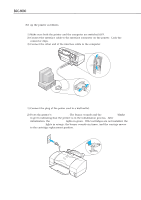
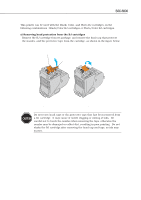
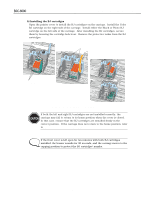
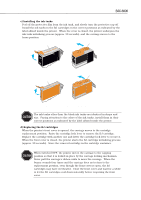
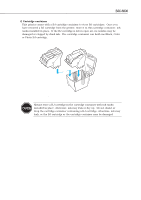
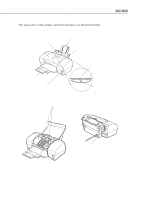
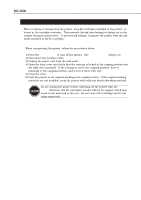
Part 3: Operating Instructions BJC-6000 c) Installing the ink tanks Peel off the protective film from the ink tank, and slowly turn the protective cap off. Install the ink tanks in the BJ cartridges in the correct positions as indicated by the label affixed inside the printer. When the cover is closed, the printer undergoes the ink tank initializing process (approx. 30 seconds), and the carriage moves to the home position. Protective Film Protective Cap Protective Film Protective Cap Figure 3-7 Installing the Ink Tanks CAUTION The ink tanks other than the black ink tanks are identical in shape and size. Paying attention to the colors of the ink tanks, install them in their correct positions as indicated by the label affixed inside the printer. d) Replacing the BJ cartridges When the printer's front cover is opened, the carriage moves to the cartridge replacement position. Raise the cartridge lock lever to remove the BJ cartridge. Replace the cartridge with another one and lower the cartridge lock lever to secure it. When the front cover is closed, the printer starts the BJ cartridge initializing process (approx. 30 seconds). Store the removed cartridge in the cartridge container. CAUTION When switched OFF, the printer moves the carriage to the capping position so that it is locked in place by the carriage locking mechanism. Never pull the carriage's ribbon cable to move the carriage. When the buzzer sounds four times and the carriage does not return to the replacement position, even though the front cover is open, the BJ cartridges may have overheated. Close the front cover and wait for a while to let the BJ cartridges cool down naturally before reopening the front cover. 3-6
-
 1
1 -
2
-
3
-
4
-
5
-
6
-
7
-
8
-
9
-
10
-
11
-
12
-
13
-
14
-
15
-
16
-
17
-
18
-
19
-
20
-
21
-
22
-
23
-
24
-
25
-
26
-
27
-
28
-
29
-
30
-
31
-
32
-
33
-
34
-
35
-
36
-
37
-
38
-
39
-
40
-
41
-
42
-
43
-
44
-
45
-
46
-
47
-
48
-
 49
49 -
 50
50 -
 51
51 -
 52
52 -
 53
53 -
 54
54 -
 55
55 -
 56
56 -
 57
57 -
 58
58 -
 59
59 -
60
-
61
-
62
-
63
-
64
-
65
-
66
-
67
-
68
-
69
-
70
-
71
-
72
-
73
-
74
-
75
-
76
-
77
-
78
-
79
-
80
-
81
-
82
-
83
-
84
-
85
-
86
-
87
-
88
-
89
-
90
-
91
-
92
-
93
-
94
-
95
-
96
-
97
-
98
-
99
-
100
-
101
-
102
-
103
-
104
-
105
-
106
-
107
-
108
-
109
-
110
-
111
-
112
-
113
-
114
-
115
-
116
-
117
-
118
-
119
-
120
-
121
-
122
-
123
-
124
-
125
-
126
-
127
-
128
-
129
-
130
-
131
-
132
-
133
-
134
-
135
-
136
-
137
-
138
-
139
-
140
-
141
-
142
-
143
-
144
-
145
-
146
-
147
-
148
-
149
-
150
-
151
-
152
-
153
-
154
-
155
-
156
-
157
-
158
-
159
-
160
-
161
-
162
-
163
-
164
-
165
-
166
-
167
-
168
-
169
-
170
-
171
-
172
-
173
-
174
 |
 |
