Canon BJC 6000 Service Manual - Page 123
Part 5, Maintenance, Removing the Printer Unit
 |
View all Canon BJC 6000 manuals
Add to My Manuals
Save this manual to your list of manuals |
Page 123 highlights
BJC-6000 Part 5: Maintenance 4.2.2 Removing the printer unit Refer to Figure 5 (page B-9) of the parts catalog. 1) Set the paper thickness lever to its lowest position (envelope position). 2) Press the locking tab on the right side of the printer in the direction of arrow 1 and slightly lift the right side of the printer unit in the direction of arrow 2, resting it on the boss. 3) Likewise press the locking tab on the left side of the printer and slightly lift the left side of the printer unit. 4) Holding the printer unit by its front part and the ASF part as illustrated below, first push back the printer unit and then lift it straight up as shown by arrow 3. 3 3 1 2 Figure 5-3 Removing the Printer Unit 5-5
-
 1
1 -
2
-
3
-
4
-
5
-
6
-
7
-
8
-
9
-
10
-
11
-
12
-
13
-
14
-
15
-
16
-
17
-
18
-
19
-
20
-
21
-
22
-
23
-
24
-
25
-
26
-
27
-
28
-
29
-
30
-
31
-
32
-
33
-
34
-
35
-
36
-
37
-
38
-
39
-
40
-
41
-
42
-
43
-
44
-
45
-
46
-
47
-
48
-
49
-
50
-
51
-
52
-
53
-
54
-
55
-
56
-
57
-
58
-
59
-
60
-
61
-
62
-
63
-
64
-
65
-
66
-
67
-
68
-
69
-
70
-
71
-
72
-
73
-
74
-
75
-
76
-
77
-
78
-
79
-
80
-
81
-
82
-
83
-
84
-
85
-
86
-
87
-
88
-
89
-
90
-
91
-
92
-
93
-
94
-
95
-
96
-
97
-
98
-
99
-
100
-
101
-
102
-
103
-
104
-
105
-
106
-
107
-
108
-
109
-
110
-
111
-
112
-
113
-
114
-
115
-
116
-
117
-
 118
118 -
 119
119 -
 120
120 -
 121
121 -
 122
122 -
 123
123 -
 124
124 -
 125
125 -
 126
126 -
 127
127 -
 128
128 -
129
-
130
-
131
-
132
-
133
-
134
-
135
-
136
-
137
-
138
-
139
-
140
-
141
-
142
-
143
-
144
-
145
-
146
-
147
-
148
-
149
-
150
-
151
-
152
-
153
-
154
-
155
-
156
-
157
-
158
-
159
-
160
-
161
-
162
-
163
-
164
-
165
-
166
-
167
-
168
-
169
-
170
-
171
-
172
-
173
-
174
 |
 |

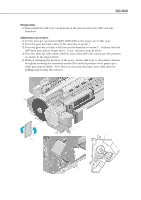
4.2.2 Removing the printer unit
Refer to Figure 5 (page B-9) of the parts catalog.
1) Set the paper thickness lever to its lowest position (envelope position).
2) Press the locking tab on the right side of the printer in the direction of arrow 1 and
slightly lift the right side of the printer unit in the direction of arrow 2, resting it on
the boss.
3) Likewise press the locking tab on the left side of the printer and slightly lift the left
side of the printer unit.
4) Holding the printer unit by its front part and the ASF part as illustrated below, first
push back the printer unit and then lift it straight up as shown by arrow 3.
5-5
BJC-6000
Part 5:
Maintenance
Figure 5-3 Removing the Printer Unit
1
2
3
3