Canon EOS C200B EOS C200 EOS C200B Instruction Manual - Page 37
Preparing the Lens, Attaching an EF Lens
 |
View all Canon EOS C200B manuals
Add to My Manuals
Save this manual to your list of manuals |
Page 37 highlights
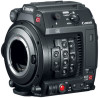
• You can use the optional RD-1 Rod Clamp to use the camera with a commercially available viewfinder or other accessories with a ∅ 15 mm (0.59 in.) rod. Preparing the Camera RD-1 Rod Clamp (optional) 37 Preparing the Lens As much as possible, attach and remove the lens quickly and in a clean environment free of dust. Refer also to the instruction manual of the lens used. IMPORTANT • When attaching/removing a lens, avoid direct sunlight or strong light sources. Also, be careful not to drop the camera or lens. NOTES • After removing a lens/When a lens is not attached to the camera: - Do not touch the lens's surfaces, the lens mount or any components inside the lens mount area. - Place the body cap back on the lens mount and the dust caps on the lens. Clean any dust or dirt from the body cap and dust caps before using them. Attaching an EF Lens ባ 1 Set the Q switch to OFF. 2 Remove the body cap from the camera and the dust caps from the lens. 3 Attach the lens to the camera and turn the lens in the direction of the arrow until it clicks in place. • EF lenses: Align the red mark on the lens with the red EF ባ Lens mount index mark on the camera. ቤ • EF-S lenses: Align the white mark on the lens with the white EF-S Lens mount index mark on the camera. Removing an EF Lens ባ 1 Set the Q switch to OFF. 2 Hold down the lens release button and turn the lens all the way in the direction of the arrow until it stops. 3 Remove the lens and replace the body cap on the camera and the dust caps on the lens. ቤ
-
 1
1 -
2
-
3
-
4
-
5
-
6
-
7
-
8
-
9
-
10
-
11
-
12
-
13
-
14
-
15
-
16
-
17
-
18
-
19
-
20
-
21
-
22
-
23
-
24
-
25
-
26
-
27
-
28
-
29
-
30
-
31
-
 32
32 -
 33
33 -
 34
34 -
 35
35 -
 36
36 -
 37
37 -
 38
38 -
 39
39 -
 40
40 -
 41
41 -
 42
42 -
43
-
44
-
45
-
46
-
47
-
48
-
49
-
50
-
51
-
52
-
53
-
54
-
55
-
56
-
57
-
58
-
59
-
60
-
61
-
62
-
63
-
64
-
65
-
66
-
67
-
68
-
69
-
70
-
71
-
72
-
73
-
74
-
75
-
76
-
77
-
78
-
79
-
80
-
81
-
82
-
83
-
84
-
85
-
86
-
87
-
88
-
89
-
90
-
91
-
92
-
93
-
94
-
95
-
96
-
97
-
98
-
99
-
100
-
101
-
102
-
103
-
104
-
105
-
106
-
107
-
108
-
109
-
110
-
111
-
112
-
113
-
114
-
115
-
116
-
117
-
118
-
119
-
120
-
121
-
122
-
123
-
124
-
125
-
126
-
127
-
128
-
129
-
130
-
131
-
132
-
133
-
134
-
135
-
136
-
137
-
138
-
139
-
140
-
141
-
142
-
143
-
144
-
145
-
146
-
147
-
148
-
149
-
150
-
151
-
152
-
153
-
154
-
155
-
156
-
157
-
158
-
159
-
160
-
161
-
162
-
163
-
164
-
165
-
166
-
167
-
168
-
169
-
170
-
171
-
172
-
173
-
174
-
175
-
176
-
177
-
178
-
179
-
180
-
181
-
182
-
183
-
184
-
185
-
186
-
187
-
188
-
189
-
190
-
191
-
192
-
193
-
194
-
195
-
196
-
197
-
198
-
199
-
200
-
201
-
202
-
203
-
204
-
205
-
206
-
207
-
208
-
209
-
210
-
211
-
212
-
213
-
214
-
215
-
216
-
217
-
218
-
219
-
220
-
221
-
222
-
223
-
224
-
225
-
226
-
227
-
228
-
229
-
230
-
231
-
232
-
233
-
234
-
235
-
236
-
237
 |
 |
