Canon EOS C200B EOS C200 EOS C200B Instruction Manual - Page 40
Using the LCD Monitor, [C200] Using the Viewfinder, Attaching and Removing the Eye Cup
 |
View all Canon EOS C200B manuals
Add to My Manuals
Save this manual to your list of manuals |
Page 40 highlights
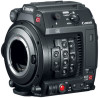
Preparing the Camera Using the LCD Monitor You can rotate and position the LCD monitor in a number of ways to match your shooting style. 40 1 Rotate the LCD monitor mount 90° toward the lens. • Make sure LCD attachment unit alignment mark ቢ (on LCD attachment unit pivot A) and - (on the LCD monitor mount) are aligned. 2 Rotate LCD attachment unit pivot B 180° toward the CFast card slot. • Make sure LCD attachment unit alignment mark ባ (on LCD attachment base 2) and - (on LCD attachment unit pivot B) are aligned. 3 Adjust the LCD monitor to the desired position. ቢ ባ ቤ k You can use the viewfinder and watch the LCD screen at the same time NOTES • Based on the LCD monitor's position, you can invert the image displayed on the screen. Repeatedly pressing the MIRROR button will change the displayed image in the following order: Image inverted horizontally Image inverted vertically Image inverted horizontally and vertically Original image. When the image is inverted only horizontally or vertically, the camera's onscreen displays will be turned off. • You can use the > [B % System Setup] > [Touch Screen Response] setting to adjust the LCD monitor's response to touch input. k Using the Viewfinder The camera's viewfinder features an OLED screen that turns on automatically when you look through the viewfinder. The screen also turns off automatically shortly after you stop using the viewfinder. ቢ Dioptric adjustment lever Adjusting the Viewfinder ባ 1 Adjust the angle as necessary. 2 Turn on the camera and adjust the dioptric adjustment lever until the viewfinder's image is sharp. NOTES • You can turn on the viewfinder permanently by setting Sensor] to [Off]. > [¢ # Monitoring Setup] > [VF Eye Attaching and Removing the Eye Cup Attach the eye cup so that it covers the rubber rim of the viewfinder unit. To remove the eye cup, pull it gently in a "peeling off" motion from the bottom up. • For left eye use, attach the eye cup so that the protruding part faces the opposite side. Eye cup Viewfinder unit
-
 1
1 -
2
-
3
-
4
-
5
-
6
-
7
-
8
-
9
-
10
-
11
-
12
-
13
-
14
-
15
-
16
-
17
-
18
-
19
-
20
-
21
-
22
-
23
-
24
-
25
-
26
-
27
-
28
-
29
-
30
-
31
-
32
-
33
-
34
-
 35
35 -
 36
36 -
 37
37 -
 38
38 -
 39
39 -
 40
40 -
 41
41 -
 42
42 -
 43
43 -
 44
44 -
 45
45 -
46
-
47
-
48
-
49
-
50
-
51
-
52
-
53
-
54
-
55
-
56
-
57
-
58
-
59
-
60
-
61
-
62
-
63
-
64
-
65
-
66
-
67
-
68
-
69
-
70
-
71
-
72
-
73
-
74
-
75
-
76
-
77
-
78
-
79
-
80
-
81
-
82
-
83
-
84
-
85
-
86
-
87
-
88
-
89
-
90
-
91
-
92
-
93
-
94
-
95
-
96
-
97
-
98
-
99
-
100
-
101
-
102
-
103
-
104
-
105
-
106
-
107
-
108
-
109
-
110
-
111
-
112
-
113
-
114
-
115
-
116
-
117
-
118
-
119
-
120
-
121
-
122
-
123
-
124
-
125
-
126
-
127
-
128
-
129
-
130
-
131
-
132
-
133
-
134
-
135
-
136
-
137
-
138
-
139
-
140
-
141
-
142
-
143
-
144
-
145
-
146
-
147
-
148
-
149
-
150
-
151
-
152
-
153
-
154
-
155
-
156
-
157
-
158
-
159
-
160
-
161
-
162
-
163
-
164
-
165
-
166
-
167
-
168
-
169
-
170
-
171
-
172
-
173
-
174
-
175
-
176
-
177
-
178
-
179
-
180
-
181
-
182
-
183
-
184
-
185
-
186
-
187
-
188
-
189
-
190
-
191
-
192
-
193
-
194
-
195
-
196
-
197
-
198
-
199
-
200
-
201
-
202
-
203
-
204
-
205
-
206
-
207
-
208
-
209
-
210
-
211
-
212
-
213
-
214
-
215
-
216
-
217
-
218
-
219
-
220
-
221
-
222
-
223
-
224
-
225
-
226
-
227
-
228
-
229
-
230
-
231
-
232
-
233
-
234
-
235
-
236
-
237
 |
 |
