Canon XL2 XL2 Instruction Manual - Page 23
Attaching the Lens Hood
 |
View all Canon XL2 manuals
Add to My Manuals
Save this manual to your list of manuals |
Page 23 highlights
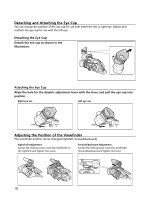
Attaching the Lens Hood Attach the lens hood to shade the lens from stray light and to protect the lens. E 1. Place the lens hood on the front of the lens and screw it clockwise until the Canon logo appears on top. q • Be careful not to deform the lens hood. • Make sure that the lens hood is aligned with the thread. 2. Tighten the locking screw. w Preparation 23
-
 1
1 -
2
-
3
-
4
-
5
-
6
-
7
-
8
-
9
-
10
-
11
-
12
-
13
-
14
-
15
-
16
-
17
-
 18
18 -
 19
19 -
 20
20 -
 21
21 -
 22
22 -
 23
23 -
 24
24 -
 25
25 -
 26
26 -
 27
27 -
 28
28 -
29
-
30
-
31
-
32
-
33
-
34
-
35
-
36
-
37
-
38
-
39
-
40
-
41
-
42
-
43
-
44
-
45
-
46
-
47
-
48
-
49
-
50
-
51
-
52
-
53
-
54
-
55
-
56
-
57
-
58
-
59
-
60
-
61
-
62
-
63
-
64
-
65
-
66
-
67
-
68
-
69
-
70
-
71
-
72
-
73
-
74
-
75
-
76
-
77
-
78
-
79
-
80
-
81
-
82
-
83
-
84
-
85
-
86
-
87
-
88
-
89
-
90
-
91
-
92
-
93
-
94
-
95
-
96
-
97
-
98
-
99
-
100
-
101
-
102
-
103
-
104
-
105
-
106
-
107
-
108
-
109
-
110
-
111
-
112
-
113
-
114
-
115
-
116
-
117
-
118
-
119
-
120
-
121
-
122
-
123
-
124
-
125
-
126
 |
 |

23
E
Preparation
Attaching the Lens Hood
Attach the lens hood to shade the lens from stray light and to protect the lens.
1. Place the lens hood on the front of the
lens and screw it clockwise until the
Canon logo appears on top.
• Be careful not to deform the lens hood.
• Make sure that the lens hood is aligned with
the thread.
2. Tighten the locking screw.
w
q