Canon XL2 XL2 Instruction Manual - Page 43
Using the ND Filter Lenses with Built-in ND Filter
 |
View all Canon XL2 manuals
Add to My Manuals
Save this manual to your list of manuals |
Page 43 highlights
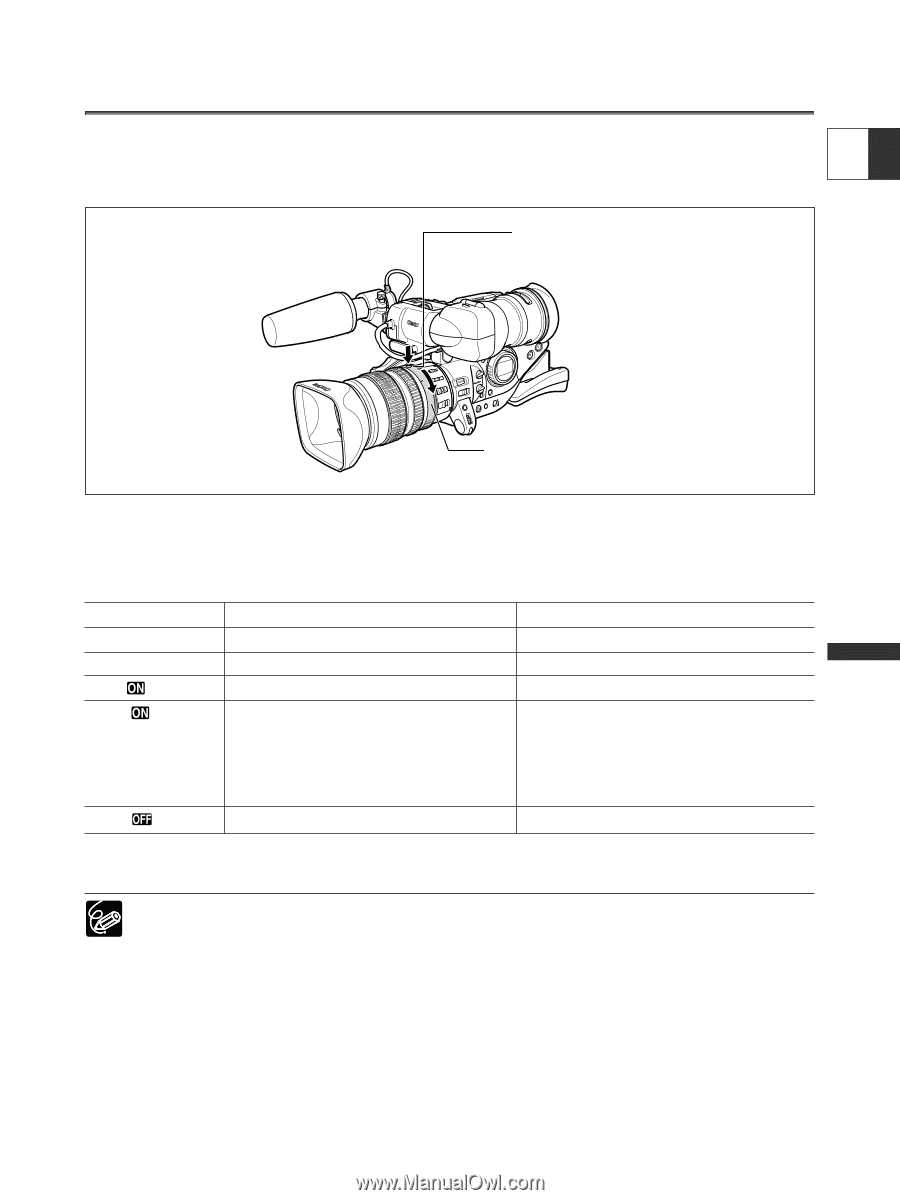
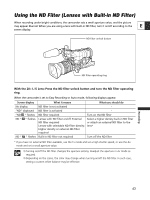
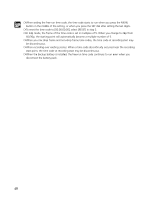
Using the ND Filter (Lenses with Built-in ND Filter) When recording under bright conditions, the camcorder sets a small aperture value, and the picture may appear blurred. When you are using a lens with built-in ND filter, turn it on/off according to the E screen display. ND filter unlock button Recording ND filter operating ring With the 20× L IS Lens: Press the ND filter unlock button and turn the ND filter operating ring. When the camcorder is set to Easy Recording or Auto mode, following displays appear: Screen display No display "ND" displayed "ND " flashes ND " " flashes ND " " flashes What it means ND filter is not activated ND filter is activated ND filter required Lenses with ND filter on/off: External ND filter required Lenses with selectable ND filter density: Higher density or external ND filter required Built-in ND filter not required What you should do - Turn on the ND filter Select a higher density built-in ND filter or attach an external ND filter to the lens* Turn off the ND filter * If you have no external ND filter available, use the Tv mode and set a high shutter speed, or use the Av mode and set a small aperture value. ❍ Turning on/off the ND filter changes the aperture setting. Readjust the aperture in Av mode as required. ❍ Depending on the scene, the color may change when turning on/off the ND filter. In such case, setting a custom white balance may be effective. 43
-
 1
1 -
2
-
3
-
4
-
5
-
6
-
7
-
8
-
9
-
10
-
11
-
12
-
13
-
14
-
15
-
16
-
17
-
18
-
19
-
20
-
21
-
22
-
23
-
24
-
25
-
26
-
27
-
28
-
29
-
30
-
31
-
32
-
33
-
34
-
35
-
36
-
37
-
 38
38 -
 39
39 -
 40
40 -
 41
41 -
 42
42 -
 43
43 -
 44
44 -
 45
45 -
 46
46 -
 47
47 -
 48
48 -
49
-
50
-
51
-
52
-
53
-
54
-
55
-
56
-
57
-
58
-
59
-
60
-
61
-
62
-
63
-
64
-
65
-
66
-
67
-
68
-
69
-
70
-
71
-
72
-
73
-
74
-
75
-
76
-
77
-
78
-
79
-
80
-
81
-
82
-
83
-
84
-
85
-
86
-
87
-
88
-
89
-
90
-
91
-
92
-
93
-
94
-
95
-
96
-
97
-
98
-
99
-
100
-
101
-
102
-
103
-
104
-
105
-
106
-
107
-
108
-
109
-
110
-
111
-
112
-
113
-
114
-
115
-
116
-
117
-
118
-
119
-
120
-
121
-
122
-
123
-
124
-
125
-
126
 |
 |