Dell C1760NW Color Laser Printer User Guide - Page 142
Panel Language, Panel Lock Function, Enabling the Panel Lock
 |
View all Dell C1760NW Color Laser Printer manuals
Add to My Manuals
Save this manual to your list of manuals |
Page 142 highlights
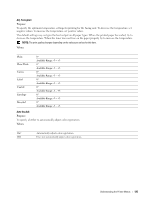
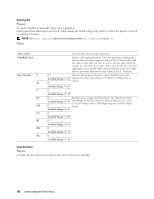
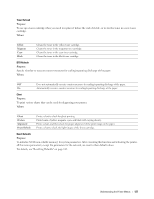
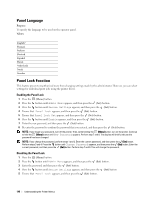
Panel Language Purpose: To specify the language to be used on the operator panel. Values: English* Français Italiano Deutsch Español Dansk Nederlands Norsk Svenska Panel Lock Function This feature prevents unauthorized users from changing settings made by the administrator. However, you can select settings for individual print jobs using the printer driver. Enabling the Panel Lock 1 Press the (Menu) button. 2 Press the button until Admin Menu appears, and then press the (Set) button. 3 Press the button until Secure Settings appears, and then press the (Set) button. 4 Ensure that Panel Lock appears, and then press the (Set) button. 5 Ensure that Panel Lock Set appears, and then press the (Set) button. 6 Press the button until Enable appears, and then press the (Set) button. 7 Enter the new password, and then press the (Set) button. 8 Re-enter the password to confirm the password that you entered, and then press the (Set) button. NOTE: If you forget your password, turn off the printer. Then, while holding the (Menu) button, turn on the printer. Continue to hold the (Menu) button until New Password appears. Perform step 7 and 8. The display will briefly indicate the password has been changed. NOTE: If you change the password, perform steps 1 and 2. Enter the current password, and then press the (Set) button. Perform steps 3 and 4. Press the button until Change Password appears, and then press the (Set) button. Enter the current password, and then press the (Set) button. Perform step 7 and 8. This will change the password. Disabling the Panel Lock 1 Press the (Menu) button. 2 Press the button until Admin Menu appears, and then press the (Set) button. 3 Enter the password, and then press the (Set) button. 4 Press the button until Secure Settings appears, and then press the (Set) button. 5 Ensure that Panel Lock appears, and then press the (Set) button. 140 Understanding the Printer Menus
-
 1
1 -
2
-
3
-
4
-
5
-
6
-
7
-
8
-
9
-
10
-
11
-
12
-
13
-
14
-
15
-
16
-
17
-
18
-
19
-
20
-
21
-
22
-
23
-
24
-
25
-
26
-
27
-
28
-
29
-
30
-
31
-
32
-
33
-
34
-
35
-
36
-
37
-
38
-
39
-
40
-
41
-
42
-
43
-
44
-
45
-
46
-
47
-
48
-
49
-
50
-
51
-
52
-
53
-
54
-
55
-
56
-
57
-
58
-
59
-
60
-
61
-
62
-
63
-
64
-
65
-
66
-
67
-
68
-
69
-
70
-
71
-
72
-
73
-
74
-
75
-
76
-
77
-
78
-
79
-
80
-
81
-
82
-
83
-
84
-
85
-
86
-
87
-
88
-
89
-
90
-
91
-
92
-
93
-
94
-
95
-
96
-
97
-
98
-
99
-
100
-
101
-
102
-
103
-
104
-
105
-
106
-
107
-
108
-
109
-
110
-
111
-
112
-
113
-
114
-
115
-
116
-
117
-
118
-
119
-
120
-
121
-
122
-
123
-
124
-
125
-
126
-
127
-
128
-
129
-
130
-
131
-
132
-
133
-
134
-
135
-
136
-
 137
137 -
 138
138 -
 139
139 -
 140
140 -
 141
141 -
 142
142 -
 143
143 -
 144
144 -
 145
145 -
 146
146 -
 147
147 -
148
-
149
-
150
-
151
-
152
-
153
-
154
-
155
-
156
-
157
-
158
-
159
-
160
-
161
-
162
-
163
-
164
-
165
-
166
-
167
-
168
-
169
-
170
-
171
-
172
-
173
-
174
-
175
-
176
-
177
-
178
-
179
-
180
-
181
-
182
-
183
-
184
-
185
-
186
-
187
-
188
-
189
-
190
-
191
-
192
-
193
-
194
-
195
-
196
-
197
-
198
-
199
-
200
-
201
-
202
-
203
-
204
-
205
-
206
-
207
-
208
-
209
-
210
-
211
-
212
-
213
-
214
-
215
-
216
-
217
-
218
-
219
-
220
-
221
-
222
-
223
-
224
-
225
-
226
-
227
-
228
-
229
-
230
-
231
-
232
-
233
-
234
-
235
-
236
-
237
-
238
-
239
-
240
 |
 |
