Dell C1760NW Color Laser Printer User Guide - Page 32
Wireless Connection - ratings
 |
View all Dell C1760NW Color Laser Printer manuals
Add to My Manuals
Save this manual to your list of manuals |
Page 32 highlights
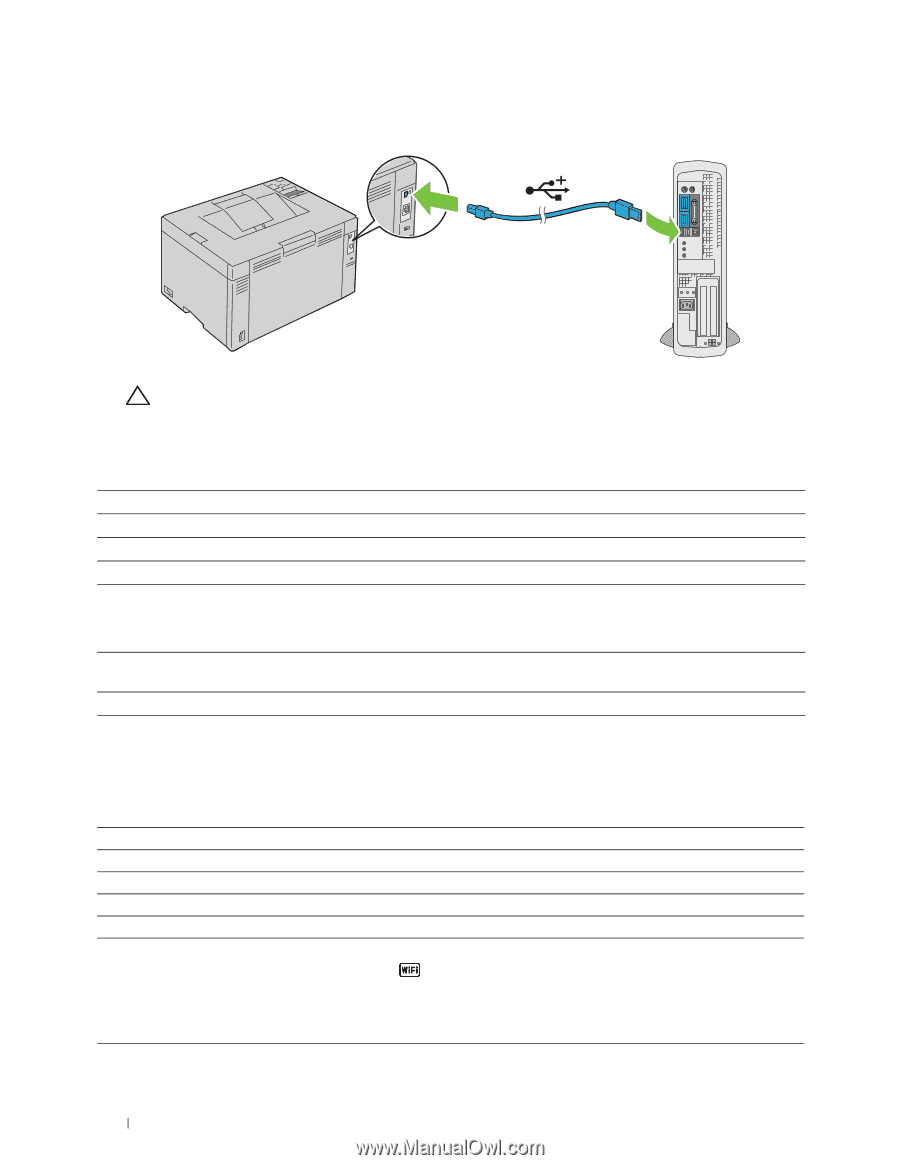
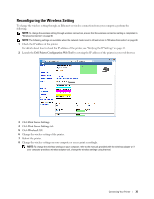
2 Connect the smaller USB connector into the USB port at the back of the printer. 3 Connect the other end of the cable into a USB port of your computer. CAUTION: Do not connect the printer USB cable to the USB port available on the keyboard. Wireless Connection The specifications of wireless setting function are described below: Item Specification Connectivity Wireless Connectivity Standard IEEE 802.11b/802.11g/802.11n compliant Bandwidth 2.4 GHz Data Transfer Rate IEEE 802.11b mode: 11, 5.5, 2, 1 Mbps IEEE 802.11g mode: 54, 48, 36, 24, 18, 12, 9, 6 Mbps IEEE 802.11n mode: 65 Mbps Security Wi-Fi Protected Setup® (WPS)*1 64 (40-bit key)/ 128 (104-bit key) WEP, WPA-PSK (TKIP, AES), WPA2-PSK (AES)(IEEE 802.1x attestation function of WPA 1x non-corresponds), Mixed Mode PSK Push Button Configuration (PBC), Personal Identification Number (PIN) *1 WPS 2.0 compliant. WPS 2.0 works on access points with the following encryption types: Mixed mode PSK, WPA-PSK AES, WPA2-PSK AES, WPA-PSK TKIP, Open (No Security) You can select a method to configure a wireless setting from the following: WPS-PBC (Wi-Fi | WPS Button)*1 WPS-PBC (Operator Panel Menu)*1 WPS-PIN*2 Auto SSID Setup Manual SSID Setup *1 WPS-PBC (Wi-Fi Protected Setup-Push Button Configuration) is a method to authenticate and register devices required for wireless configuration, by starting WPS-PBC on the printer with the (Wi-Fi | WPS) button or operator panel menu, and then pressing the button provided on the wireless LAN access point (Registrar) or router. This setting is available only when the access point supports WPS-PBC. *2 WPS-PIN (Wi-Fi Protected Setup-Personal Identification Number) is a method to authenticate and register devices required for wireless configuration, by entering PIN assignments in the printer and computer. This setting, performed through access point, is available only when the access points of your wireless router supports WPS. 30 Connecting Your Printer
-
 1
1 -
2
-
3
-
4
-
5
-
6
-
7
-
8
-
9
-
10
-
11
-
12
-
13
-
14
-
15
-
16
-
17
-
18
-
19
-
20
-
21
-
22
-
23
-
24
-
25
-
26
-
 27
27 -
 28
28 -
 29
29 -
 30
30 -
 31
31 -
 32
32 -
 33
33 -
 34
34 -
 35
35 -
 36
36 -
 37
37 -
38
-
39
-
40
-
41
-
42
-
43
-
44
-
45
-
46
-
47
-
48
-
49
-
50
-
51
-
52
-
53
-
54
-
55
-
56
-
57
-
58
-
59
-
60
-
61
-
62
-
63
-
64
-
65
-
66
-
67
-
68
-
69
-
70
-
71
-
72
-
73
-
74
-
75
-
76
-
77
-
78
-
79
-
80
-
81
-
82
-
83
-
84
-
85
-
86
-
87
-
88
-
89
-
90
-
91
-
92
-
93
-
94
-
95
-
96
-
97
-
98
-
99
-
100
-
101
-
102
-
103
-
104
-
105
-
106
-
107
-
108
-
109
-
110
-
111
-
112
-
113
-
114
-
115
-
116
-
117
-
118
-
119
-
120
-
121
-
122
-
123
-
124
-
125
-
126
-
127
-
128
-
129
-
130
-
131
-
132
-
133
-
134
-
135
-
136
-
137
-
138
-
139
-
140
-
141
-
142
-
143
-
144
-
145
-
146
-
147
-
148
-
149
-
150
-
151
-
152
-
153
-
154
-
155
-
156
-
157
-
158
-
159
-
160
-
161
-
162
-
163
-
164
-
165
-
166
-
167
-
168
-
169
-
170
-
171
-
172
-
173
-
174
-
175
-
176
-
177
-
178
-
179
-
180
-
181
-
182
-
183
-
184
-
185
-
186
-
187
-
188
-
189
-
190
-
191
-
192
-
193
-
194
-
195
-
196
-
197
-
198
-
199
-
200
-
201
-
202
-
203
-
204
-
205
-
206
-
207
-
208
-
209
-
210
-
211
-
212
-
213
-
214
-
215
-
216
-
217
-
218
-
219
-
220
-
221
-
222
-
223
-
224
-
225
-
226
-
227
-
228
-
229
-
230
-
231
-
232
-
233
-
234
-
235
-
236
-
237
-
238
-
239
-
240
 |
 |