Dell C1760NW Color Laser Printer User Guide - Page 198
Adjusting Color Registration, Performing Auto Correct, Printing the Color Registration Chart
 |
View all Dell C1760NW Color Laser Printer manuals
Add to My Manuals
Save this manual to your list of manuals |
Page 198 highlights
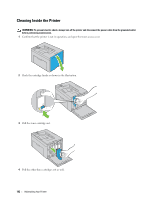
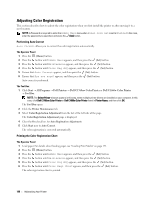
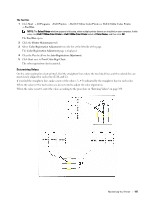
Adjusting Color Registration This section describes how to adjust the color registration when you first install the printer or after moving it to a new location. NOTE: A Password is required to enter the Admin Menu menu when Panel Lock Set is set to Enable. In this case, enter the password you specified, and press the (Set) button. Performing Auto Correct Auto Correct allows you to correct the color registration automatically. The Operator Panel 1 Press the (Menu) button. 2 Press the button until Admin Menu appears, and then press the (Set) button. 3 Press the button until Maintenance appears, and then press the (Set) button. 4 Press the button until Color Reg Adj appears, and then press the (Set) button. 5 Ensure that Auto Correct appears, and then press the (Set) button. 6 Ensure that Are you sure? appears, and then press the (Set) button. Auto correct is performed. The Tool Box 1 Click Start → All Programs → Dell Printers → Dell C1760nw Color Printer or Dell C1660w Color Printer → Tool Box. NOTE: The Select Printer window appears in this step, when multiple printer drivers are installed on your computer. In this case, click Dell C1760nw Color Printer or Dell C1660w Color Printer listed in Printer Name, and then click OK. The Tool Box opens. 2 Click the Printer Maintenance tab. 3 Select Color Registration Adjustment from the list at the left side of the page. The Color Registration Adjustment page is displayed. 4 Clear the On check box for Auto Registration Adjustment. 5 Click Start next to Auto Correct. The color registration is corrected automatically. Printing the Color Registration Chart The Operator Panel 1 Load paper. For details about loading paper, see "Loading Print Media" on page 151. 2 Press the (Menu) button. 3 Press the button until Admin Menu appears, and then press the (Set) button. 4 Press the button until Maintenance appears, and then press the (Set) button. 5 Press the button until Color Reg Adj appears, and then press the (Set) button. 6 Press the button until Color Regi Chart appears, and then press the (Set) button. The color registration chart is printed. 196 Maintaining Your Printer
-
 1
1 -
2
-
3
-
4
-
5
-
6
-
7
-
8
-
9
-
10
-
11
-
12
-
13
-
14
-
15
-
16
-
17
-
18
-
19
-
20
-
21
-
22
-
23
-
24
-
25
-
26
-
27
-
28
-
29
-
30
-
31
-
32
-
33
-
34
-
35
-
36
-
37
-
38
-
39
-
40
-
41
-
42
-
43
-
44
-
45
-
46
-
47
-
48
-
49
-
50
-
51
-
52
-
53
-
54
-
55
-
56
-
57
-
58
-
59
-
60
-
61
-
62
-
63
-
64
-
65
-
66
-
67
-
68
-
69
-
70
-
71
-
72
-
73
-
74
-
75
-
76
-
77
-
78
-
79
-
80
-
81
-
82
-
83
-
84
-
85
-
86
-
87
-
88
-
89
-
90
-
91
-
92
-
93
-
94
-
95
-
96
-
97
-
98
-
99
-
100
-
101
-
102
-
103
-
104
-
105
-
106
-
107
-
108
-
109
-
110
-
111
-
112
-
113
-
114
-
115
-
116
-
117
-
118
-
119
-
120
-
121
-
122
-
123
-
124
-
125
-
126
-
127
-
128
-
129
-
130
-
131
-
132
-
133
-
134
-
135
-
136
-
137
-
138
-
139
-
140
-
141
-
142
-
143
-
144
-
145
-
146
-
147
-
148
-
149
-
150
-
151
-
152
-
153
-
154
-
155
-
156
-
157
-
158
-
159
-
160
-
161
-
162
-
163
-
164
-
165
-
166
-
167
-
168
-
169
-
170
-
171
-
172
-
173
-
174
-
175
-
176
-
177
-
178
-
179
-
180
-
181
-
182
-
183
-
184
-
185
-
186
-
187
-
188
-
189
-
190
-
191
-
192
-
 193
193 -
 194
194 -
 195
195 -
 196
196 -
 197
197 -
 198
198 -
 199
199 -
 200
200 -
 201
201 -
 202
202 -
 203
203 -
204
-
205
-
206
-
207
-
208
-
209
-
210
-
211
-
212
-
213
-
214
-
215
-
216
-
217
-
218
-
219
-
220
-
221
-
222
-
223
-
224
-
225
-
226
-
227
-
228
-
229
-
230
-
231
-
232
-
233
-
234
-
235
-
236
-
237
-
238
-
239
-
240
 |
 |
