Dell Latitude E5500 Service Manual - Page 14
Display - keyboard not working
 |
View all Dell Latitude E5500 manuals
Add to My Manuals
Save this manual to your list of manuals |
Page 14 highlights
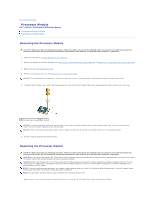
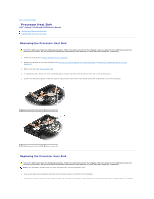
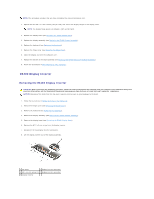
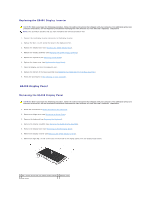
Back to Contents Page Display Dell™ Latitude™ E5400 and E5500 Service Manual E5400 Display Assembly E5400 Display Bezel E5400 Display Hinges E5400 Display Inverter E5400 Display Panel E5400 Display Cable E5500 Display Assembly E5500 Display Bezel E5500 Display Hinges E5500 Display Inverter E5500 Display Panel E5500 Display Cable E5400 Display Assembly Removing the E5400 Display Assembly CAUTION: Before you begin the following procedure, follow the safety instructions that shipped with your computer. For additional safety best practices information, see the Regulatory Compliance Homepage on www.dell.com at: www.dell.com/regulatory_compliance. 1. Follow the instructions in Before Working on Your Computer. 2. Remove the bottom of the base assembly (see Removing the E5400 Bottom of the Base Assembly). 3. Remove the hinge cover (see Removing the Hinge Cover). 4. Remove the keyboard (see Removing the Keyboard). 5. Remove the display cable from the system board by pulling on the blue tab next to the display cable connector. 6. Carefully remove the display cable by moving it away from the metal and plastic cable guide tabs. NOTICE: Ensure that the display cable and the antenna cables do not get caught beneath the guide tabs on the palm rest. 1 display cable 2 antenna cables 7. Turn the computer over. Disconnect the antenna cables from their cards and remove them by moving them out of the cable guides on the bottom of the computer. 8. Slide the antenna cables through the hole in the palm rest. 9. Remove the antenna cables from the cable guides on the top of the computer. 10. Remove the four M2.5 x 5-mm screws (two per hinge) on the top of the computer that secure the metal hinges.
-
 1
1 -
2
-
3
-
4
-
5
-
6
-
7
-
8
-
 9
9 -
 10
10 -
 11
11 -
 12
12 -
 13
13 -
 14
14 -
 15
15 -
 16
16 -
 17
17 -
 18
18 -
 19
19 -
20
-
21
-
22
-
23
-
24
-
25
-
26
-
27
-
28
-
29
-
30
-
31
-
32
-
33
-
34
-
35
-
36
-
37
-
38
-
39
-
40
-
41
-
42
-
43
-
44
-
45
-
46
-
47
-
48
-
49
-
50
-
51
-
52
-
53
-
54
-
55
-
56
-
57
-
58
-
59
-
60
-
61
-
62
-
63
-
64
-
65
-
66
-
67
-
68
-
69
-
70
-
71
-
72
-
73
 |
 |