Dell OptiPlex 320 User Guide - Page 25
PCI and PCI Express Cards
 |
UPC - 683728237738
View all Dell OptiPlex 320 manuals
Add to My Manuals
Save this manual to your list of manuals |
Page 25 highlights
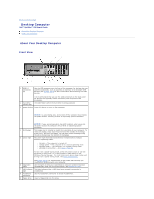
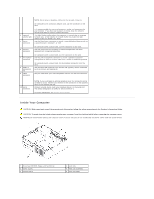
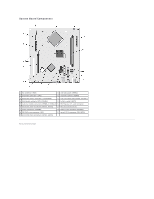
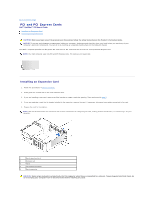
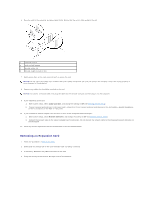
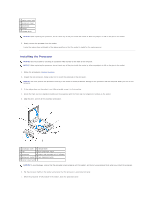
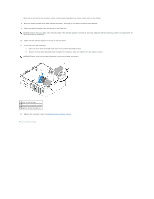
Back to Contents Page PCI and PCI Express Cards Dell™ OptiPlex™ 320 User's Guide Installing an Expansion Card Removing an Expansion Card CAUTION: Before you begin any of the procedures in this section, follow the safety instructions in the Product Information Guide. NOTICE: To prevent static damage to components inside your computer, discharge static electricity from your body before you touch any of your computer's electronic components. You can do so by touching an unpainted metal surface on the computer chassis. Your Dell™ computer provides two low-profile PCI card slots for PCI cards and one card slot for a low-profile PCI Express card: NOTE: Your Dell computer uses only PCI and PCI Express slots. ISA cards are not supported. Installing an Expansion Card 1. Follow the procedures in Before You Begin. 2. Gently push the release tab on the card retention latch. 3. If you are installing a new card, remove the filler bracket to create a card-slot opening. Then continue with step 5. 4. If you are replacing a card that is already installed in the computer, remove the card. If necessary, disconnect any cables connected to the card. 5. Prepare the card for installation. NOTE: See the documentation that came with the card for information on configuring the card, making internal connections, or customizing it for your computer. 1 card retention latch 2 release tab 3 card 4 card-edge connector 5 card connector CAUTION: Some network adapters automatically start the computer when they are connected to a network. To guard against electrical shock, be sure to unplug your computer from its electrical outlet before installing any cards.
-
 1
1 -
2
-
3
-
4
-
5
-
6
-
7
-
8
-
9
-
10
-
11
-
12
-
13
-
14
-
15
-
16
-
17
-
18
-
19
-
 20
20 -
 21
21 -
 22
22 -
 23
23 -
 24
24 -
 25
25 -
 26
26 -
 27
27 -
 28
28 -
 29
29 -
 30
30 -
31
-
32
-
33
-
34
-
35
-
36
-
37
-
38
-
39
-
40
-
41
-
42
-
43
-
44
-
45
-
46
-
47
-
48
-
49
-
50
-
51
-
52
-
53
-
54
-
55
-
56
-
57
-
58
-
59
-
60
-
61
-
62
-
63
-
64
-
65
-
66
-
67
-
68
-
69
-
70
-
71
-
72
-
73
-
74
-
75
-
76
-
77
-
78
-
79
-
80
-
81
-
82
-
83
-
84
-
85
-
86
-
87
-
88
-
89
-
90
-
91
-
92
-
93
-
94
-
95
-
96
-
97
-
98
-
99
-
100
-
101
-
102
-
103
-
104
-
105
-
106
-
107
-
108
-
109
-
110
-
111
-
112
-
113
-
114
-
115
-
116
-
117
-
118
-
119
-
120
-
121
-
122
-
123
-
124
-
125
-
126
-
127
-
128
-
129
-
130
-
131
-
132
-
133
-
134
-
135
-
136
-
137
-
138
-
139
-
140
 |
 |