Dell OptiPlex 320 User Guide - Page 76
Mini Tower Computer - troubleshooting
 |
UPC - 683728237738
View all Dell OptiPlex 320 manuals
Add to My Manuals
Save this manual to your list of manuals |
Page 76 highlights
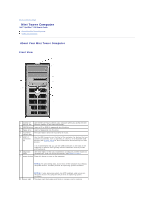
Back to Contents Page Mini Tower Computer Dell™ OptiPlex™ 320 User's Guide About Your Mini Tower Computer Inside Your Computer About Your Mini Tower Computer Front View 1 location of Service Tag Use the Service Tag to identify your computer when you access the Dell Support website or call technical support. 2 CD/DVD drive Insert a CD or DVD (if supported) into this drive. 3 floppy drive Insert a floppy disk into this drive. 4 hard-drive This light flickers when the hard drive is in use. activity light 5 USB 2.0 connectors (2) Use the USB connectors on the front of the computer for devices that you connect occasionally, such as joysticks or cameras, or for bootable USB devices (see System Setup for more information about booting to a USB device). It is recommended that you use the USB connectors on the back of the computer for devices that typically remain connected, such as printers and keyboards. 6 diagnostic lights Use these lights to help you troubleshoot a computer problem based on the diagnostic code. For more information, seeDiagnostic Lights. 7 power button Press this button to turn on the computer. NOTICE: To avoid losing data, do not turn off the computer by pressing the power button. Instead, perform an operating system shutdown. 8 power light NOTICE: If your operating system has ACPI enabled, when you press the power button the computer will perform an operating system shutdown. The power light illuminates and blinks or remains solid to indicate
-
 1
1 -
2
-
3
-
4
-
5
-
6
-
7
-
8
-
9
-
10
-
11
-
12
-
13
-
14
-
15
-
16
-
17
-
18
-
19
-
20
-
21
-
22
-
23
-
24
-
25
-
26
-
27
-
28
-
29
-
30
-
31
-
32
-
33
-
34
-
35
-
36
-
37
-
38
-
39
-
40
-
41
-
42
-
43
-
44
-
45
-
46
-
47
-
48
-
49
-
50
-
51
-
52
-
53
-
54
-
55
-
56
-
57
-
58
-
59
-
60
-
61
-
62
-
63
-
64
-
65
-
66
-
67
-
68
-
69
-
70
-
 71
71 -
 72
72 -
 73
73 -
 74
74 -
 75
75 -
 76
76 -
 77
77 -
 78
78 -
 79
79 -
 80
80 -
 81
81 -
82
-
83
-
84
-
85
-
86
-
87
-
88
-
89
-
90
-
91
-
92
-
93
-
94
-
95
-
96
-
97
-
98
-
99
-
100
-
101
-
102
-
103
-
104
-
105
-
106
-
107
-
108
-
109
-
110
-
111
-
112
-
113
-
114
-
115
-
116
-
117
-
118
-
119
-
120
-
121
-
122
-
123
-
124
-
125
-
126
-
127
-
128
-
129
-
130
-
131
-
132
-
133
-
134
-
135
-
136
-
137
-
138
-
139
-
140
 |
 |
