Dell Precision M65 User's Guide - Page 46
Using Multimedia
 |
View all Dell Precision M65 manuals
Add to My Manuals
Save this manual to your list of manuals |
Page 46 highlights
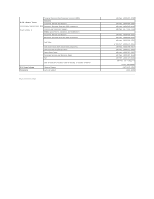
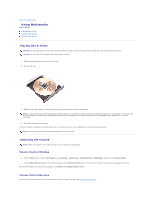
Back to Contents Page Using Multimedia User's Guide Playing CDs or DVDs Adjusting the Volume Adjusting the Picture Playing CDs or DVDs NOTICE: Do not press down on the CD or DVD tray when you open or close it. Keep the tray closed when you are not using the drive. NOTICE: Do not move the computer while playing CDs or DVDs. 1. Press the eject button on the front of the drive. 2. Pull out the tray. 3. Place the disc, label side up, in the center of the tray and snap the disc onto the spindle. NOTE: If you use a module that shipped with another computer, you need to install the drivers and software necessary to play DVDs or write data. For more information, see the Drivers and Utilities CD (the Drivers and Utilities CD is optional and may not be available for your computer or in certain countries). 4. Push the tray back into the drive. To format CDs for storing data, to create music CDs, or to copy CDs, see the CD software that came with your computer. NOTE: Ensure that you follow all copyright laws when you create CDs. Adjusting the Volume NOTE: When the speakers are muted, you do not hear the CD or DVD playing. Volume Control Window 1. Click the Start button, point to All Programs (or Programs)® Accessories® Entertainment (or Multimedia), and then click Volume Control. 2. In the Volume Control window, click and drag the bar in the Volume Control column and slide it up or down to increase or decrease the volume. For more information on volume control options, click Help in the Volume Control window. Volume Control Buttons You can adjust the volume with the volume control buttons on your computer. See volume control buttons.
-
 1
1 -
2
-
3
-
4
-
5
-
6
-
7
-
8
-
9
-
10
-
11
-
12
-
13
-
14
-
15
-
16
-
17
-
18
-
19
-
20
-
21
-
22
-
23
-
24
-
25
-
26
-
27
-
28
-
29
-
30
-
31
-
32
-
33
-
34
-
35
-
36
-
37
-
38
-
39
-
40
-
 41
41 -
 42
42 -
 43
43 -
 44
44 -
 45
45 -
 46
46 -
 47
47 -
 48
48 -
 49
49 -
 50
50 -
 51
51 -
52
-
53
-
54
-
55
-
56
-
57
-
58
-
59
-
60
-
61
-
62
-
63
-
64
-
65
-
66
-
67
-
68
-
69
-
70
-
71
-
72
-
73
-
74
-
75
-
76
-
77
-
78
-
79
-
80
-
81
-
82
-
83
-
84
-
85
-
86
-
87
-
88
-
89
-
90
-
91
-
92
-
93
-
94
-
95
-
96
-
97
-
98
-
99
-
100
 |
 |