Denon S-5BD Owners Manual - English - Page 66

Part Names and Functions

Page 66 highlights

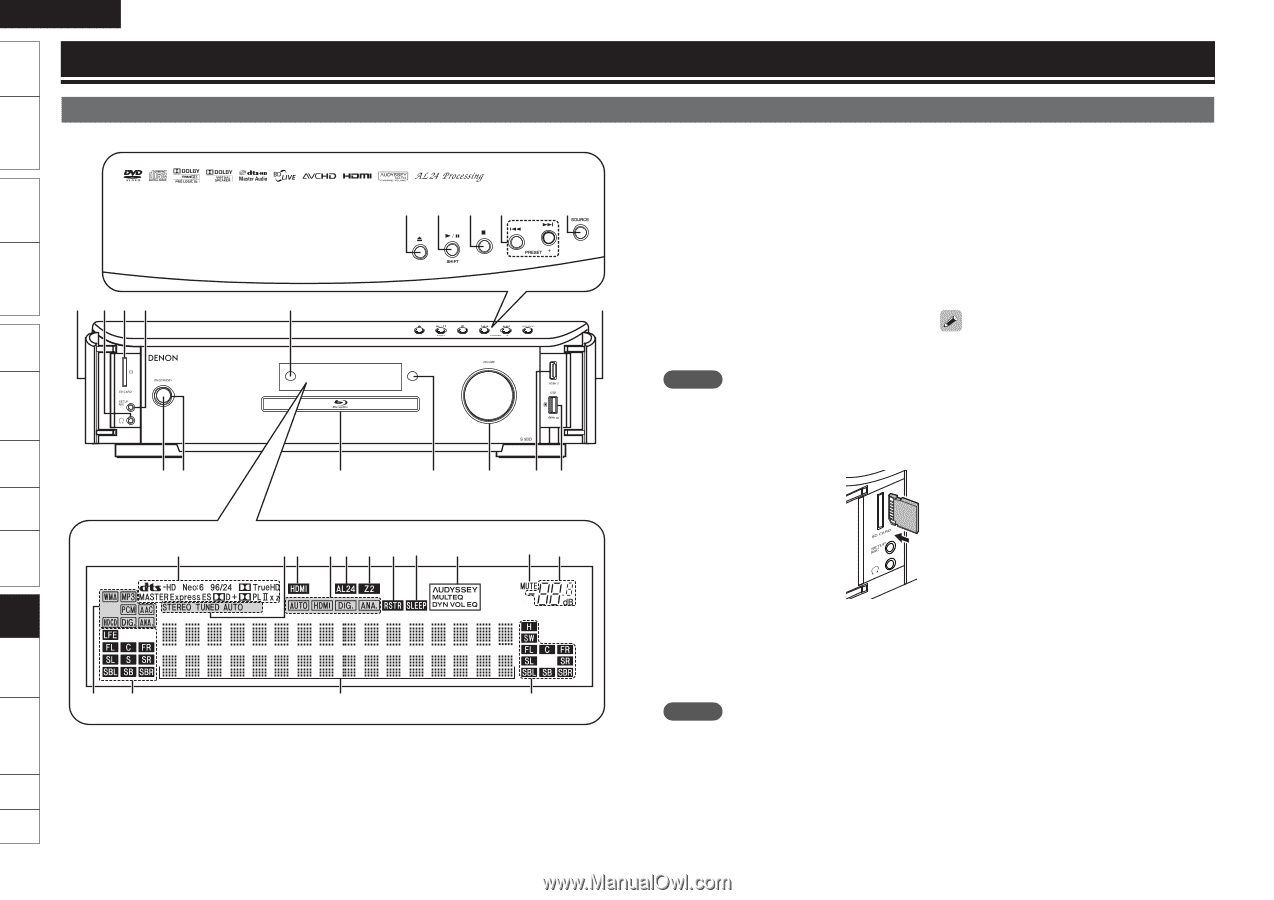
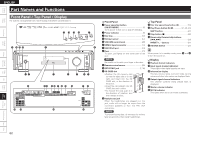
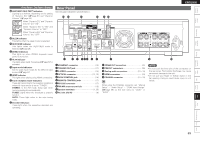
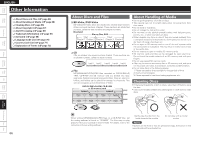
Getting Started Simple Version Connections Playback (Basic) Settings ENGLISH Part Names and Functions Front Panel / Top Panel / Display For buttons not explained here, see the page indicated in parentheses ( ). Q3 Q4 Q5 Q6 Q7 i Q2 Q1 Q0 o i qw E2 e r t yu E1E0 W9 W8 W7 W6 W5 W4 W3 W2 Q8 Q9 W0 W1 n Front Panel q Power operation button (ON/STANDBY 5) Turns power to this unit on and off (standby). w Power indicator 5) e Disc tray 10) r Dimmer sensor 57) t VOLUME control knob 28) y HDMI-3 input connector 12) u USB (iPod) port 14) i Door 77) To open, pull lightly on the lower part of the door. NOTE Be careful not to catch your finger in the door. o Remote control sensor 65) Q0 SETUP MIC jack 7, 36) Q1 SD CARD slot • Position the SD memory card so that the label side is on the right, and insert into the SD CARD slot, in the direction of the arrow. • Insert the card straight into SD CARD slot until it clicks. • To remove the card, push it in the direction of insertion, and then release to eject. Q2 Headphones jack When the headphones are plugged into this jack, audio will no longer be output from the connected speakers or from the PRE OUT connectors. NOTE To prevent hearing loss, do not raise the volume level excessively when using headphones. n Top Panel Q3 Disc tray open/close button (5 10) Q4 Play/Pause button (1/3 21, 28, 29) SHIFT button 27) Q5 Stop button (2 28) Q6 Revers-skip/Forward-skip buttons (8, 9 29) PRESET +, - buttons 27) Q7 SOURCE button 20) When power is in standby mode, press Q3 and Q4 to turn the power on. n Display Q8 Playback format indicators Q9 Input signal channel indicators These light when digital signals are input. W0 Information display The input source name, surround mode, setting values and other information are displayed here. W1 Output signal channel indicators The channel currently being played back is displayed. W2 Master volume indicator W3 MUTE indicator This lights when the mute mode is selected. Playback (Advanced) Multizone GUI Remote Control Part Names Other Information Troubleshooting Spec. Index 62

  • 1
  • 2
  • 3
  • 4
  • 5
  • 6
  • 7
  • 8
  • 9
  • 10
  • 11
  • 12
  • 13
  • 14
  • 15
  • 16
  • 17
  • 18
  • 19
  • 20
  • 21
  • 22
  • 23
  • 24
  • 25
  • 26
  • 27
  • 28
  • 29
  • 30
  • 31
  • 32
  • 33
  • 34
  • 35
  • 36
  • 37
  • 38
  • 39
  • 40
  • 41
  • 42
  • 43
  • 44
  • 45
  • 46
  • 47
  • 48
  • 49
  • 50
  • 51
  • 52
  • 53
  • 54
  • 55
  • 56
  • 57
  • 58
  • 59
  • 60
  • 61
  • 62
  • 63
  • 64
  • 65
  • 66
  • 67
  • 68
  • 69
  • 70
  • 71
  • 72
  • 73
  • 74
  • 75
  • 76
  • 77
  • 78
  • 79
  • 80
  • 81
  • 82
  • 83
  • 84
  • 85
  • 86
  • 87
  • 88
  • 89
  • 90
  • 91
  • 92
  • 93
  • 94
  • 95

¶²
ENGLISH
Remote
Control
Playback
(Advanced)
Connections
Simple
Version
Playback
(Basic)
Multi-
zone
GUI
Settings
Getting
Started
Troubleshooting
Other
Information
Spec.
Index
Part
Names
Front Panel / Top Panel / Display
For buttons not explained here, see the page indicated in parentheses ( ).
q
w
e
Q
0
Q
2
Q
1
i
i
o
r
t
y
u
Q
7
Q
6
Q
5
Q
4
Q
3
W
2
W
3
W
8
E
1
E
2
W
4
W
9
W
5
W
7
W
6
E
0
Q
9
Q
8
W
0
W
1
Front Panel
q
Power operation button
(ON/STANDBY)
············································ (5)
Turns power to this unit on and off (standby).
w
Power indicator
············································ (5)
e
Disc tray
······················································ (10)
r
Dimmer sensor
··········································· (57)
t
VOLUME control knob
······························· (28)
y
HDMI-3 input connector
···························· (12)
u
USB (iPod) port
··········································· (14)
i
Door
····························································· (77)
To open, pull lightly on the lower part of the
door.
NOTE
Be careful not to catch your finger in the door.
o
Remote control sensor
······························ (65)
Q
0
SETUP MIC jack
······································ (7, 36)
Q
1
SD CARD slot
Position the SD memory card
so that the label side is on the
right, and insert into the SD
CARD slot, in the direction of
the arrow.
Insert the card straight into SD
CARD slot until it clicks.
To remove the card, push it in
the direction of insertion, and
then release to eject.
Q
2
Headphones jack
When the headphones are plugged into this
jack, audio will no longer be output from the
connected speakers or from the PRE OUT
connectors.
NOTE
To prevent hearing loss, do not raise the volume
level excessively when using headphones.
n
Top Panel
Q
3
Disc tray open/close button (
5
)
················ (10)
Q
4
Play/Pause button (
1
/
3
)
··············· (21, 28, 29)
SHIFT button
··············································· (27)
Q
5
Stop button (
2
)
·········································· (28)
Q
6
Revers-skip/Forward-skip buttons
(
8
,
9
)
·················································· (29)
PRESET +, – buttons
··································· (27)
Q
7
SOURCE button
·········································· (20)
When power is in standby mode, press
Q
3
and
Q
4
to turn the power on.
Display
Q
8
Playback format indicators
Q
9
Input signal channel indicators
These light when digital signals are input.
W
0
Information display
The input source name, surround mode, setting
values and other information are displayed here.
W
1
Output signal channel indicators
The channel currently being played back is
displayed.
W
2
Master volume indicator
W
3
MUTE indicator
This lights when the mute mode is selected.
n
n
Part Names and Functions