Denon S-5BD Owners Manual - English - Page 79
Audio, Video
 |
UPC - 083795001216
View all Denon S-5BD manuals
Add to My Manuals
Save this manual to your list of manuals |
Page 79 highlights
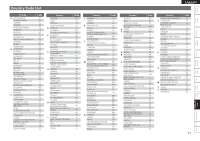
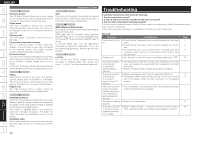
Getting Started Simple Version Connections Playback (Basic) Settings GAudioH Symptom Audio is not output. No sound is produced from surround back speaker. No sound is produced from front height speaker. No sound is produced from subwoofer. DTS sound is not output. Dolby TrueHD, DTSHD, Dolby Digital Plus audio is not output. HD audio is not output. Audio input to the COAXIAL connector is not output. Audio input to the OPTICAL connector is not output. Cause/Solution • Check the connections for all devices. • Check the speaker connections. • Check whether the audio device power is turned on. • Adjust the master volume. • Cancel the mute mode. • Select a suitable input source. • Select a suitable input mode. • Disconnect the headphones. No sound is output from the speakers or the PRE OUT connectors when headphones are connected. • Set "Speaker Assign" on the GUI menu to "5.1CH + Surround Back". • Set "Speaker Configuration" - "Surround Back" on the GUI menu to something other than "None". • Set "Surround Parameters" - "Surround Back" on the GUI menu to something other than "OFF". • Set the surround mode to something other than "STEREO". • Set "Audio Adjust" - "Surround Parameters" - "Front Height" on the GUI menu to "ON". • Set "Manual Setup" - "Speaker Setup" - "Speaker Assign" on the GUI menu to "5.1CH + Front Height". • Check the subwoofer connections. • Turn on the subwoofer's power. • Set "Subwoofer" on the GUI menu to "Yes". • Set "Decode Mode" on the GUI menu to "Auto" or "DTS". • Make HDMI connections. • Set "BD Audio Mode" on the MODE menu to "HD Audio Output". • Set "Manual Setup" - "Audio Setup" - "COAX Input Assign" on the GUI menu to "AUX1" or "AUX2". • Set "Source Select" - "Input Mode" on the GUI menu to "Auto" or "Digital". • Set "Manual Setup" - "Audio Setup" - "COAX Input Assign" on the GUI menu to "OFF". Page 12 4, 35 5 28 10, 64 20 47 62 53 54 50 31 49 53 4 - 53 47 12 58 56 47 56 GVideoH Symptom Cause/Solution No picture appears. • Check the TV connection. • Set the TV input correctly. No picture appears, • The picture may be slightly disturbed directly after fast-forwarding the picture is or reversing. This is not a malfunction. disrupted, or the Blu- • Discs not compatible with this unit, or discs with different region ray disc or DVD video codes, cannot be played back. The region codes compatible with picture appears in this unit include "A" for BD-Video and "1" or "ALL" for DVD black and white. video. Picture quality has deteriorated. When ZONE2 is powered on, the HDMI video resolution in the MAIN ZONE switches automatically according to the input signal. GHDMIH Symptom Cause/Solution No audio is output with HDMI connection. • Check the connection of the HDMI connectors. • When outputting HDMI audio from the speakers, set "HDMI Audio Out" on the GUI menu to "AMP". • When outputting HDMI audio from a TV, set "HDMI Audio Out" on the GUI menu to "TV". No video is output with HDMI connection. • Check the connection of the HDMI connectors. • Set the input source to match the connected HDMI connector. • Check whether the TV is compatible with copyright protection (HDCP). If connected to a device not compatible with HDCP, video will not be output correctly. • Check whether the HDMI video resolution set in this unit is compatible with the TV resolution. If set to "Auto", this unit sets it automatically. When the following • Set "HDMI Control" - "Control" on the GUI menu to "OFF". To operations are operate power only for each device, set "Power Off Control" to performed on "OFF". devices compatible with HDMI control, the same operations occur on this unit. • Power ON/OFF • Switching audio output devices • Adjust volume • Switch input source ENGLISH Page 12, 13 - 29 19 13, 41 Page 12 55 55 12 20 - 13 55 Playback (Advanced) Multizone GUI Remote Control Part Names Other Information Troubleshooting Spec. Index 75
-
 1
1 -
2
-
3
-
4
-
5
-
6
-
7
-
8
-
9
-
10
-
11
-
12
-
13
-
14
-
15
-
16
-
17
-
18
-
19
-
20
-
21
-
22
-
23
-
24
-
25
-
26
-
27
-
28
-
29
-
30
-
31
-
32
-
33
-
34
-
35
-
36
-
37
-
38
-
39
-
40
-
41
-
42
-
43
-
44
-
45
-
46
-
47
-
48
-
49
-
50
-
51
-
52
-
53
-
54
-
55
-
56
-
57
-
58
-
59
-
60
-
61
-
62
-
63
-
64
-
65
-
66
-
67
-
68
-
69
-
70
-
71
-
72
-
73
-
 74
74 -
 75
75 -
 76
76 -
 77
77 -
 78
78 -
 79
79 -
 80
80 -
 81
81 -
 82
82 -
 83
83 -
 84
84 -
85
-
86
-
87
-
88
-
89
-
90
-
91
-
92
-
93
-
94
-
95
 |
 |