Denon S-5BD Owners Manual - English - Page 69
Inserting a Disc
 |
UPC - 083795001216
View all Denon S-5BD manuals
Add to My Manuals
Save this manual to your list of manuals |
Page 69 highlights
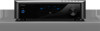
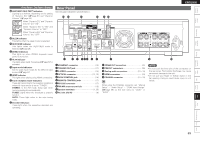
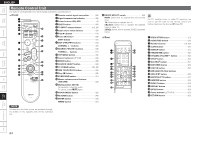
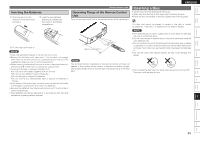
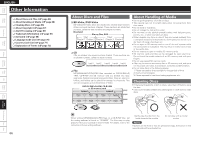
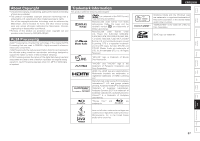
Getting Started Simple Version Connections Playback (Basic) ENGLISH Inserting the Batteries q Slide the rear lid in the direction of the arrow and remove it. w Load the two batteries properly as indicated by the marks in the battery compartment. e Put the rear cover back on. NOTE • Insert the specified batteries in the remote control unit. • Replace the batteries with new ones if the set does not operate even when the remote control unit is operated close to the unit. (The supplied batteries are only for verifying operation.) • When inserting the batteries, be sure to do so in the proper direction, following the q and w marks in the battery compartment. • To prevent damage or leakage of battery fluid: • Do not use a new battery together with an old one. • Do not use two different types of batteries. • Do not attempt to charge dry batteries. • Do not short-circuit, disassemble, heat or dispose of batteries in flames. • If the battery fluid should leak, carefully wipe the fluid off the inside of the battery compartment and insert new batteries. • Remove the batteries from the remote control unit if it will not be in use for long periods. • Used batteries should be disposed of in accordance with the local regulations regarding battery disposal. Remote Control Unit Operating Range of the Remote Control Unit Point the remote control unit at the remote sensor when operating it. Approx. 23 feet/7 m 30° 30° NOTE The set may function improperly or the remote control unit may not operate if the remote control sensor is exposed to direct sunlight, strong artificial light from an inverter type fluorescent lamp or infrared light. Inserting a Disc • Set the disc with the labeled side facing up. • Make sure the disc tray is fully open when inserting the disc. • Place the disc horizontally in the tray, aligned with the tray guide. If a disc that cannot be played is loaded or the disc is loaded up-sidedown, "NO DISC" is displayed on the player's display. NOTE • Only load one disc at a time. Loading two or more discs can damage the unit or scratch the discs. • Do not use cracked or warped discs or discs that have been repaired with adhesive, etc. • Do not use discs on which the sticky part of cellophane tape or labels is exposed or on which there are traces of where labels have been removed. Such discs can get caught inside the player and damage it. • Do not use discs with special shapes, as they could damage the player. • Do not push the disc tray in by hand when the power is turned off. Doing so could damage the set. Settings Playback (Advanced) Multizone GUI Remote Control Part Names Other Information Troubleshooting Spec. Index 65
-
 1
1 -
2
-
3
-
4
-
5
-
6
-
7
-
8
-
9
-
10
-
11
-
12
-
13
-
14
-
15
-
16
-
17
-
18
-
19
-
20
-
21
-
22
-
23
-
24
-
25
-
26
-
27
-
28
-
29
-
30
-
31
-
32
-
33
-
34
-
35
-
36
-
37
-
38
-
39
-
40
-
41
-
42
-
43
-
44
-
45
-
46
-
47
-
48
-
49
-
50
-
51
-
52
-
53
-
54
-
55
-
56
-
57
-
58
-
59
-
60
-
61
-
62
-
63
-
 64
64 -
 65
65 -
 66
66 -
 67
67 -
 68
68 -
 69
69 -
 70
70 -
 71
71 -
 72
72 -
 73
73 -
 74
74 -
75
-
76
-
77
-
78
-
79
-
80
-
81
-
82
-
83
-
84
-
85
-
86
-
87
-
88
-
89
-
90
-
91
-
92
-
93
-
94
-
95
 |
 |