Denon S-5BD Owners Manual - English - Page 81
Resetting the Microprocessor, Attaching the Door - update
 |
UPC - 083795001216
View all Denon S-5BD manuals
Add to My Manuals
Save this manual to your list of manuals |
Page 81 highlights
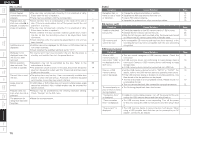
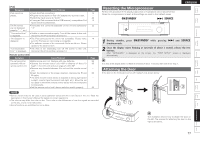
Getting Started Simple Version Connections Playback (Basic) Settings GiPodH Symptom Cause/Solution iPod cannot be played. The file names are not displayed properly ("...", etc.). "Connection Error" is displayed. "Not Support" is displayed. "Communication Error" is displayed. • Check the iPod connections. • Plug the control dock for iPod's AC adapter into a power outlet. • Switch the input source to "AUX1". • If using an iPod connected to the USB terminal, incompatible iPod types cannot be played back. • Characters that cannot be displayed on this unit are replaced by "z". • Unable to communicate properly. Turn off the power to this unit, disconnect the iPod and then reconnect it. • The iPod connected to the unit is not compatible. Please make sure the iPod you are connecting is compatible. • The software version of the connected iPod is an old one. Please update to the latest version. • The iPod is not responding.Turn off the power to this unit, disconnect the iPod and then reconnect it. GRemote Control UnitH Symptom Cause/Solution The set cannot be operated with the remote control unit. • Batteries are worn out. Replace with new batteries. • Operate the remote control unit within a distance of about 23 feet/7 m from this unit and at an angle of within 30°. • Remove any obstacle between this unit and the remote control unit. • Insert the batteries in the proper direction, checking the q and w marks. • The set's remote control sensor is exposed to strong light (direct sunlight, inverter type fluorescent bulb light, etc.). Move the set to a place in which the remote control sensor will not be exposed to strong light. • Set the remote control unit's device selection switch properly. Page 14 - 20 14 22 - 14 - - Page 65 65 - 65 - 59 Resetting the Microprocessor Perform this procedure if the display is abnormal or if operations cannot be performed. When the microprocessor is reset, all the settings are reset to their default values. ON/STANDBY 9 SOURCE ENGLISH 1 During standby, press ON/STANDBY while pressing 9 and SOURCE simultaneously. 2 Once the display starts flashing at intervals of about 1 second, release the two buttons. After "INITIALIZED" is displayed on the screen, the "FIRST SETUP" screen is displayed automatically. If in step 2 the display does not flash at intervals of about 1 second, start over from step 1. Attaching the Door If the door on the front panel comes off, reattach it as shown below. e NOTE • Some function may not be used in some operation status and this is not failure of the unit. Read the description in this Owner's Manual for details on correct operations. • The volume may differ from disc to disc. This is due to the differences in how the signals are recorded on the disc, and is not a malfunction. • Some functions are prohibited on some discs. wq Playback (Advanced) Multizone GUI Remote Control Part Names Other Information Troubleshooting Spec. Index The illustration shows how to attach the door on the left. The process for attaching the door on the right is the same. 77
-
 1
1 -
2
-
3
-
4
-
5
-
6
-
7
-
8
-
9
-
10
-
11
-
12
-
13
-
14
-
15
-
16
-
17
-
18
-
19
-
20
-
21
-
22
-
23
-
24
-
25
-
26
-
27
-
28
-
29
-
30
-
31
-
32
-
33
-
34
-
35
-
36
-
37
-
38
-
39
-
40
-
41
-
42
-
43
-
44
-
45
-
46
-
47
-
48
-
49
-
50
-
51
-
52
-
53
-
54
-
55
-
56
-
57
-
58
-
59
-
60
-
61
-
62
-
63
-
64
-
65
-
66
-
67
-
68
-
69
-
70
-
71
-
72
-
73
-
74
-
75
-
 76
76 -
 77
77 -
 78
78 -
 79
79 -
 80
80 -
 81
81 -
 82
82 -
 83
83 -
 84
84 -
 85
85 -
 86
86 -
87
-
88
-
89
-
90
-
91
-
92
-
93
-
94
-
95
 |
 |