Epson 6100i User's Guide - Page 44
Controlling the Picture and Sound, Switching Between Picture Sources
 |
UPC - 010343858176
View all Epson 6100i manuals
Add to My Manuals
Save this manual to your list of manuals |
Page 44 highlights
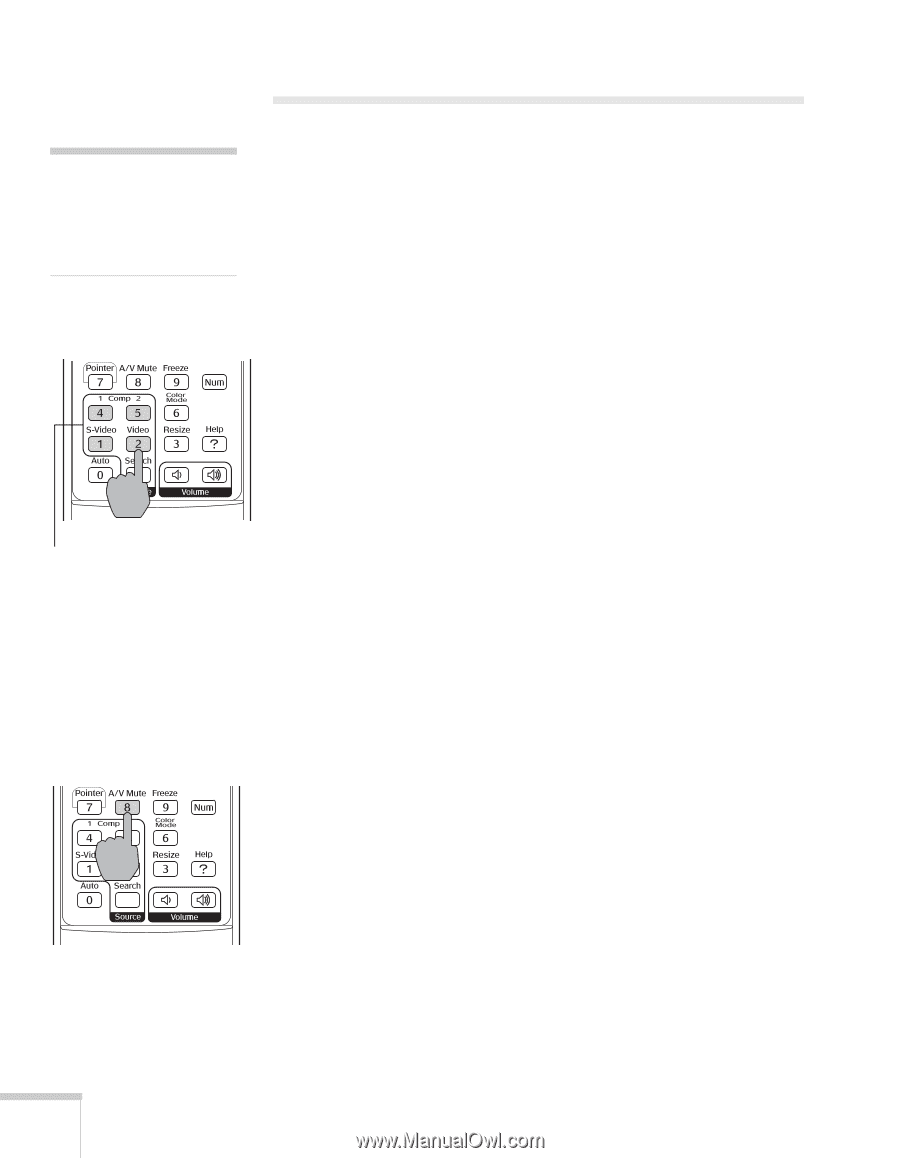
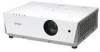
note You can use the projector's menus to fine-tune the picture and sound quality as described in Chapter 4. Source buttons Controlling the Picture and Sound You can use the remote control to select your picture sources, temporarily turn off the picture and sound, freeze the action, zoom in on the picture, and adjust the volume. Switching Between Picture Sources If your projector is connected to more than one computer and/or video source, you can switch between the different sources: ■ On the projector's control panel, there is a Source Search button. Press the button to switch between equipment connected to the Computer1, Computer2, Video, and S-Video ports. ■ On the remote control, there are four Source buttons. Use them to switch between equipment connected to the port identified on each button. After you select a source, the screen goes dark for a moment before the image appears. Turning Off the Picture and Sound You can use the A/V Mute button on the remote control to turn off the image and sound and darken your screen. (If you've connected an external monitor to the projector, it will continue displaying.) This feature is useful if you want to temporarily redirect your audience's attention without the distraction of a bright screen. ■ To turn off the picture, press the A/V Mute button. The screen goes dark. ■ To turn the image back on, press the button again. You can also have an image, such as a company logo, display on the screen whenever you press the A/V Mute button (see page 58). 44 Using the Remote Control
-
 1
1 -
2
-
3
-
4
-
5
-
6
-
7
-
8
-
9
-
10
-
11
-
12
-
13
-
14
-
15
-
16
-
17
-
18
-
19
-
20
-
21
-
22
-
23
-
24
-
25
-
26
-
27
-
28
-
29
-
30
-
31
-
32
-
33
-
34
-
35
-
36
-
37
-
38
-
 39
39 -
 40
40 -
 41
41 -
 42
42 -
 43
43 -
 44
44 -
 45
45 -
 46
46 -
 47
47 -
 48
48 -
 49
49 -
50
-
51
-
52
-
53
-
54
-
55
-
56
-
57
-
58
-
59
-
60
-
61
-
62
-
63
-
64
-
65
-
66
-
67
-
68
-
69
-
70
-
71
-
72
-
73
-
74
-
75
-
76
-
77
-
78
-
79
-
80
-
81
-
82
-
83
-
84
-
85
-
86
-
87
-
88
-
89
-
90
-
91
-
92
-
93
-
94
-
95
-
96
-
97
-
98
-
99
-
100
-
101
-
102
-
103
-
104
-
105
-
106
-
107
-
108
-
109
-
110
-
111
-
112
-
113
-
114
-
115
-
116
-
117
-
118
-
119
-
120
-
121
-
122
-
123
-
124
-
125
-
126
-
127
-
128
-
129
-
130
-
131
-
132
 |
 |