Epson EX3220 User Manual - Page 96
Enter, Extended, Display, Display Background, Startup Screen, A/V Mute, to exit the message screen.
 |
View all Epson EX3220 manuals
Add to My Manuals
Save this manual to your list of manuals |
Page 96 highlights
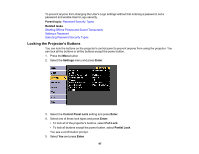
5. Use the arrow buttons on the remote control to surround the image area you want to use as the User's Logo and press Enter. You see a prompt asking if you want to select this image area. 6. Select Yes and press Enter. (If you want to change the selected area, select No, press Enter, and repeat the last step.) You see the User's Logo zoom factor menu. 7. Select a zoom percentage and press Enter. You see a prompt asking if you want to save the image as the User's Logo. 8. Select Yes and press Enter. Note: It takes a few moments for the projector to save the image; do not use the projector, its remote control, or any connected equipment until it is finished. You see a completion message. 9. Press Esc to exit the message screen. 10. Select the Extended menu and press Enter. 11. Select Display and press Enter. 12. Select when you want to display the User's Logo screen: • To display it whenever there is no input signal, select Display Background and set it to Logo. • To display it whenever you turn the projector on, select Startup Screen and set it to On. • To display it whenever you press the A/V Mute button, select A/V Mute and set it to Logo. 96
-
 1
1 -
2
-
3
-
4
-
5
-
6
-
7
-
8
-
9
-
10
-
11
-
12
-
13
-
14
-
15
-
16
-
17
-
18
-
19
-
20
-
21
-
22
-
23
-
24
-
25
-
26
-
27
-
28
-
29
-
30
-
31
-
32
-
33
-
34
-
35
-
36
-
37
-
38
-
39
-
40
-
41
-
42
-
43
-
44
-
45
-
46
-
47
-
48
-
49
-
50
-
51
-
52
-
53
-
54
-
55
-
56
-
57
-
58
-
59
-
60
-
61
-
62
-
63
-
64
-
65
-
66
-
67
-
68
-
69
-
70
-
71
-
72
-
73
-
74
-
75
-
76
-
77
-
78
-
79
-
80
-
81
-
82
-
83
-
84
-
85
-
86
-
87
-
88
-
89
-
90
-
 91
91 -
 92
92 -
 93
93 -
 94
94 -
 95
95 -
 96
96 -
 97
97 -
 98
98 -
 99
99 -
 100
100 -
 101
101 -
102
-
103
-
104
-
105
-
106
-
107
-
108
-
109
-
110
-
111
-
112
-
113
-
114
-
115
-
116
-
117
-
118
-
119
-
120
-
121
-
122
-
123
-
124
-
125
-
126
-
127
-
128
-
129
-
130
-
131
-
132
-
133
-
134
-
135
-
136
-
137
-
138
-
139
-
140
-
141
-
142
-
143
-
144
-
145
-
146
-
147
-
148
-
149
-
150
-
151
-
152
-
153
-
154
-
155
-
156
-
157
-
158
-
159
-
160
-
161
-
162
-
163
-
164
-
165
-
166
-
167
-
168
-
169
-
170
-
171
-
172
-
173
-
174
-
175
-
176
-
177
-
178
-
179
-
180
-
181
-
182
-
183
-
184
-
185
-
186
-
187
-
188
-
189
-
190
-
191
-
192
-
193
-
194
-
195
-
196
-
197
-
198
-
199
-
200
-
201
-
202
-
203
-
204
-
205
-
206
-
207
 |
 |