Epson XP-400 User Manual - Page 127
Setting Up File Sharing for Photo Transfers From Your Computer
 |
View all Epson XP-400 manuals
Add to My Manuals
Save this manual to your list of manuals |
Page 127 highlights
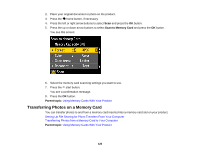
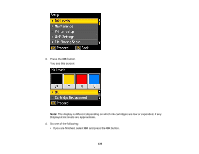
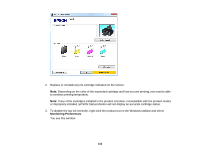
Setting Up File Sharing for Photo Transfers From Your Computer Before you transfer photos from a computer to a memory card inserted into a memory card slot on your product, you may need to set up your product's file sharing settings. Caution: Remove the memory card before you change this setting or you may lose data from the memory card. Do not remove a memory card or turn off your product while the memory card access light is flashing or you may lose data from the memory card. 1. Press the left or right arrow buttons to select Setup and press the OK button . 2. Press the up or down arrow buttons to select File Sharing Setup and press the OK button. 3. Press the arrow buttons to select your connection type and press the OK button. Parent topic: Transferring Photos on a Memory Card Transferring Photos from a Memory Card to Your Computer You can transfer photos to and from a memory card inserted into a memory card slot on your product and a computer connected to your product. Note: Do not transfer photos to and from a memory card while you are printing from the memory card. 1. Make sure your product is connected to a computer. 2. Insert a memory card into a memory card slot on your product. 3. Do one of the following to access your memory card files from your computer: • Windows: Select the Computer or My Computer utility, then select the removable disk icon. • Mac OS X with a USB connection: Look for the removable disk icon on your desktop, then select it. • Mac OS X 10.5/10.6/10.7 with a network connection: Select the hard drive icon on your desktop or select Computer from the Go menu, select your product in the SHARED section of the sidebar (you may need to widen the sidebar to see the name), then select the MEMORYCARD icon. 4. Select the folder that contains your photos. 5. Drag the photos you want to transfer to the desired folder on your computer or on your memory card. Note: Your product's LCD screen does not update to display new photos transferred to the memory card. Wait until the memory card access light stops flashing, then remove and insert the memory card to update the photos displayed. 127
-
 1
1 -
2
-
3
-
4
-
5
-
6
-
7
-
8
-
9
-
10
-
11
-
12
-
13
-
14
-
15
-
16
-
17
-
18
-
19
-
20
-
21
-
22
-
23
-
24
-
25
-
26
-
27
-
28
-
29
-
30
-
31
-
32
-
33
-
34
-
35
-
36
-
37
-
38
-
39
-
40
-
41
-
42
-
43
-
44
-
45
-
46
-
47
-
48
-
49
-
50
-
51
-
52
-
53
-
54
-
55
-
56
-
57
-
58
-
59
-
60
-
61
-
62
-
63
-
64
-
65
-
66
-
67
-
68
-
69
-
70
-
71
-
72
-
73
-
74
-
75
-
76
-
77
-
78
-
79
-
80
-
81
-
82
-
83
-
84
-
85
-
86
-
87
-
88
-
89
-
90
-
91
-
92
-
93
-
94
-
95
-
96
-
97
-
98
-
99
-
100
-
101
-
102
-
103
-
104
-
105
-
106
-
107
-
108
-
109
-
110
-
111
-
112
-
113
-
114
-
115
-
116
-
117
-
118
-
119
-
120
-
121
-
 122
122 -
 123
123 -
 124
124 -
 125
125 -
 126
126 -
 127
127 -
 128
128 -
 129
129 -
 130
130 -
 131
131 -
 132
132 -
133
-
134
-
135
-
136
-
137
-
138
-
139
-
140
-
141
-
142
-
143
-
144
-
145
-
146
-
147
-
148
-
149
-
150
-
151
-
152
-
153
-
154
-
155
-
156
-
157
-
158
-
159
-
160
-
161
-
162
-
163
-
164
-
165
-
166
-
167
-
168
-
169
-
170
-
171
-
172
-
173
-
174
-
175
-
176
-
177
-
178
-
179
-
180
-
181
-
182
-
183
-
184
-
185
-
186
-
187
-
188
-
189
-
190
-
191
-
192
-
193
-
194
-
195
-
196
-
197
-
198
-
199
-
200
-
201
-
202
-
203
-
204
-
205
-
206
-
207
-
208
-
209
-
210
-
211
-
212
-
213
-
214
-
215
-
216
-
217
-
218
-
219
-
220
 |
 |
