Epson XP-400 User Manual - Page 50
Selecting Advanced Print Settings - Windows, Fix Photo, Advanced, Settings, Fix Red-Eye, Reverse Order - black not printing
 |
View all Epson XP-400 manuals
Add to My Manuals
Save this manual to your list of manuals |
Page 50 highlights
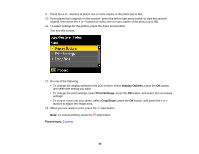
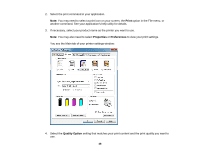
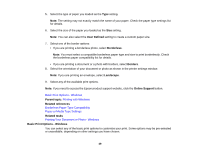
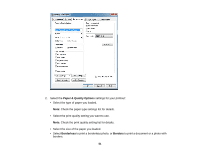
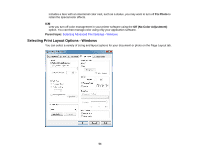
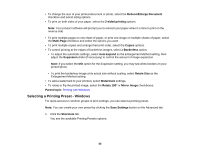
Fix Photo Improves the color, contrast, and sharpness of flawed photos. Click the arrow next to Advanced Settings and select the Fix Red-Eye setting to reduce or remove red-eye in photos. Note: Fix Photo uses a sophisticated face recognition technology to optimize photos that include faces. For this to work, both eyes and the nose must be visible in the subject's face. If your photo includes a face with an intentional color cast, such as a statue, you may want to turn off Fix Photo to retain the special color effects. Fix Red-Eye Reduces or removes red-eye in photos. Reverse Order Prints multi-page print jobs last page first. Print Preview Displays a preview of your printout before printing. Black/Grayscale Prints text and graphics in black or shades of gray. Quiet Mode Lessens noise during printing when you select Plain Paper/Bright White Paper as the paper Type or Media Type setting. Parent topic: Selecting Basic Print Settings - Windows Selecting Advanced Print Settings - Windows Select print settings on the Advanced tab to customize the quality and color settings for your printout, and save your own printing presets. 1. Click the Advanced tab. You see the advanced print settings: 50
-
 1
1 -
2
-
3
-
4
-
5
-
6
-
7
-
8
-
9
-
10
-
11
-
12
-
13
-
14
-
15
-
16
-
17
-
18
-
19
-
20
-
21
-
22
-
23
-
24
-
25
-
26
-
27
-
28
-
29
-
30
-
31
-
32
-
33
-
34
-
35
-
36
-
37
-
38
-
39
-
40
-
41
-
42
-
43
-
44
-
 45
45 -
 46
46 -
 47
47 -
 48
48 -
 49
49 -
 50
50 -
 51
51 -
 52
52 -
 53
53 -
 54
54 -
 55
55 -
56
-
57
-
58
-
59
-
60
-
61
-
62
-
63
-
64
-
65
-
66
-
67
-
68
-
69
-
70
-
71
-
72
-
73
-
74
-
75
-
76
-
77
-
78
-
79
-
80
-
81
-
82
-
83
-
84
-
85
-
86
-
87
-
88
-
89
-
90
-
91
-
92
-
93
-
94
-
95
-
96
-
97
-
98
-
99
-
100
-
101
-
102
-
103
-
104
-
105
-
106
-
107
-
108
-
109
-
110
-
111
-
112
-
113
-
114
-
115
-
116
-
117
-
118
-
119
-
120
-
121
-
122
-
123
-
124
-
125
-
126
-
127
-
128
-
129
-
130
-
131
-
132
-
133
-
134
-
135
-
136
-
137
-
138
-
139
-
140
-
141
-
142
-
143
-
144
-
145
-
146
-
147
-
148
-
149
-
150
-
151
-
152
-
153
-
154
-
155
-
156
-
157
-
158
-
159
-
160
-
161
-
162
-
163
-
164
-
165
-
166
-
167
-
168
-
169
-
170
-
171
-
172
-
173
-
174
-
175
-
176
-
177
-
178
-
179
-
180
-
181
-
182
-
183
-
184
-
185
-
186
-
187
-
188
-
189
-
190
-
191
-
192
-
193
-
194
-
195
-
196
-
197
-
198
-
199
-
200
-
201
-
202
-
203
-
204
-
205
-
206
-
207
-
208
-
209
-
210
-
211
-
212
-
213
-
214
-
215
-
216
-
217
-
218
-
219
-
220
 |
 |
