Garmin 2620 Owners Manual - Page 47
Customizing your Map Map Setup, Least, North Up, Track Up, North, Night, Automatic
 |
UPC - 753759045449
View all Garmin 2620 manuals
Add to My Manuals
Save this manual to your list of manuals |
Page 47 highlights
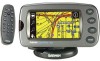
Customizing your Map Page You can customize they way information appears on the Map page in order to make your viewing experience more pleasurable. For example, you can change the color of the Map page, show more or less detail on the Map page, or even prevent items such as railroads from appearing on the Map page. Many of your changes to the Map page can be made by pressing the Map Setup icon on the Menu page. Access the Menu page by pressing the MENU key on your StreetPilot. A Map Setup page appears, which features five tabbed sections: Map, Line, Point, City, and Area. Note that your StreetPilot's factory settings (or default settings) do not need to be changed in order for your unit to function completely. Experiment with a variety of settings as you become more familiar with your StreetPilot. If you do not like your trial settings, you can change some or all of them. See the following page for instructions on resetting all of your customized settings on the Map Setup page. Map tab Map Detail - Adjusts the amount of detail that will be displayed on your Map page. Most shows maximum detail and Least shows minimum detail. The higher the detail level, the slower the map redrawing time. Select Most once you have focused in on a small map area and wish to view lots of detail in that area. Orientation - Selecting North Up displays the map with North at the top. Selecting Track Up automatically rotates the map to keep your current direction of travel at the top of the page. A white North indicator is displayed on the map when in the Track Up mode. The indicator always points to North. An 'N' with a black arrow pointing up displays while in North Up. To quickly change the map orientation, touch the Orientation icon in the upper left to toggle between North Up and Track Up. Color Mode - Select between Day, Night, or Automatic for best viewing conditions. Day shows a mostly yellow background. Night shows a black background for less intensity in a dark environment, which provides easier viewing while driving at night. Automatic allows your StreetPilot to automatically switch between the two (depending on the time of day as well as the StreetPilot's calculation of sunrise and sunset). Reference Customizing the Map Page Many of your changes to the Map page can be made by pressing the Map Setup icon on the Menu page, shown above. Access the Menu page by pressing the MENU key on your StreetPilot. The Orientation icon indicates Track Up. Touch it again to switch to North Up. A series of "file tabs" allow you to change page viewing options on the Map Setup page, shown above. 39
-
 1
1 -
2
-
3
-
4
-
5
-
6
-
7
-
8
-
9
-
10
-
11
-
12
-
13
-
14
-
15
-
16
-
17
-
18
-
19
-
20
-
21
-
22
-
23
-
24
-
25
-
26
-
27
-
28
-
29
-
30
-
31
-
32
-
33
-
34
-
35
-
36
-
37
-
38
-
39
-
40
-
41
-
 42
42 -
 43
43 -
 44
44 -
 45
45 -
 46
46 -
 47
47 -
 48
48 -
 49
49 -
 50
50 -
 51
51 -
 52
52 -
53
-
54
-
55
-
56
-
57
-
58
-
59
-
60
-
61
-
62
-
63
-
64
-
65
-
66
-
67
-
68
-
69
-
70
-
71
-
72
-
73
-
74
-
75
-
76
-
77
-
78
-
79
-
80
-
81
-
82
-
83
-
84
-
85
-
86
-
87
-
88
-
89
-
90
-
91
-
92
-
93
 |
 |
