Garmin 2620 Owners Manual - Page 71
Appendix, Attaching the StreetPilot to the Base, Adjusting the StreetPilot's Viewing Angle
 |
UPC - 753759045449
View all Garmin 2620 manuals
Add to My Manuals
Save this manual to your list of manuals |
Page 71 highlights
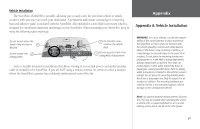
Attaching the StreetPilot to the Base These steps apply to both the non-skid friction mount base and the adhesive dash mount. 1. Slide the locking lever on the mounting base, to the left (unlocked position). 2. Attach the StreetPilot to the mounting base by sliding the disk on the bottom of the StreetPilot into the base until it clicks into place. 3. Rotate the StreetPilot left or right until the desired angle is achieved. Slide the locking lever to the right (lock) to secure the StreetPilot to the base. Adjusting the StreetPilot's Viewing Angle 1. Tilt the StreetPilot forward or backward as needed. The mounting bracket clicks as you adjust the tilt. 2. Rotate the entire StreetPilot by sliding the locking lever to the left (unlocked position). Adjust the angle as desired and move the lever back (right) to the locked position. Removing the StreetPilot from the Base Unlock to adjust left/right 1. Slide the locking lever (on the mounting base) to the left (unlocked position). 2. Press the release tab downward and slide the StreetPilot to the right. Appendix Vehicle Installation 63
-
 1
1 -
2
-
3
-
4
-
5
-
6
-
7
-
8
-
9
-
10
-
11
-
12
-
13
-
14
-
15
-
16
-
17
-
18
-
19
-
20
-
21
-
22
-
23
-
24
-
25
-
26
-
27
-
28
-
29
-
30
-
31
-
32
-
33
-
34
-
35
-
36
-
37
-
38
-
39
-
40
-
41
-
42
-
43
-
44
-
45
-
46
-
47
-
48
-
49
-
50
-
51
-
52
-
53
-
54
-
55
-
56
-
57
-
58
-
59
-
60
-
61
-
62
-
63
-
64
-
65
-
 66
66 -
 67
67 -
 68
68 -
 69
69 -
 70
70 -
 71
71 -
 72
72 -
 73
73 -
 74
74 -
 75
75 -
 76
76 -
77
-
78
-
79
-
80
-
81
-
82
-
83
-
84
-
85
-
86
-
87
-
88
-
89
-
90
-
91
-
92
-
93
 |
 |
