Garmin RINO 520 Owner's Manual - Page 45
Using Sight ‘N Go, Calibrating the Compass, To use Sight 'N Go to navigate - case
 |
UPC - 753759049072
View all Garmin RINO 520 manuals
Add to My Manuals
Save this manual to your list of manuals |
Page 45 highlights
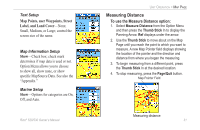
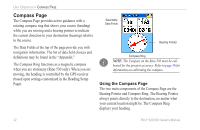
Using Sight 'N Go Available for the Rino 530 only, this feature allows you visually locate an object and navigate to it. To use Sight 'N Go to navigate: 1. Use the Page button to access the Compass Page and then use the Thumb Stick to access the Option Menu. 2. Use the Thumb Stick to highlight Sight 'N Go and press In. Note that the compass ring with pointer is in-line with the two sighting marks on the case. 3. Hold the Rino 530 at eye level and line up the two sighting marks on the case with a distant object. Press the Thumb Stick In to Lock Direction. 4. To navigate to your destination, select Set Course and press the Thumb Stick In. Begin traveling to your destination using the pointer as a guide. To view your destination as a waypoint, select Project Waypoint and press the Thumb Stick In. To re-sight the destination, press the Thumb Stick In when Re-Sight is highlighted. Rino® 520/530 Owner's Manual Unit Operation > Compass Page Sighting Marks Rino 530 held level for Sight 'N Go Calibrating the Compass When you first use the Rino 530, the Electronic Compass must be calibrated outdoors and away from metal objects. The accuracy of the Electronic Compass is adversely affected if the unit is not held level or is held near items that generate magnetic fields, such as cars, large belt buckles, etc. Recalibration is recommended after significant environmental changes such as location changes, temperature fluctuations, switching from lithium-ion battery power to alkaline or NiCad. etc. 35
-
 1
1 -
2
-
3
-
4
-
5
-
6
-
7
-
8
-
9
-
10
-
11
-
12
-
13
-
14
-
15
-
16
-
17
-
18
-
19
-
20
-
21
-
22
-
23
-
24
-
25
-
26
-
27
-
28
-
29
-
30
-
31
-
32
-
33
-
34
-
35
-
36
-
37
-
38
-
39
-
 40
40 -
 41
41 -
 42
42 -
 43
43 -
 44
44 -
 45
45 -
 46
46 -
 47
47 -
 48
48 -
 49
49 -
 50
50 -
51
-
52
-
53
-
54
-
55
-
56
-
57
-
58
-
59
-
60
-
61
-
62
-
63
-
64
-
65
-
66
-
67
-
68
-
69
-
70
-
71
-
72
-
73
-
74
-
75
-
76
-
77
-
78
-
79
-
80
-
81
-
82
-
83
-
84
-
85
-
86
-
87
-
88
-
89
-
90
-
91
-
92
-
93
-
94
-
95
-
96
-
97
-
98
-
99
-
100
-
101
-
102
-
103
-
104
-
105
-
106
-
107
-
108
-
109
-
110
-
111
-
112
-
113
-
114
-
115
-
116
-
117
-
118
-
119
-
120
-
121
-
122
-
123
-
124
-
125
-
126
-
127
-
128
-
129
-
130
-
131
-
132
 |
 |
