Gateway FX540X 8512728 - FX540 Hardware Reference Guide - Page 61
Adding or replacing an optical, disc drive
 |
View all Gateway FX540X manuals
Add to My Manuals
Save this manual to your list of manuals |
Page 61 highlights
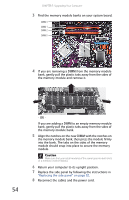
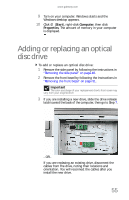
www.gateway.com 9 Turn on your computer. Windows starts and the Windows desktop appears. 10 Click (Start), right-click Computer, then click Properties. The amount of memory in your computer is displayed. Adding or replacing an optical disc drive To add or replace an optical disc drive: 1 Remove the side panel by following the instructions in "Removing the side panel" on page 49. 2 Remove the front bezel by following the instructions in "Removing the front bezel" on page 51. Important The color and shape of your replacement drive's front cover may vary from your original drive. 3 If you are installing a new drive, slide the drive release latch toward the back of the computer, then go to Step 7. - OR If you are replacing an existing drive, disconnect the cables from the drive, noting their locations and orientation. You will reconnect the cables after you install the new drive. 55
-
 1
1 -
2
-
3
-
4
-
5
-
6
-
7
-
8
-
9
-
10
-
11
-
12
-
13
-
14
-
15
-
16
-
17
-
18
-
19
-
20
-
21
-
22
-
23
-
24
-
25
-
26
-
27
-
28
-
29
-
30
-
31
-
32
-
33
-
34
-
35
-
36
-
37
-
38
-
39
-
40
-
41
-
42
-
43
-
44
-
45
-
46
-
47
-
48
-
49
-
50
-
51
-
52
-
53
-
54
-
55
-
 56
56 -
 57
57 -
 58
58 -
 59
59 -
 60
60 -
 61
61 -
 62
62 -
 63
63 -
 64
64 -
 65
65 -
 66
66 -
67
-
68
-
69
-
70
-
71
-
72
-
73
-
74
-
75
-
76
-
77
-
78
-
79
-
80
-
81
-
82
-
83
-
84
-
85
-
86
-
87
-
88
-
89
-
90
-
91
-
92
-
93
-
94
-
95
-
96
-
97
-
98
-
99
-
100
-
101
-
102
-
103
-
104
-
105
-
106
-
107
-
108
-
109
-
110
-
111
-
112
-
113
-
114
-
115
-
116
-
117
-
118
-
119
-
120
-
121
-
122
-
123
-
124
-
125
-
126
-
127
-
128
-
129
-
130
-
131
-
132
-
133
-
134
-
135
-
136
-
137
-
138
-
139
-
140
-
141
-
142
-
143
-
144
-
145
-
146
-
147
-
148
-
149
-
150
-
151
-
152
-
153
-
154
-
155
-
156
-
157
-
158
-
159
-
160
-
161
-
162
-
163
-
164
 |
 |