Gateway FX540X 8512728 - FX540 Hardware Reference Guide - Page 72
Replacing the power supply
 |
View all Gateway FX540X manuals
Add to My Manuals
Save this manual to your list of manuals |
Page 72 highlights
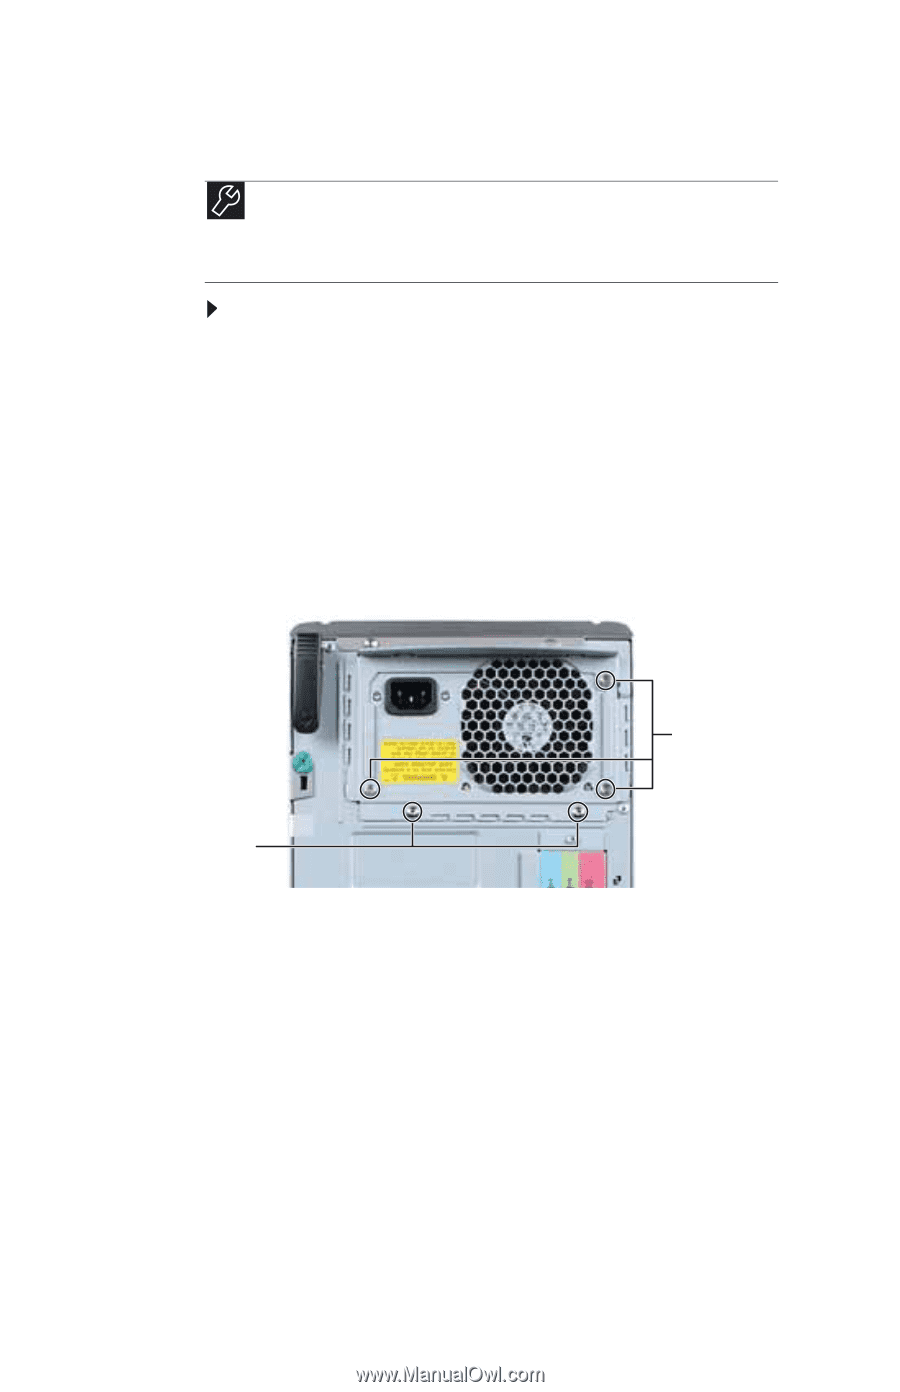
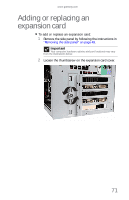
CHAPTER 5: Upgrading Your Computer Replacing the power supply Tools You need a Phillips screwdriver and a Torx® or "star" driver (size T15) to replace the power supply. A slotted (flat) screwdriver can be used in place of the Torx driver, but it must be the 7/64" (3 mm) size, and you must be very careful while applying torque so that the screw head does not get stripped. To replace the power supply: 1 Remove the side panel by following the instructions in "Removing the side panel" on page 49. Make sure that you disconnect the power cable. 2 Disconnect the power supply cables from all components (such as hard drives, optical and diskette drives, and the system board), noting their locations and orientation. (You will reconnect the cables after you install the new power supply.) 3 Remove the three Phillips screws that secure the power supply to the power supply bracket. Phillips screws Torx screws 4 Use a Torx ("star") T15 driver to remove the two Torx screws that secure the power supply bracket to the computer, then slide the bracket down and off the computer. 5 Slide the power supply and cables out the back of the computer. 6 Insert the new power supply and cables into the case through the opening in the back of the computer. 7 Slide the power supply bracket into place, then secure it into place using the two Torx screws you removed previously. 8 Secure the power supply to the power supply bracket using the three Phillips screws you removed previously. 66
-
 1
1 -
2
-
3
-
4
-
5
-
6
-
7
-
8
-
9
-
10
-
11
-
12
-
13
-
14
-
15
-
16
-
17
-
18
-
19
-
20
-
21
-
22
-
23
-
24
-
25
-
26
-
27
-
28
-
29
-
30
-
31
-
32
-
33
-
34
-
35
-
36
-
37
-
38
-
39
-
40
-
41
-
42
-
43
-
44
-
45
-
46
-
47
-
48
-
49
-
50
-
51
-
52
-
53
-
54
-
55
-
56
-
57
-
58
-
59
-
60
-
61
-
62
-
63
-
64
-
65
-
66
-
 67
67 -
 68
68 -
 69
69 -
 70
70 -
 71
71 -
 72
72 -
 73
73 -
 74
74 -
 75
75 -
 76
76 -
 77
77 -
78
-
79
-
80
-
81
-
82
-
83
-
84
-
85
-
86
-
87
-
88
-
89
-
90
-
91
-
92
-
93
-
94
-
95
-
96
-
97
-
98
-
99
-
100
-
101
-
102
-
103
-
104
-
105
-
106
-
107
-
108
-
109
-
110
-
111
-
112
-
113
-
114
-
115
-
116
-
117
-
118
-
119
-
120
-
121
-
122
-
123
-
124
-
125
-
126
-
127
-
128
-
129
-
130
-
131
-
132
-
133
-
134
-
135
-
136
-
137
-
138
-
139
-
140
-
141
-
142
-
143
-
144
-
145
-
146
-
147
-
148
-
149
-
150
-
151
-
152
-
153
-
154
-
155
-
156
-
157
-
158
-
159
-
160
-
161
-
162
-
163
-
164
 |
 |