Gateway FX540X 8512728 - FX540 Hardware Reference Guide - Page 64
thumbscrew because it was originally installed
 |
View all Gateway FX540X manuals
Add to My Manuals
Save this manual to your list of manuals |
Page 64 highlights
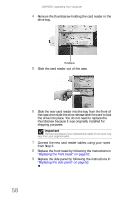
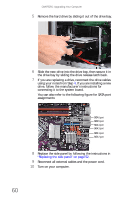
CHAPTER 5: Upgrading Your Computer 4 Remove the thumbscrew holding the card reader in the drive bay. Thumbscrew 5 Slide the card reader out of the case. 6 Slide the new card reader into the bay from the front of the case, then slide the drive release latch forward to lock the drive into place. You do not need to replace the thumbscrew because it was originally installed for shipping purposes. Important The color and shape of your replacement reader's front cover may vary from your original reader. 7 Connect the new card reader cables, using your notes from Step 3. 8 Replace the front bezel by following the instructions in "Replacing the front bezel" on page 52. 9 Replace the side panel by following the instructions in "Replacing the side panel" on page 52. 58
-
 1
1 -
2
-
3
-
4
-
5
-
6
-
7
-
8
-
9
-
10
-
11
-
12
-
13
-
14
-
15
-
16
-
17
-
18
-
19
-
20
-
21
-
22
-
23
-
24
-
25
-
26
-
27
-
28
-
29
-
30
-
31
-
32
-
33
-
34
-
35
-
36
-
37
-
38
-
39
-
40
-
41
-
42
-
43
-
44
-
45
-
46
-
47
-
48
-
49
-
50
-
51
-
52
-
53
-
54
-
55
-
56
-
57
-
58
-
 59
59 -
 60
60 -
 61
61 -
 62
62 -
 63
63 -
 64
64 -
 65
65 -
 66
66 -
 67
67 -
 68
68 -
 69
69 -
70
-
71
-
72
-
73
-
74
-
75
-
76
-
77
-
78
-
79
-
80
-
81
-
82
-
83
-
84
-
85
-
86
-
87
-
88
-
89
-
90
-
91
-
92
-
93
-
94
-
95
-
96
-
97
-
98
-
99
-
100
-
101
-
102
-
103
-
104
-
105
-
106
-
107
-
108
-
109
-
110
-
111
-
112
-
113
-
114
-
115
-
116
-
117
-
118
-
119
-
120
-
121
-
122
-
123
-
124
-
125
-
126
-
127
-
128
-
129
-
130
-
131
-
132
-
133
-
134
-
135
-
136
-
137
-
138
-
139
-
140
-
141
-
142
-
143
-
144
-
145
-
146
-
147
-
148
-
149
-
150
-
151
-
152
-
153
-
154
-
155
-
156
-
157
-
158
-
159
-
160
-
161
-
162
-
163
-
164
 |
 |
