Gateway FX540X 8512728 - FX540 Hardware Reference Guide - Page 75
Replacing the I/O board
 |
View all Gateway FX540X manuals
Add to My Manuals
Save this manual to your list of manuals |
Page 75 highlights
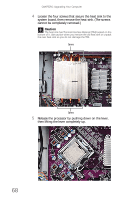
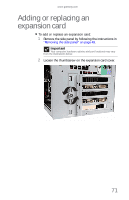
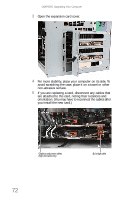
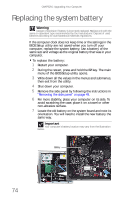
www.gateway.com 6 Remove the processor from the system board. 7 Install the new processor onto the system board making sure that Pin 1 on the processor (indicated by the silk-screened arrow on the corner of the processor) aligns with Pin 1 on the processor socket (indicated by the absence of a pin hole in the processor socket), then return the lever to its locked position. 8 Wipe the old thermal paste off the bottom of the heat sink, then apply a new bead of thermal paste about the size of half a pea. 9 Place the heat sink on the system board, then tighten the screws that secure it to the system board. 10 Replace the fan cover. 11 Return your computer to its upright position. 12 Replace the side panel by following the instructions in "Replacing the side panel" on page 52. Replacing the I/O board Tools You need a Phillips screwdriver to replace the I/O board. To replace the front I/O board: 1 Remove the side panel by following the instructions in "Removing the side panel" on page 49. 2 Remove the front bezel by following the instructions in "Removing the front bezel" on page 51. 69
-
 1
1 -
2
-
3
-
4
-
5
-
6
-
7
-
8
-
9
-
10
-
11
-
12
-
13
-
14
-
15
-
16
-
17
-
18
-
19
-
20
-
21
-
22
-
23
-
24
-
25
-
26
-
27
-
28
-
29
-
30
-
31
-
32
-
33
-
34
-
35
-
36
-
37
-
38
-
39
-
40
-
41
-
42
-
43
-
44
-
45
-
46
-
47
-
48
-
49
-
50
-
51
-
52
-
53
-
54
-
55
-
56
-
57
-
58
-
59
-
60
-
61
-
62
-
63
-
64
-
65
-
66
-
67
-
68
-
69
-
 70
70 -
 71
71 -
 72
72 -
 73
73 -
 74
74 -
 75
75 -
 76
76 -
 77
77 -
 78
78 -
 79
79 -
 80
80 -
81
-
82
-
83
-
84
-
85
-
86
-
87
-
88
-
89
-
90
-
91
-
92
-
93
-
94
-
95
-
96
-
97
-
98
-
99
-
100
-
101
-
102
-
103
-
104
-
105
-
106
-
107
-
108
-
109
-
110
-
111
-
112
-
113
-
114
-
115
-
116
-
117
-
118
-
119
-
120
-
121
-
122
-
123
-
124
-
125
-
126
-
127
-
128
-
129
-
130
-
131
-
132
-
133
-
134
-
135
-
136
-
137
-
138
-
139
-
140
-
141
-
142
-
143
-
144
-
145
-
146
-
147
-
148
-
149
-
150
-
151
-
152
-
153
-
154
-
155
-
156
-
157
-
158
-
159
-
160
-
161
-
162
-
163
-
164
 |
 |