HP 1320n HP LaserJet 1160 and 1320 Series - User Guide - Page 168
Testing the DIMM installation, Removing a DIMM, Turn off the power switch, and unplug the printer.
 |
UPC - 829160407364
View all HP 1320n manuals
Add to My Manuals
Save this manual to your list of manuals |
Page 168 highlights
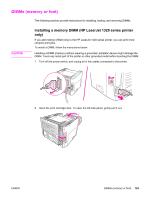
CAUTION Testing the DIMM installation To test the DIMM installation, print a configuration page, and check the Total Memory specified on the page. See Printer information pages for more information. If all lights on the control panel are blinking, the DIMM installation was unsuccessful. Remove the DIMM and reinstall it. Removing a DIMM To remove a DIMM, follow the instructions below: Handling a DIMM (memory) without wearing a grounded, antistatic device might damage the DIMM. Touch any metal part of the printer or other grounded metal before touching the DIMM. 1. Turn off the power switch, and unplug the printer. 2. Open the print cartridge door. To open the left side panel, gently pull it out. 158 Appendix D HP parts and accessories ENWW
-
 1
1 -
2
-
3
-
4
-
5
-
6
-
7
-
8
-
9
-
10
-
11
-
12
-
13
-
14
-
15
-
16
-
17
-
18
-
19
-
20
-
21
-
22
-
23
-
24
-
25
-
26
-
27
-
28
-
29
-
30
-
31
-
32
-
33
-
34
-
35
-
36
-
37
-
38
-
39
-
40
-
41
-
42
-
43
-
44
-
45
-
46
-
47
-
48
-
49
-
50
-
51
-
52
-
53
-
54
-
55
-
56
-
57
-
58
-
59
-
60
-
61
-
62
-
63
-
64
-
65
-
66
-
67
-
68
-
69
-
70
-
71
-
72
-
73
-
74
-
75
-
76
-
77
-
78
-
79
-
80
-
81
-
82
-
83
-
84
-
85
-
86
-
87
-
88
-
89
-
90
-
91
-
92
-
93
-
94
-
95
-
96
-
97
-
98
-
99
-
100
-
101
-
102
-
103
-
104
-
105
-
106
-
107
-
108
-
109
-
110
-
111
-
112
-
113
-
114
-
115
-
116
-
117
-
118
-
119
-
120
-
121
-
122
-
123
-
124
-
125
-
126
-
127
-
128
-
129
-
130
-
131
-
132
-
133
-
134
-
135
-
136
-
137
-
138
-
139
-
140
-
141
-
142
-
143
-
144
-
145
-
146
-
147
-
148
-
149
-
150
-
151
-
152
-
153
-
154
-
155
-
156
-
157
-
158
-
159
-
160
-
161
-
162
-
 163
163 -
 164
164 -
 165
165 -
 166
166 -
 167
167 -
 168
168 -
 169
169 -
 170
170 -
 171
171 -
 172
172 -
 173
173 -
174
-
175
-
176
-
177
-
178
-
179
-
180
-
181
-
182
-
183
-
184
 |
 |

Testing the DIMM installation
To test the DIMM installation, print a configuration page, and check the Total Memory
specified on the page. See
Printer
information
pages
for more information.
If all lights on the control panel are blinking, the DIMM installation was unsuccessful.
Remove the DIMM and reinstall it.
Removing a DIMM
To remove a DIMM, follow the instructions below:
CAUTION
Handling a DIMM (memory) without wearing a grounded, antistatic device might damage the
DIMM. Touch any metal part of the printer or other grounded metal before touching the DIMM.
1.
Turn off the power switch, and unplug the printer.
2.
Open the print cartridge door. To open the left side panel, gently pull it out.
158
Appendix D
HP parts and accessories
ENWW