HP 1320n HP LaserJet 1160 and 1320 Series - User Guide - Page 63
Printing on transparencies or labels, more than 75 transparencies at a time. - laserjet fuser
 |
UPC - 829160407364
View all HP 1320n manuals
Add to My Manuals
Save this manual to your list of manuals |
Page 63 highlights
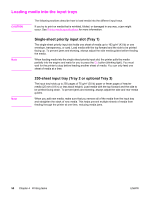
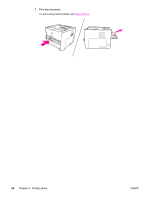
Printing on transparencies or labels CAUTION CAUTION Note Note Only use transparencies and labels that are recommended for use in laser printers, such as HP transparency film and HP LaserJet labels. See Printer media specifications for more information. Be sure to set the correct media type in the printer settings as instructed below. The printer adjusts the fuser temperature according to the media type setting. When printing on special media such as transparencies or labels, this adjustment prevents the fuser from damaging the media as it passes through the printer. Inspect the media to make sure that it is not wrinkled or curled and that it does not have any torn edges or missing labels. 1. Open the straight-through output door. 2. Before feeding the media, open the single-sheet priority input slot (Tray 1), and adjust the media guides to the width of the media. 3. Feed a single page in the single-sheet priority input slot (Tray 1). Make sure that the top of the media is forward and the side to be printed (rough side) is facing up. The media will partially feed into the printer, and the printer will pause. You can load multiple transparencies in the main input tray (Tray 2). However, do not load more than 75 transparencies at a time. 4. Access the printer Properties (or Printing Preferences in Windows 2000 and XP). See Printer Properties (driver) for instructions. 5. On the Paper/Quality tab or the Paper tab (the Paper Type/Quality tab for some Mac drivers), choose the correct media type. Not all printer features are available in all drivers or operating systems. See the printer Properties (driver) online Help for information about availability of features for that drivers. 6. Print the document. Remove the media from the back of the printer as it prints to prevent it from sticking together, and place the printed pages on a flat surface. ENWW Printing on transparencies or labels 53
-
 1
1 -
2
-
3
-
4
-
5
-
6
-
7
-
8
-
9
-
10
-
11
-
12
-
13
-
14
-
15
-
16
-
17
-
18
-
19
-
20
-
21
-
22
-
23
-
24
-
25
-
26
-
27
-
28
-
29
-
30
-
31
-
32
-
33
-
34
-
35
-
36
-
37
-
38
-
39
-
40
-
41
-
42
-
43
-
44
-
45
-
46
-
47
-
48
-
49
-
50
-
51
-
52
-
53
-
54
-
55
-
56
-
57
-
 58
58 -
 59
59 -
 60
60 -
 61
61 -
 62
62 -
 63
63 -
 64
64 -
 65
65 -
 66
66 -
 67
67 -
 68
68 -
69
-
70
-
71
-
72
-
73
-
74
-
75
-
76
-
77
-
78
-
79
-
80
-
81
-
82
-
83
-
84
-
85
-
86
-
87
-
88
-
89
-
90
-
91
-
92
-
93
-
94
-
95
-
96
-
97
-
98
-
99
-
100
-
101
-
102
-
103
-
104
-
105
-
106
-
107
-
108
-
109
-
110
-
111
-
112
-
113
-
114
-
115
-
116
-
117
-
118
-
119
-
120
-
121
-
122
-
123
-
124
-
125
-
126
-
127
-
128
-
129
-
130
-
131
-
132
-
133
-
134
-
135
-
136
-
137
-
138
-
139
-
140
-
141
-
142
-
143
-
144
-
145
-
146
-
147
-
148
-
149
-
150
-
151
-
152
-
153
-
154
-
155
-
156
-
157
-
158
-
159
-
160
-
161
-
162
-
163
-
164
-
165
-
166
-
167
-
168
-
169
-
170
-
171
-
172
-
173
-
174
-
175
-
176
-
177
-
178
-
179
-
180
-
181
-
182
-
183
-
184
 |
 |
