HP 695c (English) Windows Users Guide - C4562-60287 - Page 76
Caution
 |
View all HP 695c manuals
Add to My Manuals
Save this manual to your list of manuals |
Page 76 highlights
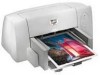
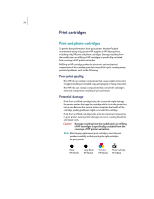
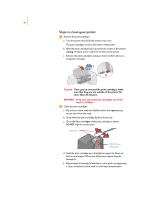
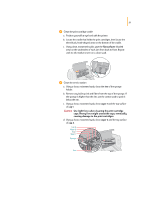
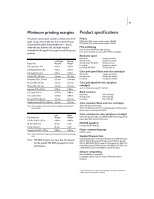
57 ᕣ Clean the print cartridge cradle a. Position yourself at eye level with the printer. b. Locate the cradle that holds the print cartridges, then locate the three black, hook-shaped arms on the bottom of the cradle. c. Using clean, moistened swabs, wipe the flat surfaces (shaded area) on the undersides of each arm from back to front. Repeat until no ink residue is seen on a clean swab. ᕤ Clean the service station a. Using a clean, moistened swab, clean the rim of the sponge holder. b. Remove any built-up ink and fibers from the top of the sponge. If the sponge is higher than the rim, use the cotton swab to push it below the rim. c. Using a clean, moistened swab, clean wiper 1 and the top surface of cap 1. Caution Use light force when cleaning the print cartridge caps. Heavy force might unseat the caps, eventually causing damage to the print cartridges. d. Using a clean, moistened swab, clean wiper 2 and the top surface of cap 2. Cap 2 Wiper 2 Cap 1 Wiper 1 Sponge Rim
-
 1
1 -
2
-
3
-
4
-
5
-
6
-
7
-
8
-
9
-
10
-
11
-
12
-
13
-
14
-
15
-
16
-
17
-
18
-
19
-
20
-
21
-
22
-
23
-
24
-
25
-
26
-
27
-
28
-
29
-
30
-
31
-
32
-
33
-
34
-
35
-
36
-
37
-
38
-
39
-
40
-
41
-
42
-
43
-
44
-
45
-
46
-
47
-
48
-
49
-
50
-
51
-
52
-
53
-
54
-
55
-
56
-
57
-
58
-
59
-
60
-
61
-
62
-
63
-
64
-
65
-
66
-
67
-
68
-
69
-
70
-
 71
71 -
 72
72 -
 73
73 -
 74
74 -
 75
75 -
 76
76 -
 77
77 -
 78
78 -
 79
79 -
 80
80 -
 81
81 -
82
-
83
-
84
-
85
-
86
-
87
-
88
-
89
-
90
-
91
-
92
-
93
-
94
-
95
 |
 |