HP A6430f Getting Started - Page 204
Watching TV programs stored on the HP Media Drive, settings, Recorder, Recorder Storage
 |
UPC - 883585738946
View all HP A6430f manuals
Add to My Manuals
Save this manual to your list of manuals |
Page 204 highlights
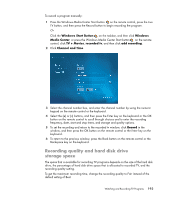
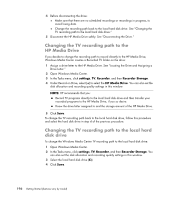
To change these settings: 1 Open Windows Media Center. 2 In the Tasks menu, click settings, TV, Recorder, and then Recorder Storage. 3 Under Recording quality and Maximum TV limit (storage for TV recordings), select the settings by clicking the (+) or (-) next to the item that you want to change. 4 Click Save. 5 In the Tasks menu, click settings, TV, Recorder, and then Recording Defaults. 6 Select the settings by clicking the (+) or (-) next to the item that you want to change. 7 Click Save. Quality of recording Best Better Good Fair Approximate hard disk drive space used* 2.7 GB/hour 2.1 GB/hour 1.4 GB/hour 1.2 GB/hour *This table shows approximate sizes of recorded TV program files. Some files might be smaller or larger. 1 GB = 1 billion bytes when referring to hard disk drive capacity. Actual formatted capacity is smaller. Watching TV programs stored on the HP Media Drive NOTE: Refer to Help and Support for more information about recording errors, advanced recording features, and TV settings. An HP Media Drive is purchased separately. To play recorded TV files that are stored on the HP Media Drive, you must: 1 Connect the HP Media Drive to the computer with the power turned off. 2 Turn on the computer, and then open Windows Media Center. 3 In the Tasks menu, click settings, TV, Recorder, and then Recorder Storage. 4 Under Record on drive, select the HP Media Drive, and then click Save. A Recorded TV folder is created and placed in the HP Media Drive. Recorded TV programs must be placed in this folder for you to access them by using Windows Media Center. NOTE: You must close Windows Media Center before removing or connecting the HP Media Drive for the stored TV files to update properly. 5 Under Record on drive, select the local hard disk drive, and then click Save. 194 Getting Started (features vary by model)
-
 1
1 -
2
-
3
-
4
-
5
-
6
-
7
-
8
-
9
-
10
-
11
-
12
-
13
-
14
-
15
-
16
-
17
-
18
-
19
-
20
-
21
-
22
-
23
-
24
-
25
-
26
-
27
-
28
-
29
-
30
-
31
-
32
-
33
-
34
-
35
-
36
-
37
-
38
-
39
-
40
-
41
-
42
-
43
-
44
-
45
-
46
-
47
-
48
-
49
-
50
-
51
-
52
-
53
-
54
-
55
-
56
-
57
-
58
-
59
-
60
-
61
-
62
-
63
-
64
-
65
-
66
-
67
-
68
-
69
-
70
-
71
-
72
-
73
-
74
-
75
-
76
-
77
-
78
-
79
-
80
-
81
-
82
-
83
-
84
-
85
-
86
-
87
-
88
-
89
-
90
-
91
-
92
-
93
-
94
-
95
-
96
-
97
-
98
-
99
-
100
-
101
-
102
-
103
-
104
-
105
-
106
-
107
-
108
-
109
-
110
-
111
-
112
-
113
-
114
-
115
-
116
-
117
-
118
-
119
-
120
-
121
-
122
-
123
-
124
-
125
-
126
-
127
-
128
-
129
-
130
-
131
-
132
-
133
-
134
-
135
-
136
-
137
-
138
-
139
-
140
-
141
-
142
-
143
-
144
-
145
-
146
-
147
-
148
-
149
-
150
-
151
-
152
-
153
-
154
-
155
-
156
-
157
-
158
-
159
-
160
-
161
-
162
-
163
-
164
-
165
-
166
-
167
-
168
-
169
-
170
-
171
-
172
-
173
-
174
-
175
-
176
-
177
-
178
-
179
-
180
-
181
-
182
-
183
-
184
-
185
-
186
-
187
-
188
-
189
-
190
-
191
-
192
-
193
-
194
-
195
-
196
-
197
-
198
-
 199
199 -
 200
200 -
 201
201 -
 202
202 -
 203
203 -
 204
204 -
 205
205 -
 206
206 -
 207
207 -
 208
208 -
 209
209 -
210
-
211
-
212
-
213
-
214
-
215
-
216
 |
 |