HP Pavilion zd8000 Getting Started - Enhanced for Accessibility - Page 9
Step 3: Connect the Modem, Start > Help and Support.
 |
View all HP Pavilion zd8000 manuals
Add to My Manuals
Save this manual to your list of manuals |
Page 9 highlights
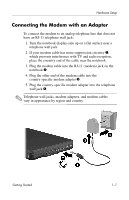
Hardware Setup Step 3: Connect the Modem Å WARNING: To reduce the risk of electric shock, disconnect the modem from the telephone network before accessing an internal compartment of the notebook. Internal compartments include the memory compartment, the battery bay, and the hard drive bay. To connect the modem so that you can register your notebook and operating system during software setup: ■ Follow the instructions in this section for connecting the modem to an analog telephone line. - or - ■ Follow the instructions provided by your Internet service provider (ISP) to connect the notebook to the Internet through a DSL (Digital Subscriber Line) modem, cable modem, or network connection. For more information about DSL, cable, and network connections, select Start > Help and Support. The Help and Support utility provides hardware and software information, instructions, tutorials, and wizards that can help you set up or troubleshoot a variety of connections. ✎ It may be easier to connect your modem to a telephone line now and set up another Internet connection later, after you have completed software setup. Wall jacks for analog telephone lines vary by country. ■ If you are connecting the modem to a telephone line in a country where RJ-11 telephone wall jacks are standard, see the following section "Connecting the Modem to an RJ-11 Jack." ■ If you are connecting the modem to a telephone line in a country where RJ-11 telephone wall jacks are not standard, see the section "Connecting the Modem with an Adapter," later in this chapter. Getting Started 1-5
-
 1
1 -
2
-
3
-
 4
4 -
 5
5 -
 6
6 -
 7
7 -
 8
8 -
 9
9 -
 10
10 -
 11
11 -
 12
12 -
 13
13 -
 14
14 -
15
-
16
-
17
-
18
-
19
-
20
-
21
-
22
-
23
-
24
-
25
-
26
-
27
-
28
-
29
-
30
-
31
-
32
-
33
-
34
-
35
-
36
-
37
-
38
-
39
-
40
-
41
-
42
-
43
-
44
-
45
-
46
-
47
-
48
-
49
-
50
-
51
-
52
-
53
-
54
-
55
-
56
-
57
-
58
-
59
-
60
-
61
-
62
-
63
-
64
-
65
-
66
 |
 |