HP Photosmart C4390 User Guide - Page 127
self-test report shows a problem, clean the print cartridges. If the problem persists
 |
View all HP Photosmart C4390 manuals
Add to My Manuals
Save this manual to your list of manuals |
Page 127 highlights
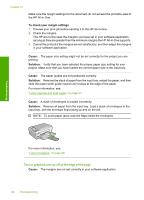
Chapter 13 self-test report shows a problem, clean the print cartridges. If the problem persists, you might need to replace the print cartridges. For more information, see: "Troubleshoot print cartridges" on page 95 Cause: The document you are printing contains an additional blank page. Solution: Open the document file in your software application and remove any extra pages or lines at the end of the document. Cause: The HP All-in-One picked up two sheets of paper. Solution: If the HP All-in-One has only a few sheets remaining, load more paper in the input tray. If there is plenty of paper in the input tray, remove the paper, tap the stack of paper against a flat surface, and reload the paper into the input tray. For more information, see: "Load full-size paper" on page 35 Cause: The protective plastic tape was only partially removed from the print cartridge. Solution: Check each print cartridge. The tape might have been removed from the copper-colored contacts, but still might cover the ink nozzles. If the tape is still covering the ink nozzles, carefully remove the tape from the print cartridges. Do not touch the ink nozzles or the copper-colored contacts. 1 Copper-colored contacts 2 Plastic tape with pink pull tab (must be removed before installing) 3 Ink nozzles under tape Troubleshooting 126 Troubleshooting
-
 1
1 -
2
-
3
-
4
-
5
-
6
-
7
-
8
-
9
-
10
-
11
-
12
-
13
-
14
-
15
-
16
-
17
-
18
-
19
-
20
-
21
-
22
-
23
-
24
-
25
-
26
-
27
-
28
-
29
-
30
-
31
-
32
-
33
-
34
-
35
-
36
-
37
-
38
-
39
-
40
-
41
-
42
-
43
-
44
-
45
-
46
-
47
-
48
-
49
-
50
-
51
-
52
-
53
-
54
-
55
-
56
-
57
-
58
-
59
-
60
-
61
-
62
-
63
-
64
-
65
-
66
-
67
-
68
-
69
-
70
-
71
-
72
-
73
-
74
-
75
-
76
-
77
-
78
-
79
-
80
-
81
-
82
-
83
-
84
-
85
-
86
-
87
-
88
-
89
-
90
-
91
-
92
-
93
-
94
-
95
-
96
-
97
-
98
-
99
-
100
-
101
-
102
-
103
-
104
-
105
-
106
-
107
-
108
-
109
-
110
-
111
-
112
-
113
-
114
-
115
-
116
-
117
-
118
-
119
-
120
-
121
-
 122
122 -
 123
123 -
 124
124 -
 125
125 -
 126
126 -
 127
127 -
 128
128 -
 129
129 -
 130
130 -
 131
131 -
 132
132 -
133
-
134
-
135
-
136
-
137
-
138
-
139
-
140
-
141
-
142
-
143
-
144
-
145
-
146
-
147
-
148
-
149
-
150
-
151
-
152
-
153
-
154
-
155
-
156
-
157
-
158
-
159
-
160
-
161
-
162
-
163
-
164
-
165
-
166
-
167
-
168
-
169
-
170
-
171
-
172
-
173
-
174
-
175
-
176
-
177
-
178
-
179
 |
 |
