HP Photosmart C4390 User Guide - Page 95
Clear paper jams, To clear a paper jam from the rear door, Start Copy Black, Start Copy Color
 |
View all HP Photosmart C4390 manuals
Add to My Manuals
Save this manual to your list of manuals |
Page 95 highlights
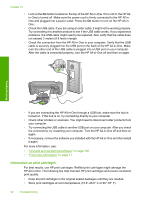
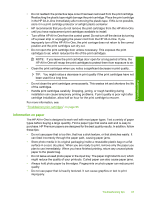
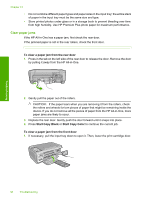
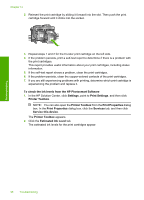
Chapter 13 • Do not combine different paper types and paper sizes in the input tray; the entire stack of paper in the input tray must be the same size and type. • Store printed photos under glass or in a storage book to prevent bleeding over time from high humidity. Use HP Premium Plus photo paper for maximum performance. Clear paper jams If the HP All-in-One has a paper jam, first check the rear door. If the jammed paper is not in the rear rollers, check the front door. To clear a paper jam from the rear door 1. Press in the tab on the left side of the rear door to release the door. Remove the door by pulling it away from the HP All-in-One. 2. Gently pull the paper out of the rollers. CAUTION: If the paper tears when you are removing it from the rollers, check the rollers and wheels for torn pieces of paper that might be remaining inside the device. If you do not remove all the pieces of paper from the HP All-in-One, more paper jams are likely to occur. 3. Replace the rear door. Gently push the door forward until it snaps into place. 4. Press Start Copy Black or Start Copy Color to continue the current job. To clear a paper jam from the front door 1. If necessary, pull the input tray down to open it. Then, lower the print cartridge door. Troubleshooting 94 Troubleshooting
-
 1
1 -
2
-
3
-
4
-
5
-
6
-
7
-
8
-
9
-
10
-
11
-
12
-
13
-
14
-
15
-
16
-
17
-
18
-
19
-
20
-
21
-
22
-
23
-
24
-
25
-
26
-
27
-
28
-
29
-
30
-
31
-
32
-
33
-
34
-
35
-
36
-
37
-
38
-
39
-
40
-
41
-
42
-
43
-
44
-
45
-
46
-
47
-
48
-
49
-
50
-
51
-
52
-
53
-
54
-
55
-
56
-
57
-
58
-
59
-
60
-
61
-
62
-
63
-
64
-
65
-
66
-
67
-
68
-
69
-
70
-
71
-
72
-
73
-
74
-
75
-
76
-
77
-
78
-
79
-
80
-
81
-
82
-
83
-
84
-
85
-
86
-
87
-
88
-
89
-
 90
90 -
 91
91 -
 92
92 -
 93
93 -
 94
94 -
 95
95 -
 96
96 -
 97
97 -
 98
98 -
 99
99 -
 100
100 -
101
-
102
-
103
-
104
-
105
-
106
-
107
-
108
-
109
-
110
-
111
-
112
-
113
-
114
-
115
-
116
-
117
-
118
-
119
-
120
-
121
-
122
-
123
-
124
-
125
-
126
-
127
-
128
-
129
-
130
-
131
-
132
-
133
-
134
-
135
-
136
-
137
-
138
-
139
-
140
-
141
-
142
-
143
-
144
-
145
-
146
-
147
-
148
-
149
-
150
-
151
-
152
-
153
-
154
-
155
-
156
-
157
-
158
-
159
-
160
-
161
-
162
-
163
-
164
-
165
-
166
-
167
-
168
-
169
-
170
-
171
-
172
-
173
-
174
-
175
-
176
-
177
-
178
-
179
 |
 |
