HP t505 ThinPro 4.3 Administrator s Guide
HP t505 Manual
 |
View all HP t505 manuals
Add to My Manuals
Save this manual to your list of manuals |
HP t505 manual content summary:
- HP t505 | ThinPro 4.3 Administrator s Guide - Page 1
HP ThinPro 4.3 Administrator's Guide Document Part Number: 727357-002 Edition: Second Edition: May 2013, First Edition: February 2013 - HP t505 | ThinPro 4.3 Administrator s Guide - Page 2
Computer Software, Computer Software Documentation, and Technical Data for Commercial Items are licensed to the U.S. Government under vendor's standard commercial license. The information contained herein is subject to change without notice. The only warranties for HP products and services are - HP t505 | ThinPro 4.3 Administrator s Guide - Page 3
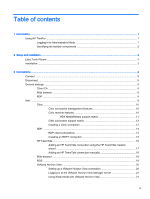
of contents 1 Introduction ...1 Using HP ThinPro ...1 Logging in to Administrative Mode 1 Identifying the taskbar components 2 2 Setup and installation ...3 Easy Tools Wizard ...3 Installation ...3 3 Connections ...4 Connect ...5 Disconnect ...5 General settings ...5 Citrix ICA ...5 Web browser - HP t505 | ThinPro 4.3 Administrator s Guide - Page 4
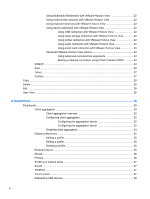
client aggregation 32 Configuring the aggregation clients 32 Configuring the aggregation server 32 Disabling client aggregation 34 Display preferences ...35 Adding a profile 35 Editing a profile 36 Deleting a profile 36 Keyboard layout ...36 Mouse ...36 Printers ...36 SCIM input method setup - HP t505 | ThinPro 4.3 Administrator s Guide - Page 5
Factory reset ...45 HP Automatic Update ...45 HPDM Agent ...45 SSHD Manager ...45 ThinState ...46 Manage the HP ThinPro image 46 Capture HP ThinPro image to an FTP server 46 Deploy HP ThinPro image from a remote site 46 Capture HP ThinPro image to a bootable USB flash drive 47 Deploy HP ThinPro - HP t505 | ThinPro 4.3 Administrator s Guide - Page 6
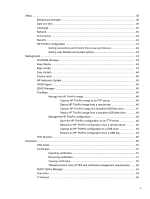
Keyboard shortcuts ...54 5 System Information ...56 General ...56 Network ...57 Net tools ...57 Software information ...58 System logs ...58 Index ...59 vi - HP t505 | ThinPro 4.3 Administrator s Guide - Page 7
HP ThinPro interface. When the thin client is in Administrative Mode, the following changes occur: ● The top section of the control center changes from blue to red. ● The title adds the text "Administrative Mode". By default, HP ThinPro opens in User Mode. To switch to Administrative Mode: Using HP - HP t505 | ThinPro 4.3 Administrator s Guide - Page 8
1. Click the HP logo in the bottom left of the screen. -or- Position your cursor over the screen background and right-click. 2. Select Administrator/User Mode Switch. 3. In the Switch to Administration Mode box, under Administrative password, type a password and click OK. NOTE: If you are logging in - HP t505 | ThinPro 4.3 Administrator s Guide - Page 9
Easy Tools thin client management suite is documented in the HP Easy Tools Administrator's Guide which can be found at http://www.hp.com/support. Installation Once you have set up and configured a thin client, copy that image or configuration and deploy it to other thin clients of identical model - HP t505 | ThinPro 4.3 Administrator s Guide - Page 10
and manage remote connections. To access all HP ThinPro functionality, you must log in as an Administrator. As a User, you can only run connections and have limited access to HP ThinPro functionality. The HP ThinPro display, when configured, lists all server and/or application connections assigned - HP t505 | ThinPro 4.3 Administrator s Guide - Page 11
processing power and multimedia capability of the thin client. Enable Windows Alert Sound Enable the Windows alert sound. ICA Acceleration (LAN Only) Enable ICA Acceleration. Allow Backing Store Allow for backing store. Use Server Redraw Use the server's redraw functionality. Disable Info - HP t505 | ThinPro 4.3 Administrator s Guide - Page 12
from the thin client. Auto Printer Creation Automatically create a printer. Drive Mapping Enable Drive Mapping Allows you to specify drive mappings to local paths. Table 3-3 Citrix ICA connection window options Option Enable Seamless Window Default Window Size Default Window Colors Default 256 - HP t505 | ThinPro 4.3 Administrator s Guide - Page 13
box applies to Citrix servers using multiple published resources. If applicable to your system, use the Auto Logout Delay to set the number of seconds between the closing of the last Xen published resource and the time that a user automatically logs out and returns to the initial login screen. If - HP t505 | ThinPro 4.3 Administrator s Guide - Page 14
published application or desktop. If applicable to your system, use the Auto Logout Delay with Single App box to set the number of seconds between the closing of a Xen published resource and the time that a user automatically logs out and returns to the initial login screen. NOTE: Citrix processing - HP t505 | ThinPro 4.3 Administrator s Guide - Page 15
general options Option Description Send hostname as Send your thin client's MAC address or hostname as the hostname specified to the remote system. Multimedia Redirection Select 1 to enable multimedia redirection. Select 0 to disable multimedia redirection. Add The Add button is used to - HP t505 | ThinPro 4.3 Administrator s Guide - Page 16
) services. Configure a Citrix remote connection with the connection wizard. If the default values do not meet your requirements, use the extended options to complete the connection setup process. Citrix connection management features When using a Citrix connection, you can configure the client to - HP t505 | ThinPro 4.3 Administrator s Guide - Page 17
-accelerated on most models) ● HDX Flash Redirection (x86-only) ● HDX Webcam Compression ● HDX RealTime (MS Lync Optimization) (x86-only) HDX MediaStream support matrix Table 3-11 HDX MediaStream support matrix Feature Support Frame rate ● 24 fps Resolution ● 1080p ● 720p Video containers - HP t505 | ThinPro 4.3 Administrator s Guide - Page 18
Fully Qualified Domain Name (FQDN) of the site and the local root certificate in the Citrix certificate store. 2. In the HP ThinPro interface, log in as the administrator. 3. Under Connections, select Add > Citrix. 4. In the Configuration dialog box, fill in the following information: Table 3-13 - HP t505 | ThinPro 4.3 Administrator s Guide - Page 19
USB devices on page 38 for instructions. RDP Microsoft Remote Desktop Protocol (RDP) enables Windows-based applications to communicate over network connections. It is installed on all versions of Windows later than Windows NT. RDP client connections The RDP client is based on FreeRDP 1.0 and - HP t505 | ThinPro 4.3 Administrator s Guide - Page 20
Password Type the password for this network connection. Domain Type the domain name for this network connection. Allow smart card login Mode, select one of the following options: a. Standard Desktop b. Remote Application c. Alternate Shell 6. Depending on the mode sure that HP ThinPro does - HP t505 | ThinPro 4.3 Administrator s Guide - Page 21
b. Remote Application-Specify the Application box as described in the RDP Application options table. Table 3-17 RDP Application options Option Description Application Type the RDP application path for the application. If using RDP Seamless Windows mode, do the following: ● Type the path of the - HP t505 | ThinPro 4.3 Administrator s Guide - Page 22
) Option Enable encryption Force bitmap updates Attach to admin console Hostname to send Description Enables encryption for this connection. Forces bitmap updates. Attaches the connection to the administrator console port. Sends the hostname to the remote system for this connection. 9. Under Local - HP t505 | ThinPro 4.3 Administrator s Guide - Page 23
to continue. 4. Set the desired advanced options. Table 3-23 HP TeemTalk advanced options Option Description Emulation Printer The HP TeemTalk emulation printer settings. Auto Logon The HP TeemTalk auto login settings. Key Macros The HP TeemTalk key macros settings. Mouse Actions The - HP t505 | ThinPro 4.3 Administrator s Guide - Page 24
your settings and close the wizard. Adding an HP TeemTalk connection manually 1. Click Connections > Add. 2. Select HP TeemTalk and set the appropriate configuration options: Table 3-27 HP TeemTalk manual connection configuration settings Option Description Name The connection name. System - HP t505 | ThinPro 4.3 Administrator s Guide - Page 25
RGS, see the HP Remote Graphics Software User Guide. Table 3-29 New RGS connection configuration settings Option Description Name The connection name. Mode - Servers Select one of the RGS connection modes, either Normal Mode or Directory Mode. If you select Normal Mode, type the hostname - HP t505 | ThinPro 4.3 Administrator s Guide - Page 26
IP address, of a remote VMware Horizon View server. Username The username to use for the connection. Password The password to use for the Card login Allows a locally-connected smart card to provide login credentials. Close after disconnect Closes the VMware Horizon View window after HP - HP t505 | ThinPro 4.3 Administrator s Guide - Page 27
+Alt+End. To set up a Kiosk mode login: 1. As the administrator, select Connections on the HP ThinPro desktop. 2. Choose a connection and click Edit. 3. Under Network, fill in the following settings: a. Server name (hostname or IP address) b. Username c. Password d. Domain e. Desktop (if applicable - HP t505 | ThinPro 4.3 Administrator s Guide - Page 28
to the client. The file system format of the storage being remoted does not matter. For example, an ext3-formatted USB key can be used on a Windows connection. Using printer redirection with VMware Horizon View For connections made with the PCoIP protocol, USBR supports printers. 22 Chapter - HP t505 | ThinPro 4.3 Administrator s Guide - Page 29
again. NOTE: To log in to the VMware Horizon View Manager administrator server with a smart card, the local smart card driver must be installed on the client. Once logged in to the remote host, the smart card will be passed to the remote host using a virtual channel, not USBR This virtual channel - HP t505 | ThinPro 4.3 Administrator s Guide - Page 30
USB devices on page 38 for instructions. XDMCP XDMCP is a way to connect directly to remote X servers. X servers are used to display graphics on most UNIX-like operating systems, such as Linux, Berkeley Software Distribution (BSD), and Hewlett Packard UniX (HP-UX). 1. To add an XDMCP connection - HP t505 | ThinPro 4.3 Administrator s Guide - Page 31
a remote X font server instead of locally installed fonts. Font server Font server is not enabled unless the Use font server option is checked. Configure display Click to set the display configuration for the XDM connection. If you do not set this configuration, the default configuration will - HP t505 | ThinPro 4.3 Administrator s Guide - Page 32
Table 3-33 New SSH connection configuration settings (continued) Option Description Background color The default color of the background in the SSH session. Font Valid options are: 7X14, 5X7, 5X8, 6X9, 6X12, 7X13, 8X13, 8X16, 9X15, 10X20, and 12X24. Click - HP t505 | ThinPro 4.3 Administrator s Guide - Page 33
configuration options: Table 3-34 New Telnet connection configuration settings Option Description Name The name of the connection. Address The IP address of the remote to install a custom Linux application, you can use the Custom connection to allow you to open this application through the - HP t505 | ThinPro 4.3 Administrator s Guide - Page 34
that connection opens. 2. Edit the connection and click Apply. 3. Click OK. User View NOTE: This feature is available only in the Administrative Mode. 1. To select connections to be visible in the User Mode, click User View. The Allow and Deny buttons appear above the Connection Name bar. 2. Select - HP t505 | ThinPro 4.3 Administrator s Guide - Page 35
Panel items can be modified while in Administrator Mode by using the Setup tab and then the HP ThinPro Configuration tool. Peripherals These utilities allow you to configure your peripherals. The following utilities are available on this tab: ● Client aggregation on page 30 ● Display preferences on - HP t505 | ThinPro 4.3 Administrator s Guide - Page 36
hardware or software. Client aggregation overview Assume that you have four thin clients, each with 4 monitors. Using the Display Preferences dialog, the thin clients and their monitors are configured as shown-each thin client is configured with a 2x2 array of monitors. Client aggregation allows - HP t505 | ThinPro 4.3 Administrator s Guide - Page 37
of the monitors. In this configuration, moving the mouse pointer off the right side of the thin client A monitors will cause it to appear on the upper 1/3 of the left side of the thin client D monitors. Similarly, moving the mouse pointer off the right side of the thin client B monitors will cause - HP t505 | ThinPro 4.3 Administrator s Guide - Page 38
software is also installed on the HP dc72 Blade Workstation Client and the HP dc73 Blade Workstation Client (running Embedded OS versions 9.xx and 10.xx), these client computers can be interconnected to the HP gt7725 Thin Client in client aggregation configurations. Configuring client aggregation - HP t505 | ThinPro 4.3 Administrator s Guide - Page 39
3. The aggregation server thin client is displayed in a purple box that contains its hostname. Click and drag the aggregation server to the desired location in the 4x4 grid. In the following figure, the aggregation server thin client is positioned in the first row, second column of the 4x4 grid. - HP t505 | ThinPro 4.3 Administrator s Guide - Page 40
. Once the aggregation clients and the aggregation server have been configured, they automatically attempt to establish encrypted communications with each other. Click Status to view the connection status between computers. Disabling client aggregation To disable client aggregation: 34 Chapter - HP t505 | ThinPro 4.3 Administrator s Guide - Page 41
resolution or bit depth in order to function properly ● The administrator wants to standardize on one display profile, even though there are many different monitors across the organization ● One or more users run applications that require their monitor to be rotated (portrait versus landscape mode - HP t505 | ThinPro 4.3 Administrator s Guide - Page 42
Keyboard Shortcuts to minimize the number of keyboard shortcuts mapped to the thin client, if desired. 5. Click OK to save your changes and close Printers This Control Panel item starts the CUPS printer configuration tool. For more details, see http://cyberelk.net/tim/software/system-config-printer - HP t505 | ThinPro 4.3 Administrator s Guide - Page 43
box. ThinPrint To use ThinPrint: 1. Double-click ThinPrint. 2. Set the Bandwidth, Packet Size, and Printer settings for each printer. 3. Click OK. Touch screen Touch Screen allows you to operate the thin client by touching the display screen. To enable the touch screen: 1. Double-click Touch Screen - HP t505 | ThinPro 4.3 Administrator s Guide - Page 44
client, log in as the Administrator. 2. In the Control Panel, double-click USB Manager. 3. Select one of the following remote protocols: ● Citrix ● Local ● RDP ● VMware Horizon View HP ThinPro configuration on page 43 Background manager Use HP Background Manager to change the desktop background image - HP t505 | ThinPro 4.3 Administrator s Guide - Page 45
restore the default background images, select Restore Default and click Apply . 6. To save your changes and close the HP Linux Timezone ◦ Windows Timezone 3. If desired, display week numbers in the calendar by clicking Show Week Numbers under Time Servers in the Time Settings screen. 4. To manually - HP t505 | ThinPro 4.3 Administrator s Guide - Page 46
To configure network settings: 1. In the HP ThinPro Control Panel, double-click Network. 2. Configure the Wired tab: a. Enable IPv6-Enables the IPv6 connection. The default is IPv4. b. Ethernet Speed-List of Link speed/Duplex mode pairings available. c. Connection Method-Option to use Auto or - HP t505 | ThinPro 4.3 Administrator s Guide - Page 47
of private key ◦ Identity-User's identity string ◦ Private Key Password-User's key password 3. Configure the DNS tab: ● Hostname-Hostname of the thin client ● DNS Server-DNS Server name ● Search Domains-Domain to which the thin client belongs ● HTTP Proxy-Proxy to be used for HTTP communications - HP t505 | ThinPro 4.3 Administrator s Guide - Page 48
password. 3. Type the new password in the New password and Confirmation fields and click OK. 4. If you wish to force a login, enable the Must login to access desktop option. 5. Click OK. NOTE: It is strongly recommended that you change both the user and administrator passwords from their default - HP t505 | ThinPro 4.3 Administrator s Guide - Page 49
tools that can help you manage a thin client network. The following utilities are available on the Management tab: ● AD/DDNS Manager on page 44 ● Easy Deploy on page 44 ● Easy Config on page 44 ● Easy Update on page 44 ● Factory reset on page 45 ● HP Automatic Update on page 45 ● HPDM Agent - HP t505 | ThinPro 4.3 Administrator s Guide - Page 50
thin client to an Organizational Unit of the Active Directory Server, and to enable automatic Dynamic DNS updates of the thin client Administrator User Name ● Administrator User Password 3. Click Update Dynamic DNS from client the HP Easy Tools Administrator's Guide at http://www.hp.com/support for - HP t505 | ThinPro 4.3 Administrator s Guide - Page 51
Factory reset In Factory Reset, you can ● Save the current configuration ● Restore the factory settings ● Restore the factory image To access these functions: 1. Double-click Factory Reset. 2. Click the button that will accomplish the task you desire. HP Automatic Update To configure HP Automatic - HP t505 | ThinPro 4.3 Administrator s Guide - Page 52
administrator from within the thin client image. What do I need to have? ● An HP-approved USB flash drive (also referred to as a USB key) ● An HP Thin Client unit that contains the latest HP-provided HP ThinPro image Manage the HP ThinPro image HP ThinState allows you to: ● Capture HP ThinPro image - HP t505 | ThinPro 4.3 Administrator s Guide - Page 53
Next. 4. Click create a bootable USB flash drive, and then click Next. 5. Attach a USB flash drive to the thin client. Select the USB key and click Finish. When the image capture begins, all applications stop and a new window appears showing the copy progress. If a problem occurs, click Details for - HP t505 | ThinPro 4.3 Administrator s Guide - Page 54
HP ThinPro image capture is complete. Deploy HP ThinPro image from a bootable USB flash drive To install an HP ThinPro image from a bootable USB flash drive: 1. Turn off the target thin client. 2. Insert the bootable USB flash drive. 3. Turn on the thin client. The screen remains black for 10-15 - HP t505 | ThinPro 4.3 Administrator s Guide - Page 55
. Type the remote server information in the fields. NOTE: Username and Password are not required if you are using HTTP protocol. 6. Click Finish. The HP ThinPro configuration restoration is complete. Capture an HP ThinPro configuration to a USB drive 1. Attach a USB key to the thin client. 2. Double - HP t505 | ThinPro 4.3 Administrator s Guide - Page 56
field. 4. Click OK to save your changes and close the dialog box. NOTE: CDA mode can also be enabled by configuring DHCP tag 191 as a string whose value is the URL to the Citrix environment. To disable CDA mode: 1. Press Ctrl+Alt+End to minimize Web Browser. 2. Click Control Panel > Advanced > CDA - HP t505 | ThinPro 4.3 Administrator s Guide - Page 57
Certificates Use the Certificate Manager to easily import, view, or remove certificates. Importing certificates This section describes how to import certificates from a URL or file. To import certificates: 1. In the HP ThinPro Control Panel, double-click Certificates. 2. In the Certificate Manager, - HP t505 | ThinPro 4.3 Administrator s Guide - Page 58
View HTTPS and certificate management requirements VMware Horizon View Client 1.5 and VMware Horizon View Server 5.0 and later require HTTPS. By default, the VMware Horizon View client HP recommends that a signed certificate verified by a standard trusted root CA be used on the VMware Horizon View - HP t505 | ThinPro 4.3 Administrator s Guide - Page 59
server without being prompted or required to do any configuration. If using an internal CA, the VMware Horizon View client connection returns an error until you complete one of the following tasks: ● In Administrator Mode, under Control Panel > Advanced, select Certificates. Then, import the - HP t505 | ThinPro 4.3 Administrator s Guide - Page 60
you can learn more about how that option is used, both on the thin client and on the DHCP server. The drop-down list in the lower left corner Text Editor. X Terminal To access the command line of the local thin client: ▲ Double-click X Terminal. Keyboard shortcuts Keyboard Shortcuts allows the user - HP t505 | ThinPro 4.3 Administrator s Guide - Page 61
i. Click Command if you would like to edit the command. Enter in the comment or Select from directory and browse for the program/action you would like to run. ii. Click Shortcut if you would like to edit the shortcut. Perform the key combination you would like to trigger this new program/action you - HP t505 | ThinPro 4.3 Administrator s Guide - Page 62
on page 57 ● Net tools on page 57 ● Software information on page 58 ● System logs on page 58 General The General tab displays the following information: ● BIOS (Basic Input/Output System) and OS (operating system) ◦ Serial Number ◦ BIOS Version ◦ BIOS Release Date ◦ OS Build ID ◦ OS Kernel Version - HP t505 | ThinPro 4.3 Administrator s Guide - Page 63
Speed ◦ Processor ● Flash and Memory ◦ Free ◦ Used ◦ Installed Network The Network tab displays the following information: ● Interface ◦ Name ◦ State ◦ Type ◦ IP Address ◦ Network Mask ◦ MAC (Media Access Control) Address ◦ DHCP Server Address ◦ Interface Statistics ● Network ◦ Default Gateway ● DNS - HP t505 | ThinPro 4.3 Administrator s Guide - Page 64
4. Click Start Process. 5. To clear the diagnostic log, click Clear Log. Software information The Software Information tab displays the name and version of the main software installed. System logs The System Logs display log information. ● DHCP Wired Leases-Displays a log on lease information on the - HP t505 | ThinPro 4.3 Administrator s Guide - Page 65
view 28 Control Panel 29 Active Directory manager 44 AD/DDNS Manager 44 advanced utilities 50 Agent Configure Manager 45 CDA mode 50 client aggregation 30 date and time 39 DHCP Option Manager 54 display preferences 35 Dynamic Domain Name System manager 44 Easy Config 44 Easy Update 44 factory reset - HP t505 | ThinPro 4.3 Administrator s Guide - Page 66
ThinPro, installation 3 ThinState 46 capture thin client configuration to USB drive 49 capture ThinPro image to FTP server 46 capture ThinPro image to USB flash drive 47 deploy ThinPro image from a Remote Site 46 deploy ThinPro image from USB flash drive 48 manage HP ThinPro configuration 48 manage
-
 1
1 -
 2
2 -
 3
3 -
 4
4 -
 5
5 -
 6
6 -
 7
7 -
8
-
9
-
10
-
11
-
12
-
13
-
14
-
15
-
16
-
17
-
18
-
19
-
20
-
21
-
22
-
23
-
24
-
25
-
26
-
27
-
28
-
29
-
30
-
31
-
32
-
33
-
34
-
35
-
36
-
37
-
38
-
39
-
40
-
41
-
42
-
43
-
44
-
45
-
46
-
47
-
48
-
49
-
50
-
51
-
52
-
53
-
54
-
55
-
56
-
57
-
58
-
59
-
60
-
61
-
62
-
63
-
64
-
65
-
66
 |
 |

Document Part Number: 727357-002
Edition: Second Edition: May 2013, First Edition: February 2013
HP ThinPro 4.3
Administrator's Guide