HP t505 ThinPro 4.3 Administrator s Guide - Page 20
Alternate Shell, Connections, Network, Window and Mode
 |
View all HP t505 manuals
Add to My Manuals
Save this manual to your list of manuals |
Page 20 highlights
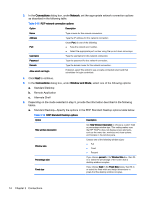
3. In the Connections dialog box, under Network, set the appropriate network connection options as described in the following table. Table 3-15 RDP network connection options Option Description Name Type a name for this network connection. Address Type the IP address for this network connection. Under Port, do one of the following: Port ● Type the network port number. ● Select the appropriate port number using the up and down arrow keys. Username Type the username for this network connection. Password Type the password for this network connection. Domain Type the domain name for this network connection. Allow smart card login If desired, select this option to use a locally-connected smart card that substitutes for login credentials. 4. Click Next to continue. 5. In the Connections dialog box, under Window and Mode, select one of the following options: a. Standard Desktop b. Remote Application c. Alternate Shell 6. Depending on the mode selected in step 5, provide the information described in the following tables. a. Standard Desktop-Specify the options in the RDP Standard Desktop options table below. Table 3-16 RDP Standard Desktop options Option Description Hide window decoration Set Hide Window Decoration to choose a custom fixed or percentage window size. This setting makes sure that HP ThinPro does not display screen elements, such as the menu bar, minimize and close options, and borders in the window pane. Window size Choose one of the following window sizes: ● Full ● Fixed ● Percent Percentage size If you choose percent in the Window Size box, then fillin or select the percentage of the screen that a desktop window occupies. Fixed size If you choose fixed in the Fixed Size boxes, then fill-in or select the fixed width and height dimensions in pixels that the desktop window occupies. 14 Chapter 3 Connections
-
 1
1 -
2
-
3
-
4
-
5
-
6
-
7
-
8
-
9
-
10
-
11
-
12
-
13
-
14
-
 15
15 -
 16
16 -
 17
17 -
 18
18 -
 19
19 -
 20
20 -
 21
21 -
 22
22 -
 23
23 -
 24
24 -
 25
25 -
26
-
27
-
28
-
29
-
30
-
31
-
32
-
33
-
34
-
35
-
36
-
37
-
38
-
39
-
40
-
41
-
42
-
43
-
44
-
45
-
46
-
47
-
48
-
49
-
50
-
51
-
52
-
53
-
54
-
55
-
56
-
57
-
58
-
59
-
60
-
61
-
62
-
63
-
64
-
65
-
66
 |
 |
