HP t505 ThinPro 4.3 Administrator s Guide - Page 25
Web browser, RGS, Connections > Add, Finish, Connections > Add > RGS
 |
View all HP t505 manuals
Add to My Manuals
Save this manual to your list of manuals |
Page 25 highlights
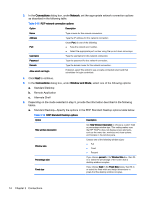
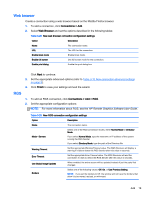
Web browser Create a connection using a web browser based on the Mozilla Firefox browser. 1. To add a connection, click Connections > Add. 2. Select Web Browser and set the options described in the following tables: Table 3-28 New web browser connection configuration settings Option Description Name The connection name. URL The URL for the connection. Enable kiosk mode Enable kiosk mode. Enable full screen Use full screen mode for the connection. Enable print dialog Enable the print dialog box. Click Next to continue. 3. Set the appropriate advanced options (refer to Table 3-10 New connection advanced settings on page 9). 4. Click Finish to save your settings and exit the wizard. RGS 1. To add an RGS connection, click Connections > Add > RGS. 2. Set the appropriate configuration options: NOTE: For more information about RGS, see the HP Remote Graphics Software User Guide. Table 3-29 New RGS connection configuration settings Option Description Name The connection name. Mode - Servers Select one of the RGS connection modes, either Normal Mode or Directory Mode. If you select Normal Mode, type the hostname or IP address of the system running the RGS Sender. If you select Directory Mode, type the path of the Directory file. Warning Timeout Set the appropriate Warning Timeout value. The RGS Receiver will display a warning if it fails to detect the RGS Sender after this value in seconds. Error Timeout Set the appropriate Error Timeout value. The RGS Receiver will end the connection if it fails to detect the RGS Sender after this value in seconds. Use Global Image Updates When enabled, the entire screen will be updated instead of just the parts that changed. Borders Select one of the following values: Off, On, or Use Previous Setting. NOTE: If you set the borders to Off, the window will not have the borders that allow it to be moved, resized, or minimized. Add 19
-
 1
1 -
2
-
3
-
4
-
5
-
6
-
7
-
8
-
9
-
10
-
11
-
12
-
13
-
14
-
15
-
16
-
17
-
18
-
19
-
 20
20 -
 21
21 -
 22
22 -
 23
23 -
 24
24 -
 25
25 -
 26
26 -
 27
27 -
 28
28 -
 29
29 -
 30
30 -
31
-
32
-
33
-
34
-
35
-
36
-
37
-
38
-
39
-
40
-
41
-
42
-
43
-
44
-
45
-
46
-
47
-
48
-
49
-
50
-
51
-
52
-
53
-
54
-
55
-
56
-
57
-
58
-
59
-
60
-
61
-
62
-
63
-
64
-
65
-
66
 |
 |
