Hitachi CMP420V1 Owners Guide
Hitachi CMP420V1 - 42" Plasma Panel Manual
 |
View all Hitachi CMP420V1 manuals
Add to My Manuals
Save this manual to your list of manuals |
Hitachi CMP420V1 manual content summary:
- Hitachi CMP420V1 | Owners Guide - Page 1
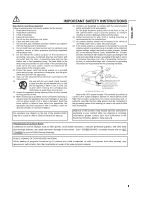
Color Plasma Display Monitor Model PW1A CMP420V1 CMP420V2 USER'S MANUAL MANUEL UTILISATEUR MANUAL DE USUARIO READ THE INSTRUCTIONS INSIDE CAREFULLY. KEEP THIS USER'S MANUAL FOR FUTURE REFERENCE. For future reference, record the serial number of your monitor. SERIAL NO. The serial number is located - Hitachi CMP420V1 | Owners Guide - Page 2
Les particularités de l'écran couleur à plasma sont les suivantes. Les informations contenues déposée d'une organisation sans but lucratif, La Video Electronics Standard Association. Toutes les marques ou noms de los errores que puedan aparecer en este manual. RECONOCIMIENTO DE MARCAS VGA y XGA son - Hitachi CMP420V1 | Owners Guide - Page 3
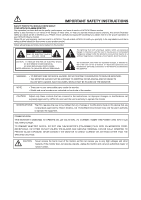
Thank you very much for purchasing the HITACHI Plasma Display Monitor. Before using your monitor, please carefully read the "SAFETY INSTRUCTIONS" and this "USER'S MANUAL" so you will know how to operate the monitor properly. Keep this manual in a safe place. You will find it useful in the future - Hitachi CMP420V1 | Owners Guide - Page 4
of your HITACHI Plasma monitor. Please fill out your warranty card and mail it to HITACHI. This will enable HITACHI to notify you promptly in the improbable event that a safety problem should be discovered in your product model. Follow all warnings and instructions marked on this monitor. The - Hitachi CMP420V1 | Owners Guide - Page 5
any way, such as power-supply cord or plug is damaged, liquid has been spilled or objects have fallen into apparatus, the apparatus has been exposed to rain or moisture, does not operate normally, or has been dropped. Do not place any objects on the top of the monitor which may fall or cause - Hitachi CMP420V1 | Owners Guide - Page 6
input terminal, or video output terminal. Options Ask your local retail dealer for further details. 1. Desktop stand: • CMPAD05B(for CMP420V1) • CMPAD05 (for CMP420V2) 2. Plasma monitor speaker: • CMPAS14W(for CMP420V1) 2 way speaker unit with one • CMPAS14V(for CMP420V2) 2.5cm dome type - Hitachi CMP420V1 | Owners Guide - Page 7
of Multiple Monitors 19 Using the Menu Screen 19 PICTURE MENU 20 AUDIO MENU 21 TIMER MENU 21 FUNCTION MENU 22 SETUP MENU 23 LANGUAGE MENU 24 OTHER FEATURES 24 Automatic Store 24 Signal Check 25 Power Save Mode 25 IMAGE RETENTION OF PLASMA DISPLAY ......26 NOTES 26 TROUBLESHOOTING 27 - Hitachi CMP420V1 | Owners Guide - Page 8
Never block ventilation openings. • Do not put the plasma screen side up. • Do not cover the monitor with a tablecloth, etc. • Do not place the monitor on a carpet or bedding, or near a curtain. Use only the correct power outlet. Incorrect power supply could result in fire or electrical shock. Use - Hitachi CMP420V1 | Owners Guide - Page 9
INSTRUCTIONS(continued) ENGLISH WARNING Be cautious of the power cord connection. Incorrect connection of the power cord could result in fire or electrical shock. • Do not touch the power cord with a wet hand. • Check that the connecting portion of the power in the manual of this monitor. • Make - Hitachi CMP420V1 | Owners Guide - Page 10
down the contrast and brightness controls. • How to clean the plasma screen panel of the monitor Before cleaning the monitor, turn off the monitor and disconnect the power plug from the power outlet. To prevent scratching or damaging the plasma screen face, do not knock or rub the surface with sharp - Hitachi CMP420V1 | Owners Guide - Page 11
off all other equipment other than the monitor. If you find a problem receiving Radio when using the monitor, check the instructions mentioned above. • Precautions for the cable connection - Do ensure that all connections, (including the power plug, extension leads and interconnections between the - Hitachi CMP420V1 | Owners Guide - Page 12
an experienced radio / TV technician for help. Instructions to Users : This equipment Part 2 and 15 for Class B Personal Computers and Peripherals; and / or CPU Boards and Power Supplies used with Class B Personal Computers: We: Hitachi Plasma Display Monitor Model Number: CMP420V PW1A ( = 0 9,A Z - Hitachi CMP420V1 | Owners Guide - Page 13
on both sides for stability. Handgrips Handgrips External speaker terminals Remote-control receiver Indicating lamp • The main power switch is located at the back, on the lower surface. Main power switch Rear Handgrips External speaker terminals External device connection terminals RGB input - Hitachi CMP420V1 | Owners Guide - Page 14
COMPONENT NAMES (continued) Remote control POWER OFF button POWER ON button MUTE button RGB/VIDEO buttons PinP button AUTO button MENU button OK button ID button VOL RGB 1 RGB 2 MUTE VOL AV1 AV2 AV3 AV4 AUTO PinP SIZE RECALL MENU OK ID ID SET POWER ON/OFF button VOLUME UP/DOWN buttons - Hitachi CMP420V1 | Owners Guide - Page 15
ENGLISH INSTALLATION INSTRUCTIONS Installation • If you have purchased the model without the stand attached: When installing the monitor, use the optional Desk-top Stand (CMPAD05B,05). The Desk-top Stand has been used for the illustrations in this manual. WARNING Use one of the special mount units - Hitachi CMP420V1 | Owners Guide - Page 16
necessary in some cases. For details, refer to the instruction manual of the personal computer or ask the personal computer manufacturer or your local retail dealer. Speaker (R) Monitor rear panel Speaker (L) Power cable connector Power cord (DVI) (D-sub) To signal output terminal To signal - Hitachi CMP420V1 | Owners Guide - Page 17
Unit (option) Refer to the instruction manual concerning mounting of the optional speaker unit. Power Cord Connection Connect the power cord, after completing all other connections. ᶃ ᶄ x Connect the power cord to this device. ➁ Connect the power cord plug to the power outlet. (The type of plug - Hitachi CMP420V1 | Owners Guide - Page 18
OPERATING INSTRUCTIONS Main power switch Indicating lamp Turning Power On and Off • To turn the monitor power ON, press the main power switch on the monitor main unit to ON, and then press the SUB POWER button or the ON/OFF or ON button on the remote control. • To turn the monitor power OFF, - Hitachi CMP420V1 | Owners Guide - Page 19
OPERATING INSTRUCTIONS (continued) Volume Adjustment The volume can be adjusted by pressing the VOL+ and VOL- buttons of the remote control (or the L and M volume buttons of the monitor unit). Volume setting value VOLUME UP/DOWN buttons INPUT SELECT button Volume 15 Adjustment status guide - Hitachi CMP420V1 | Owners Guide - Page 20
OPERATING INSTRUCTIONS (continued) SIZE button RGB 1 RGB 2 MUTE VOL AV1 AV2 AV3 AV4 AUTO PinP SIZE RECALL MENU OK ID ID SET RECALL button RECALL button SIZE button Size Switching Each time the SIZE button of the remote control or the monitor is pressed, the screen display area will - Hitachi CMP420V1 | Owners Guide - Page 21
OPERATING INSTRUCTIONS (continued) ENGLISH AUTO button MENU button ID button VOL operated normally by pressing the various remote control buttons without holding down the ID button. • Set the monitor using the ID No. of Function MENU. Using the Menu Screen (On-screen display system) When the - Hitachi CMP420V1 | Owners Guide - Page 22
OPERATING INSTRUCTIONS (continued) PICTURE MENU MENU Picture Audio Timer Function Setup Language Select OK Set change from white to magenta. This special mode is better for dark scenes. For brighter scene some parts of the picture might not be clear. We recommend to set at [+31]. "Panel Life" - Hitachi CMP420V1 | Owners Guide - Page 23
ENGLISH OPERATING INSTRUCTIONS (continued) AUDIO MENU MENU Picture Audio Timer Function Setup Language Setup hint This function automatically sets the power to standby status when the indicated time period has elapsed. This automatically sets the power from standby to ON when the indicated - Hitachi CMP420V1 | Owners Guide - Page 24
INSTRUCTIONS (continued) FUNCTION MENU Picture Audio Timer OK MENU Function Setup Language Select OK Set Function Screen Saver Screen Wipe Black Side Panel Video Power screen size area. It is always set to Off when the monitor powered On. It is recommended to set to Off to reduce the - Hitachi CMP420V1 | Owners Guide - Page 25
ENGLISH OPERATING INSTRUCTIONS (continued) SETUP MENU MENU Picture Audio Timer Function Setup Language Select OK Set Setup Auto Adjust Adjust OK Depending on the type of signal displayed, displays may not be optimized through automatic adjustment. Adjust manually to optimize them. - Hitachi CMP420V1 | Owners Guide - Page 26
OPERATING INSTRUCTIONS (continued) LANGUAGE MENU MENU Picture Audio Timer Function Setup Language Approximately 1 sec. after adjustment is completed, the adjustments will be recorded as shown in the table below. • The previously recorded items will be lost. • The signal mode can be identified - Hitachi CMP420V1 | Owners Guide - Page 27
changes in orange and the mode switches to power save mode. Recheck the personal computer power switch status and the connection status. When the input signal does not match the monitor specifications or is in an unstable status. A guide displays Invalid Scan Freq. Recheck the input signal - Hitachi CMP420V1 | Owners Guide - Page 28
to Panel Life (Extend 1.or Extend 2 shown on ) • Set the plasma monitor to an "Screen Wipe" or "Inverse" display. The occurrence of image a long period of time. * Television broadcasts include images displayed for long periods of time in which the left and right or top and bottom of the image are - Hitachi CMP420V1 | Owners Guide - Page 29
ENGLISH TROUBLESHOOTING Symptoms That Seemingly Appear to be Failures Make the checks suggested below depending on the symptoms observed. If the symptoms remain uncorrected, contact your dealer. WARNING Customer servicing can be hazardous. Symptom • No picture with the power-indicating lamp off. - Hitachi CMP420V1 | Owners Guide - Page 30
TROUBLESHOOTING (continued) Symptoms That Seemingly Appear to be Failures (continued) - Hitachi CMP420V1 | Owners Guide - Page 31
TROUBLESHOOTING (continued) ENGLISH Actions to Correct Abnormal Displays Depending on the kind of system equipment used, images may not be displayed normally. In this case, make - Hitachi CMP420V1 | Owners Guide - Page 32
Speakers/Stand) 33.2kg Ambient conditions Temperature Operating : 5˚C to 35˚C, Storage : -15˚C to 60˚C Relative humidity Operating : 20% to 80%, Storage : 20% to 90% (non-condensing) Power supply AC100 - 240V, 50/60Hz Power Input signals Video signals 0.7 modes • The monitor takes at least - Hitachi CMP420V1 | Owners Guide - Page 33
PRODUCT SPECIFICATIONS (continued) Signal Input (continued) DVI terminal (DVI-D) Pin Input signal Pin Input signal 1 T.M.D.S. Data2- 14 +5V Power 2 T.M.D.S. Data2+ 15 Ground (for+5V) 3 T.M.D.S. Data2/4 Shield 16 Hot Plug Detect 4 T.M.D.S. Data4- 17 T.M.D.S. Data0- 5 T.M.D.S. Data4+ 18 - Hitachi CMP420V1 | Owners Guide - Page 34
With Analog RGB signal input (RGB2 input) • The type of video board or connecting cable used may not allow for correct displays adjustment of Horizontal Position, Vertical Position, Horizontal Clock and Clock Phase. • The monitor may fail to display an animation image correctly when a signal having - Hitachi CMP420V1 | Owners Guide - Page 35
ENGLISH SUPPLEMENT - Hitachi CMP420V1 | Owners Guide - Page 36
Unit Function Additional functions when the optional video unit is installed are as follows: ( ) INSTALLATION INSTRUCTIONS Connecting to a Video Imaging Device (1) Make sure that the power switch of the monitor is turned off. (2) Make sure that the power switch of the imaging device is turned - Hitachi CMP420V1 | Owners Guide - Page 37
monitor is pressed, the screen display size will change in sequence and the status will be displayed at the bottom of the screen. • During VIDEO signal , some slight blanking may remain at the top and bottom. In some cases, some slight blanking may remain at the top and bottom. * An image with an - Hitachi CMP420V1 | Owners Guide - Page 38
TV program, the image would appear different from the original. Take this into consideration when making screen mode choices. • Use of this monitor normal 4:3 image is displayed over the entire screen in the Panoramic mode, parts of the periphery of the image may disappear and/or appear distorted in - Hitachi CMP420V1 | Owners Guide - Page 39
can be shifted left and right by pressing the and AV1 AV2 SELECT buttons; the audio of the video will be output from the side on which the speaker icon is located. • The same video input mode cannot be selected for both screens at the same time. • Pressing the PinP button again or - Hitachi CMP420V1 | Owners Guide - Page 40
OPERATING INSTRUCTIONS (continued) PICTURE MENU MENU Picture Audio Timer Function Setup Language Select OK Set Picture OK Picture Mode Day OK Contrast +31 Brightness -31 Color 0 Sharpness + - Hitachi CMP420V1 | Owners Guide - Page 41
OPERATING INSTRUCTIONS (continued) ENGLISH PICTURE MENU (continued) Selected characters Picture Mode Day Night Auto Color Off On This is available only when receiving an NTSC composite/S.Video signal. This monitors and adjusts the color to maintain constant color levels. It also maintains - Hitachi CMP420V1 | Owners Guide - Page 42
OPERATING INSTRUCTIONS (continued) PICTURE MENU (continued) Selected characters Setup hint 2.2 Reset Return Setup hint This is used to reduce power consumption for video input when there is no video signal. Setting it On will leads the monitor to the standby mode when the AV input with no - Hitachi CMP420V1 | Owners Guide - Page 43
ENGLISH OPERATING INSTRUCTIONS (continued) SETUP MENU MENU Picture Audio Timer Function Setup Language Select OK Set Setup System System 2 OK Color System Video Input Audio Input Scart Output Monitor RGB1 DVI-STB RGB2 Component HDTV Select OK Set Return Setup Color System OK AV1 - Hitachi CMP420V1 | Owners Guide - Page 44
OPERATING INSTRUCTIONS (continued) adjustments will be recorded as shown in the table below. Menu Picture Display Registration condition Picture Mode function and every Picture Mode, 1 setting is Tint registered. Video Power Save 1 setting is registered. System 1 setting is registered. - Hitachi CMP420V1 | Owners Guide - Page 45
This table shows the specifications when the optional video unit has been inserted. Panel Display dimensions Resolution Approx. 42 inches (920 (H) x 518 (V) mm, diagonal 1059mm) 852 (H) x 480 (V) pixels Net dimensions (excluding Speakers/Stand) Net weight (excluding Speakers/Stand) 1030 - Hitachi CMP420V1 | Owners Guide - Page 46
are simultaneously input to the monitor via a graphics board or the like, the monitor will automatically select the / S.VHS CHROMINANCE IN 16 BLANKING SIGNAL 17 COMPOSITE VIDEO GND 18 BLANKING SIGNAL GND 19 COMPOSITE VIDEO OUT 20 COMPOSITE VIDEO / S.VHS LUMINANCE IN 21 GND / SHIELD (CHASSIS - Hitachi CMP420V1 | Owners Guide - Page 47
kHz) 15.73 15.63 Dot clock frequency (MHz) Remarks With R, G, B Video input (AV2 and AV4 input). No. Signal Name 1 (NTSC-M,PAL-M) (PAL-N) 59.94 44.96 Dot clock frequency (MHz) Remarks • The monitor differentiates the signal modes according to the horizontal and vertical frequencies and - Hitachi CMP420V1 | Owners Guide - Page 48
- Hitachi CMP420V1 | Owners Guide - Page 49
Nous vous remercions d'avoir acheté un écran couleur à plasma HITACHI. Avant d'utiliser votre écran, veuillez lire attentivement les '' et réglé avant emploi par un installateur spécialisé ou votre revendeur. HITACHI ne peut assumer aucune responsabilité pour des dégâts ou des endommagements causés - Hitachi CMP420V1 | Owners Guide - Page 50
moniteur à plasma HITACHI. Ne tardez pas à remplir votre carte de garantie et à l'envoyer par la poste à HITACHI. Cela permettra à HITACHI de vous sert à aviser l'utilisateur de la présence d'importantes instructions relatives à l'utilisation et l'entretien (dépannage) dans le service après-vente. - Hitachi CMP420V1 | Owners Guide - Page 51
avec le chariot, meuble, trépied, support ou table spécifié par le fabricant ou vendu . Confiez tout dépannage à un technicien qualifié. Le service est requis lorsque l'appareil a subi un dommage tel NE SONT PAS HONORÉES par votre garantie HITACHI. VISIONNEMENT PABLIQUE DE MATÉRIEL PROTÉGÉ PAR - Hitachi CMP420V1 | Owners Guide - Page 52
affichage à plasma et à haute définition L'écran d'affichage couleur à plasma de 42 pouces, Support de bureau : • CMPAD05B (pour CMP420V1) • CMPAD05 (pour CMP420V2) 2. Haut-parleurs pour l'écran à plasma : • CMPAS14W (pour CMP420V1) unité haut-parleur 2 voies avec un haut• CMPAS14V (pour CMP420V2 - Hitachi CMP420V1 | Owners Guide - Page 53
TABLE DES MATIÉRES MISES EN GARDE IMPORTANTES 2 CARACTÉRISTIQUES 4 CONSIGNES DE SÉCURIT 6 NOM DES COMPOSANTS 11 Unité Principale 11 Télécommande à distance 12 Mise en Place des Piles 12 Utilisation de la télécommande 12 INSTRUCTIONS DE L'IMAGE DE L'ÉCRAN ÉPLASMA ....26 REMARQUES 26 DÉPISTAGE - Hitachi CMP420V1 | Owners Guide - Page 54
femelle murale d'alimentation et contacter votre revendeur. • Ne pas placer l'écran à plasma dans une salle de bains. • Ne pas exposer l'écran à la pluie ou une surface instable, en pente ou soumise à des vibrations comme un support bancal ou incliné. Ne pas empêcher la ventilation de l'écran. - Hitachi CMP420V1 | Owners Guide - Page 55
é à sa position originale. S'assurer que la mise à la terre a bien été effectuée Brancher la borne de mise à la terre de la prise c.a. de l'écran plasma avec la borne de mise à la terre qui équipe la prise en utilisant le électricien câble d'alimentation inclus avec pour procéder au remplacement - Hitachi CMP420V1 | Owners Guide - Page 56
CONSIGNES DE SÉCURITÉ (suite) ATTENTION Faire attention lorsque l'on déplace l'écran. Une négligence risque de provoquer des blessures ou des dégâts. • Ne pas déplacer l'écran en cours de fonctionnement. Avant de le déplacer, débrancher le câble d'alimentation ainsi que toutes les autres - Hitachi CMP420V1 | Owners Guide - Page 57
de l'écran, mettre celui-ci hors tension et débrancher la prise mâle d'alimentation de la prise femelle murale. Afin d'éviter d'égratigner ou d'endommager l'écran à plasma, ne pas cogner ou frotter la surface de l'écran avec des objets acérés, pointus ou durs. Nettoyer la surface de l'écran avec un - Hitachi CMP420V1 | Owners Guide - Page 58
plasma. Si vous découvrez un problème de réception avec le poste de radio lorsque vous utilisez l'écran, veuillez vous apporter aux instructions conformément aux instructions. - Utiliser uniquement le chariot, le support ou le module de fixation, le trépied, la console murale ou la table spécifiés - Hitachi CMP420V1 | Owners Guide - Page 59
NOM DES COMPOSANTS Unité Principale Vue de face Ecran Coffret (cadre avant) FRANÇAS Panneau de commande • Les boutons destinés aux réglages sont situés à la partie inférieure. • Des indications sont portées sur le couvercle arrière afin de distinguer les différent boutons de réglage. Bouton - Hitachi CMP420V1 | Owners Guide - Page 60
NOM DES COMPOSANTS (suite) Télécommande à distance Bouton ALIMENTATION OFF 16 Bouton ALIMENTATION ON 16 Bouton SOURDINE 17 Boutons RGB/VIDEO 17 Bouton PinP 37 Bouton AUTO 19 Bouton MENU 19 Bouton OK 19 VOL RGB 1 RGB 2 MUTE VOL AV1 AV2 AV3 AV4 AUTO PinP SIZE - Hitachi CMP420V1 | Owners Guide - Page 61
INSTRUCTIONS CONCERNANT L'INSTALLATION Installation • Si vous avez acheté ce modèle sans le support joint : Lorsque vous installez l'écran, veuillez utiliser le support de table de l'écran optionnel (CMPAD05B,05). Le Support de Bureau a été utilisé dans les illustrations figurant dans ce manuel. - Hitachi CMP420V1 | Owners Guide - Page 62
INSTRUCTIONS CONCERNANT L'INSTALLATION (suite) Veuillez lire attentivement les CONSIGNES DE SECURITE (pages 6 à 10 ) pour assurer des conditions de sécurité maximales avant de passer aux étapes suivantes : • Choisir un endroit approprié et installer l'appareil sur une table à niveau où le support a - Hitachi CMP420V1 | Owners Guide - Page 63
FRANÇAS INSTRUCTIONS CONCERNANT L'INSTALLATION (suite) Montage et Installation des Haut-Parleurs (en option) Se référer au Manuel Utilisateur concernant le montage de l'unité haut-parleur optionnelle. Branchement - Hitachi CMP420V1 | Owners Guide - Page 64
INSTRUCTIONS CONCERNANT L'OPÉRATION Voyant indicateur Interrupteur principal d'alimentation Mise Sous Tension s'allume en orange ou le message '' No Sync Signal '' (Pas de signal Sync), ou '' Power Save '' (Economiseur d'énergie) ou '' Invalid Scan Freq. '' (Fréquence balayage invalide) apparaît - Hitachi CMP420V1 | Owners Guide - Page 65
INSTRUCTIONS CONCERNANT L'OPÉRATION (suite) Réglage du Volume Le volume sonore peut ). FRANÇAS Valeur de réglage du volume Boutons VOLUME HAUT/BAS Bouton CHOISIR ENTREE Volume 15 Affichage du guide de l'état de réglage Bouton SOURDINE Boutons RGB VOL RGB 1 RGB 2 MUTE VOL AV1 AV2 AV3 AV4 - Hitachi CMP420V1 | Owners Guide - Page 66
INSTRUCTIONS CONCERNANT L'OPÉRATION (suite) Bouton TAILLE RGB 1 RGB 2 MUTE VOL AV1 AV2 AV3 AV4 AUTO PinP SIZE RECALL MENU OK ID ID SET Bouton RAPPEL - Hitachi CMP420V1 | Owners Guide - Page 67
INSTRUCTIONS CONCERNANT L'OPÉRATION (suite) FRANÇAS Bouton AUTO Bouton MENU Bouton ID VOL RGB 1 RGB 2 MUTE VOL AV1 AV2 AV3 AV4 AUTO PinP SIZE RECALL - Hitachi CMP420V1 | Owners Guide - Page 68
INSTRUCTIONS CONCERNANT L'OPÉRATION (suite) MENU IMAGE MENU Image Audio Minuterie Fonction Rég. Init. Langue Choisir OK Régler Image Contraste : + 31 OK Luminosité : - 31 OK Couleur : 0 Teinte : + - Hitachi CMP420V1 | Owners Guide - Page 69
L M FRANÇAS L M INSTRUCTIONS CONCERNANT L'OPÉRATION (suite) MENU AUDIO MENU Image Audio Minuterie Fonction Rég. Init. Langue Choisir OK Régler Audio Mode Audio : Film OK Aigus : + 10 Graves : - 10 - Hitachi CMP420V1 | Owners Guide - Page 70
INSTRUCTIONS CONCERNANT L'OPÉRATION (suite) MENU FONCTION MENU Image Audio Minuterie Fonction Rég. Init. Langue Choisir OK Régler Fonction Ecran de veille Off OK Volet On 60Min. - Hitachi CMP420V1 | Owners Guide - Page 71
FRANÇAS INSTRUCTIONS CONCERNANT L'OPÉRATION (suite) MENU RÉGLAGE INITIAL Image Audio MENU Minuterie OK Fonction Rég. Init. Langue Choisir OK Régler Rég. Init. Réglage Automatique Position Horizontale Position Verticale - Hitachi CMP420V1 | Owners Guide - Page 72
INSTRUCTIONS CONCERNANT L'OPÉRATION (suite) MENU LANGUE MENU Image Audio Minuterie Fonction Rég. Init. Langue Choisir OK Régler Langue OK English Français Español Choisir Retour - Hitachi CMP420V1 | Owners Guide - Page 73
entrée est basculé ou lorsque l'on appuie sur le bouton RAPPEL. Un guide est affiché pour le terminal d'entrée et la fréquence de synchronisation ( sync. n'est plus détecté. • Un guide affiche un No Sync. Signal (Pas de signal Sync) et Power Save (Economie d'énergie) (pendant approximativement 5 - Hitachi CMP420V1 | Owners Guide - Page 74
, ce phénomène disparaîtra et l'écran reviendra à son état normal. Ceci n'indique pas un dérangement de l'appareil. A propos de l'écran • Les écrans à plasma affichent les images au moyen de décharges électriques à l'intérieur du panneau de l'écran. Pour cette raison, la température de la surface de - Hitachi CMP420V1 | Owners Guide - Page 75
ômes • Pas d'image avec le voyant indicateur d'alimentation en position Off. • Le message '' No Sync. Signal (Pas de Signal sync.) '' ou '' Power Save (Economie d'énergie). '' • Pas d'image avec le voyant indicateur d'alimentation allumée en orange. ! No Sync. Signal • Le message '' Invalid Scan - Hitachi CMP420V1 | Owners Guide - Page 76
DÉPISTAGE DES DÉRANGEMENTS ET CONTRE-MESURES (suite) Symptômes Pouvant Indiquer des Dérangements (suite) - Hitachi CMP420V1 | Owners Guide - Page 77
l'ajustement pour le symptôme ci-dessous lorsque les caractères sont flous sur l'ensemble de l'écran. • L'image affichée peut être momentanément troublée durant l'ajustement de l'horloge mais ceci n'est pas un dérangement. Symptôme 2 Le texte affiché sur l'écran apparaît flou dans sa totalit - Hitachi CMP420V1 | Owners Guide - Page 78
préavis. Panneau de l'écran Dimensions de l'écran d'affichage Approximativement 42 pouces (920 (H) x 518 (V), diagonale 1059 mm) Résolution 852 (H) x 480 (V) pixels Dimensions nettes (sans les hautparleurs et le support de l'écran) 1030 (largeur) x 636 (hauteur) x 91 (profondeur) mm Poids - Hitachi CMP420V1 | Owners Guide - Page 79
CARACTÉRISTIQUES DU PRODUIT (suite) Entrée des Signaux (suite) Terminal DVI (DVI-D) Broche Signal d'entrée Broche Signal d'entrée 1 T.M.D.S Donnée2- 14 +5V Alimentation 2 T.M.D.S Donnée2+ 15 Terre (pour +5V) 3 T.M.D.S Donnée2/4 Ecran 16 Prise Chaude Détecter 4 4T.M.D.S Donnée4- 17 - Hitachi CMP420V1 | Owners Guide - Page 80
CARACTÉRISTIQUES DU PRODUIT (suite) Liste des Signaux Recommandés (suite) Avec une entrée de signaux RGB analogique (entrée RGB2) • Le type de carte vidéo ou de câble de connexion utilisé peut ne pas permettre l'ajustement des affichages corrects de la Position Horizontale, de la Position Verticale, - Hitachi CMP420V1 | Owners Guide - Page 81
FRANÇAS SUPPLÉMENTS - Hitachi CMP420V1 | Owners Guide - Page 82
installée. 34 ~ 45 INSTRUCTIONS CONCERNANT L'INSTALLATION Branchement à 5 3 1 Adaptateur Câble d'alimentation Lecteur de DVD Boîtier Set-Top Lecteur de disque vidéo Magnétoscope A utiliser si l'équipement vidéo AV2 AV3 AV4 RGB1 RCA/Péritel CVBS S-video Composante RGB DVI PC STB D-sub RGB - Hitachi CMP420V1 | Owners Guide - Page 83
INSTRUCTIONS D'OPÉRATION FRANÇAS Bouton CHOISIR ENTREE Bouton TAILLE Changement D'entrée • la séquence AV1 AV2 AV3 AV4 RGB1 RGB2 en appuyant sur le bouton CHOISIR ENTREE de l'écran. Boutons RGB/VIDEO VOL RGB 1 RGB 2 MUTE VOL AV1 AV2 AV3 AV4 AUTO PinP SIZE RECALL MENU OK AV1 AV2 AV3 - Hitachi CMP420V1 | Owners Guide - Page 84
La position verticale de l'image peut être ajustée pour les modes (Panoramic), (Zoom) et (Film) de la manière suivante. 1. Appuyer sur le bouton TAILLE et les boutons CHOISIR ML durant l'affichage de la taille de l'image. 2. L'affichage de la position apparaîtra à l'écran. 3. La plage d' - Hitachi CMP420V1 | Owners Guide - Page 85
INSTRUCTIONS D'OPÉRATION (suite) FRANÇAS Affichage de MULTI PICTURE (MULTI l'écran secondaire est le signal composant de 1080i/50 ou de 1080i/60. AV1 : Affiche le signal d'entrée VIDEO de l'écran secondaire. Activation du mode SEPARATION à partir de l'écran d'entrée vidéo Si on appuie une fois - Hitachi CMP420V1 | Owners Guide - Page 86
INSTRUCTIONS D'OPÉRATION (suite) MENU IMAGE MENU Image Audio Minuterie Fonction Rég. Init. Langue Choisir OK Régler Image OK Mode D'Image Jour Contraste +31 Luminosité -31 Couleur 0 Dé - Hitachi CMP420V1 | Owners Guide - Page 87
INSTRUCTIONS D'OPÉRATION (suite) L FRANÇAS MENU IMAGE (suite) L Rubriques choisies Suggestion réglage Bleu Off On Ceci est disponible uniquement lors de la réception d'un signal NTSC composite/S.Video. Ceci contrôle et ajuste la couleur pour maintenir des niveaux de couleur constants. Ceci - Hitachi CMP420V1 | Owners Guide - Page 88
INSTRUCTIONS D'OPÉRATION (suite) MENU IMAGE (suite) L L Rubriques choisies Suggestion réglage initial Contrôle des ée vidéo quand il n'y a pas de signal vidéo. Si on place cette fonction sur On ceci mettra l'écran à plasma en mode de veille lorsque l'entrée AV sans signal a été sélectionnée. - Hitachi CMP420V1 | Owners Guide - Page 89
INSTRUCTIONS D'OPÉRATION (suite) MENU RÉGLAGE INITIAL MENU Image Audio Minuterie Fonction Rég. Init. Langue Choisir OK Régler Rég. Init. Système Système 2 OK Système de - Hitachi CMP420V1 | Owners Guide - Page 90
INSTRUCTIONS D'OPÉRATION (suite) MENU DE RÉGLAGE INITIAL (suite) L L Rubriques choisies Entrée Audio AV1 AV2 AV3 AV4 Sortie péritel RGB1 RGB2 (Primer paso) RGB2(Segundo paso) - Hitachi CMP420V1 | Owners Guide - Page 91
insérée. Panneau de Dimensions de l'écran d'affichage Approximativement 42 pouces (920(H) X 518(V), diagonale 1059 mm) l'é X 636 (hauteur) X 91 (profondeur) mm Poids net (sans les haut-parleurs et le support de l'écran) 33,2kg Conditions Température En opération : 5°C - 35°C, Entreposage : - Hitachi CMP420V1 | Owners Guide - Page 92
-B 16 SIGNAL BLANC 6 ENTREE AUDIO (GAUCHE/MONO) 17 TERRE SUGNAL BLANC 7 ENTREE RGB-B 18 TERRE VIDEO COMPOSITE 8 INTERRUPTEUR AUDIO.RGB / 16:9 19 SORTIE VIDEO COMPOSITE 9 TERRE RGB-G 20 VIDEO COMPOSITE / S.VHS CHROMINANCE IN 10 Non utilisé 21 TERRE / ECRAN (CHASSIS) 11 ENTREE RGB-G ᶃ ᶄ 20 - Hitachi CMP420V1 | Owners Guide - Page 93
CARACTÉRISTIQUES DU PRODUIT (suite) Liste des Signaux Recommandés Avec entrée des signaux RGB numériques (Entrée RGB 1) FRANÇAS ( : acceptable) Avec entrée composite (Entrée AV1 - AV4) et entrée S-vidéo (Entrée AV3) N° Nom du signal 1 NTSC-M PAL-M 2 PAL-N Mode signal Résolution 525 Fré - Hitachi CMP420V1 | Owners Guide - Page 94
- Hitachi CMP420V1 | Owners Guide - Page 95
Muchas gracias por su adquisición del Monitor de Pantalla Plasma HITACHI. Antes del uso de su monitor, sírvase leer cuidadosamente las "INSTRUCCIONES DE SEGURIDAD" este "MANUAL DEL USUARIO" para conocer el correcto modo de operación de este monitor. Guarde este manual en un sitio seguro y de fácil - Hitachi CMP420V1 | Owners Guide - Page 96
IMPORTANTES PARA LA SEGURIDAD PUNTOS IMPORTANTES QUE DEBEN OBSERVARSE EN EL USO DE SU TELEVISOR HITACHI Nuestra reputación está respaldada por la calidad, rendimiento y facilidad de uso los Monitor Plasma HITACHI. Se ha puesto también gran importancia en la seguridad y diseño de estas unidades. Para - Hitachi CMP420V1 | Owners Guide - Page 97
monitores han sido diseñados para cumplir con las normas de seguridad recomendadas. No aplique excesiva fuerza a la parte del juego de video, referencia del mercado HITACHI. VISION PUBLICA DEL MATERIAL PROTEGIDO POR LOS DERECHOS DE AUTOR La visión pública de difusión de programas por estaciones de TV - Hitachi CMP420V1 | Owners Guide - Page 98
de este manual. En caso de ocurrir un problema en su monitor plasma, desconecte primero video. Opciones Para mayor información, consulte con su concesionario local. 1. Estante de sobremesa: • CMPAD05B (para CMP420V1) • CMPAD05 (para CMP420V2) 2. Altavoz del monitor plasma: • CMPAS14W (para CMP420V1 - Hitachi CMP420V1 | Owners Guide - Page 99
del Reloj 19 Operación Independiente de los Monitores Múltiples ......19 Uso de la Pantalla de DE LA VISUALIZACION PLASMA 26 NOTAS 26 Video Opcional 34 ESPAÑOL Notas sobre este manual • La información contenida en este manual está sujeta a modificaciones sin previo aviso. • Aunque este manual - Hitachi CMP420V1 | Owners Guide - Page 100
Varios símbolos se usan en este manual y en el producto mismo para asegurar parte superior del monitor y otros objetos tales como las paredes. • No deje ningún objeto alrededor de las aberturas de ventilación del monitor. • No bloquee las aberturas de ventilación. • No coloque la pantalla plasma - Hitachi CMP420V1 | Owners Guide - Page 101
la pila. • No recargue, desarme o suelde la batería. • No aplique golpe o impacto a la batería. • Use la batería especificada en el manual de este monitor. • Asegúrese de que los terminales positivo y negativo están correctamente alineados en el momento de la colocación de la pila. • Si hay fuga en - Hitachi CMP420V1 | Owners Guide - Page 102
otras piezas a la luz directa del sol, ni los coloque en la cercanía una fuente térmica como el calefactor, etc. • No coloque el monitor en un lugar cuya temperatura tiende a variar grandemente. Desconecte el cordón de alimentación para una completa separación • Para fines de seguridad, desconecte - Hitachi CMP420V1 | Owners Guide - Page 103
sobre la retención de imagen El monitor plasma ilumina fósforo para visualizar imágenes. El fósforo tiene una vida de iluminación limitada. Después de un tiempo prolongado de iluminación, el brillo del fósforo mermará a tal grado que las imágenes fijas quemarán esa parte de la imagen como imágenes - Hitachi CMP420V1 | Owners Guide - Page 104
que se conecta a tierra. • Precauciones durante el transporte Debido a que este monitor es pesado, tenga sumo cuidado en su transporte. Además, use la caja de y estabilidad. No aplique fuerza excesiva de tracción a la delantera o parte superior de la caja, ya que esto podría causar caída del - Hitachi CMP420V1 | Owners Guide - Page 105
LOS COMPONENTES Unidad Principal Delantera Panel Gabinete (bastidor frontal) ESPAÑOL Panel de control • Los botones de ajuste están ubicados en la parte inferior. • La cubierta posterior está provista de indicaciones para distinguir los botones de ajuste. Botón MENU 19 Botones Botón Selecci - Hitachi CMP420V1 | Owners Guide - Page 106
DESIGNACION DE LOS COMPONENTES (continuación) Control remoto Botón OFF 16 Botón ON 16 Botón Sordina 17 Botones RGB/VIDEO 17 Botón PinP 37 Botón AUTO 19 Botón MENU 19 Botón OK 19 Botón Identificación 19 VOL RGB 1 RGB 2 MUTE VOL AV1 AV2 AV3 AV4 - Hitachi CMP420V1 | Owners Guide - Page 107
INSTRUCCIONES PARA LA INSTALACION Instalación • Si ha comprado usted el modelo sin estante: En la instalación del monitor, use el Estante Sobremesa opcional (CMPAD05B,05). En este manual se muestra el Estante Sobremesa. ADVERTENCIA Utilice una de las unidades de montaje especiales para instalar el - Hitachi CMP420V1 | Owners Guide - Page 108
la computadora personal. • Use un cable adaptable al terminal de entrada de este monitor y el terminal de salida de la computadora personal. • Según el tipo personal en algunos casos. Para los detalles, refiérase al manual de instrucciones de la computadora personal o consulte con el fabricante - Hitachi CMP420V1 | Owners Guide - Page 109
en la Unidad de Altavoz (opcional) Refiérase al manual de instrucciones para el montaje de la unidad de altavoz principal de terminar todas las otras conexiones. ᶃ ᶄ x Conecte el cordón de alimentación a este monitor. ➁ Conecte el enchufe del cordón de alimentación a la toma de corriente. (El - Hitachi CMP420V1 | Owners Guide - Page 110
luego oprima el interruptor de alimentación principal de la unidad principal del monitor para dejarlo en la posición OFF. Durante el uso normal, el la frente del bastidor está en ON. Encendida en anaranjado Off (Power Save) Cuando el interruptor de alimentación principal está ajustado a ON - Hitachi CMP420V1 | Owners Guide - Page 111
botones RGB1, RGB del control remoto. La entrada puede conmutarse en el orden de RGB1 RGB2 presionando el botón Selección de Entrada del monitor. RGB1 RGB2 Visualización la guía del estado de ajuste (El valor visualizado cambiará a magenta). • Al presionar el botón, se visualiza la guía (magenta - Hitachi CMP420V1 | Owners Guide - Page 112
Botón Tamaño Conmutación de Tamaño Cada vez que presione el botón Tamaño del control remoto o el monitor, el área de visualización de la pantalla cambiará en orden y el estado se visualizará en la parte inferior de la pantalla. Normal Completo Zoom1 Real* Zoom3 Zoom2 * El modo real ofrece imagen de - Hitachi CMP420V1 | Owners Guide - Page 113
Múltiples (No. de ID) La fijación del No. ID del control remoto permite separar el control de hasta un máximo de siete monitores. El No. de ID 2 (inicialmente No. de ID 1) del control remoto puede ajustarse presionando el botón Configurar Identificación por 2 segundos o más mientras mantiene - Hitachi CMP420V1 | Owners Guide - Page 114
INSTRUCCIONES PARA LA OPERACION (continuación) MENU DE IMAGEN Imagen MENU Audio Temporizador OK Función Configurar Idioma Selecc. OK Configurar Imagen Contraste : + 31 Brillo : - 31 Color : 0 Tonalidad : + 31 Mejora de la Imagen : Off Temp. color : Normal Ajuste Temp. Color - Hitachi CMP420V1 | Owners Guide - Page 115
INSTRUCCIONES PARA LA OPERACION (continuación) MENU DE AUDIO MENU Imagen Audio Temporizador Función Configurar Idioma Selecc. OK Configurar Audio Modo Audio : Cine OK Agudos : + 10 Graves : - 10 Balance : 0L R SRS TruBass : Medio Matrix Surround : Off Volumen Perfecto : Off - Hitachi CMP420V1 | Owners Guide - Page 116
barras laterales grises en On/Off cuando esté viendo el área del tamaño de pantalla en el modo normal. Se ajusta siempre a Off cuando el monitor es activado. Se recomienda ajustar a Off para reducir la retención de imagen del panel. Opcional (se atenúa) Modo Pausa Opcional (se atenúa) Zoom por - Hitachi CMP420V1 | Owners Guide - Page 117
INSTRUCCIONES PARA LA OPERACION (continuación) MENU DE CONFIGURAR MENU Imagen Audio Temporizador OK Función Configurar Idioma Selecc. OK Configurar Configurar Ajuste Automático Posición Horizontal Posición Vertical Reloj Horizontal Fase del Reloj Reiniciar Selecc. Regresar - Hitachi CMP420V1 | Owners Guide - Page 118
INSTRUCCIONES PARA LA OPERACION (continuación) MENU DE IDIOMAS MENU Imagen Audio Temporizador Función Configurar Idioma Selecc. OK Configurar Idioma OK English Français Español Selecc. Regresar Salir Seleccione un idioma mediante los botones SELECCIONAR M L y luego pulsar el botón OK. OTRAS - Hitachi CMP420V1 | Owners Guide - Page 119
ón. • Una guía visualiza No Sync. Signal (Sin Señal Sincro) y Power Save (Ahorro de Energía) (por aproximadamente 5 seg.) • Cuando esta condición contin Cuando la señal de entrada no concuerda con las especificaciones del monitor o cuando está en un estado inestable. Una guía visualiza Invalid - Hitachi CMP420V1 | Owners Guide - Page 120
de imagen • Baje el las fijaciones del Contraste y el Brillo del monitor plasma cuanto fuera posible. Se dispone de una función que controla el brillo de o la derecha y la parte inferior de la imagen están cortadas y el nombre o la hora de la estación de TV visualizados también por un tiempo - Hitachi CMP420V1 | Owners Guide - Page 121
LOCALIZACION DE FALLAS Síntomas que Aparentan ser Fallas Realice las comprobaciones recomendadas abajo según los síntomas observados. Si los síntomas persisten, póngase en contacto con su concesionario. ADVERTENCIA El servicio por el cliente es peligroso. ESPAÑOL - Hitachi CMP420V1 | Owners Guide - Page 122
LOCALIZACION DE FALLAS (continuación) Síntomas que Aparentan ser Fallas (continuación) - Hitachi CMP420V1 | Owners Guide - Page 123
LOCALIZACION DE FALLAS (continuación) Acciones Para la Corrección de Visualizaciones Anormales Según la clase del equipo usado, puede que las imágenes no se visualicen normalmente. En este caso, haga los ajustes recomendados abajo. (sólo para RGB2) Síntoma 1 Ejemplo El texto visualizado a través - Hitachi CMP420V1 | Owners Guide - Page 124
Dimensiones de la pantalla Resolución Aprox. 42 pulg. (920(Alto) x 518 (V) RGB2 (Mini conector estéreo de 3,5mm) Señales de video 0,7 V/1,0 Vp-p, RGB análogo (Señal recomendada) Señ verde, 0,3 Vp-p [75Ω] 44 modos 31 32 • El monitor tarda por lo menos 30 minutos para obtener la óptima calidad - Hitachi CMP420V1 | Owners Guide - Page 125
ESPECIFICACIONES DEL PRODUCTO (continuación) Entrada de Señal (continuación) Terminal DVI (DVI-D) Patilla Señal de entrada Patilla Señal de entrada 1 Datos 2- T.M.D.S. 14 Alimentación +5V 2 Datos 2+ T.M.D.S. 15 Tierra (para +5V) 3 Datos 2/4 blindajes T.M.D.S. 16 Detec. patita activa 4 Datos - Hitachi CMP420V1 | Owners Guide - Page 126
entrada de señal RGB análoga (entrada RGB2) • El tipo del tablero de video o cable de conexión puede que no permita el correcto ajuste de visualización de una señal con frecuencia vertical de 85Hz o superior. • El monitor diferencia los modos de señal según las frecuencias horizontal y vertical - Hitachi CMP420V1 | Owners Guide - Page 127
ESPAÑOL SUPLEMENTO - Hitachi CMP420V1 | Owners Guide - Page 128
monitor video video. (Si el terminal de entrada de video S y el terminal de entrada de video de AV3 están conectados al mismo tiempo al monitor, tendrá preferencia la entrada de video S). • Si el terminal de SALIDA (MONITOR) está conectado al monitor de video aplicables SCART CVBS Video S Compo - Hitachi CMP420V1 | Owners Guide - Page 129
Cada vez que presione el botón Tamaño del control remoto o monitor, cambiará el tamaño de la visualización en la pantalla en el orden, y el estado se visualizará en la parte inferior de la pantalla. • Durante la entrada de señal VIDEO (AV1, AV2, AV3, AV4, RGB1 ((ajuste a [DVI-STB]) y RGB2 (ajuste - Hitachi CMP420V1 | Owners Guide - Page 130
TV, la imagen podría aparecer de una forma diferente a la original. Tenga esto en cuenta en la selección del modo de pantalla. • El uso de este monitor la pantalla entera en el modo Panoramic, en ciertos casos las partes de la periferia de la imagen pueden desaparecer y/o aparecer deformadas. Use - Hitachi CMP420V1 | Owners Guide - Page 131
Pantalla de Señal de Entrada El estado de señal de entrada puede ser visualizado en la VIDEO pantalla, presionando el botón RELLAMAR del control remoto o monitor. La visualización se apagará en aproximadamente 6 segundos. Temporizador Off Temporizador On OFF -- -- Min AV1 Compuesto Modo de - Hitachi CMP420V1 | Owners Guide - Page 132
INSTRUCCIONES PARA LA OPERACION (continuación) MENU DE IMAGEN MENU Imagen Audio Temporizador Función Configurar Idioma Selecc. OK Configurar Imagen OK Modo de Imagen Día OK Contraste +31 Brillo -31 Color 0 Definición +15 Tonalidad 0 Temp. color Normal Modo Contraste Normal - Hitachi CMP420V1 | Owners Guide - Page 133
Cut Off Verde Azul Ajusta la compensación del nivel negro. Off On Esto es posible sólo en la recepción de NTSC compuesto⁄señal S.Video. Monitorea y ajusta el color para mantener constantes los niveles de color. Mantiene también los tonos naturales mientras preserva la fidelidad de los colores - Hitachi CMP420V1 | Owners Guide - Page 134
Normal Off 1 On 60Min. Off 2.2 Reiniciar Regresar Consejo útil para el ajuste Se utiliza para reducir el consumo de energía para la entrada de video cuando no hay señal de video. Al poner en ON, el monitor queda en el modo standby cuando se selecciona la entrada de AV sin señal. - Hitachi CMP420V1 | Owners Guide - Page 135
Sistema 1 Sistema 2 Configurar Configurar Sistema Sistema 2 Entrada audio Sistema color OK AV1 Estéreo Entrada video AV2 L/Mono Entrada audio AV3 Estéreo Salida EURO Monitor AV4 L/Mono RGB1 DVI-STB Selecc. Regresar Salir RGB2 Componentes HDTV Selecc. OK Configurar Regresar - Hitachi CMP420V1 | Owners Guide - Page 136
Ahorro de Energía Se registra 1 fijación. Configurar Sistema Se registra 1 fijación. Sistema Color Se registra 1 fijación. AV1 AV2 AV3 AV4 Entrada Video - AV1 Se registra 1 fijación. AV2 AV4 Entrada Audio - AV1 Se registra 1 fijación. AV2 AV3 AV4 RGB1 RGB2 • Se perderán los - Hitachi CMP420V1 | Owners Guide - Page 137
ha sido insertada una unidad de video opcional. Panel Dimensiones de la pantalla Aprox. 42 pulgadas (920 (Alto)x 518 SALIDA (MONITOR): Terminal de salida del monitor de video compuesto (RCA) SALIDA (MONITOR): Terminal de salida del monitor de audio L/R (RCA) AV4: video compuesto / monitor de audio - Hitachi CMP420V1 | Owners Guide - Page 138
entran al mismo tiempo en el monitor a través del tablero gráfico u otro similar, el monitor seleccionará automáticamente las señales VIDEO COMPUESTO 7 ENTRADA RGB-B 18 GND SEÑAL DE SUPRESION 8 INTERRUPTOR AUDIO / RGB / 16:9 19 SALIDA VIDEO COMPUESTO 9 GND RGB-G 20 ENTRADA LUMINANCIA VIDEO - Hitachi CMP420V1 | Owners Guide - Page 139
(MHz) 525 59,94 15,73 625 50,00 15,63 Observaciones Con Entrada de Video R, G, B (Entrada AV2 y AV4). No. Nombre de señal 1 (NTSC-M, 60,00 33,75 7 720p/60 720 59,94 44,96 Observaciones • El monitor diferencia los modos de señal según las frecuencias horizontal y vertical y las - Hitachi CMP420V1 | Owners Guide - Page 140
- Hitachi CMP420V1 | Owners Guide - Page 141
- Hitachi CMP420V1 | Owners Guide - Page 142
Hitachi America, LTD. Home Electronics Division 900 Hitachi Way. Chula Vista, CA 91914, U.S.A. Tel: +1-800-HITACHI (+1-800-448-2244) Hitachi Canada, LTD. Digital Media Division 6740 Campobello Road. Mississauga, ON L5N 2L8, CANADA Tel: +1-800-HITACHI (+1-800-448-2244) HD88HP8C300 Printed in China
-
 1
1 -
 2
2 -
 3
3 -
 4
4 -
 5
5 -
 6
6 -
 7
7 -
8
-
9
-
10
-
11
-
12
-
13
-
14
-
15
-
16
-
17
-
18
-
19
-
20
-
21
-
22
-
23
-
24
-
25
-
26
-
27
-
28
-
29
-
30
-
31
-
32
-
33
-
34
-
35
-
36
-
37
-
38
-
39
-
40
-
41
-
42
-
43
-
44
-
45
-
46
-
47
-
48
-
49
-
50
-
51
-
52
-
53
-
54
-
55
-
56
-
57
-
58
-
59
-
60
-
61
-
62
-
63
-
64
-
65
-
66
-
67
-
68
-
69
-
70
-
71
-
72
-
73
-
74
-
75
-
76
-
77
-
78
-
79
-
80
-
81
-
82
-
83
-
84
-
85
-
86
-
87
-
88
-
89
-
90
-
91
-
92
-
93
-
94
-
95
-
96
-
97
-
98
-
99
-
100
-
101
-
102
-
103
-
104
-
105
-
106
-
107
-
108
-
109
-
110
-
111
-
112
-
113
-
114
-
115
-
116
-
117
-
118
-
119
-
120
-
121
-
122
-
123
-
124
-
125
-
126
-
127
-
128
-
129
-
130
-
131
-
132
-
133
-
134
-
135
-
136
-
137
-
138
-
139
-
140
-
141
-
142
 |
 |
USER'S MANUAL
MANUEL UTILISATEUR
MANUAL DE USUARIO
READ THE INSTRUCTIONS INSIDE CAREFULLY.
KEEP THIS USER'S MANUAL FOR FUTURE REFERENCE.
For future reference, record the serial number of your monitor.
SERIAL NO.
The serial number is located on the rear of the monitor.
This monitor is
ENERGY STAR
® compliant when used with a computer equipped with
VESA DPMS.
The
ENERGY STAR
® emblem does not represent EPA endorsement of any product or
service.
As an
ENERGY STAR
® Partner, Hitachi,Ltd. has determined that this product meets
the
ENERGY STAR
® guidelines for energy efficiency.
Color Plasma Display Monitor
Model
PW1A
CMP420V1
CMP420V2