Hitachi CMP420V1 Owners Guide - Page 16
INSTALLATION INSTRUCTIONS continued, Connecting to a PC
 |
View all Hitachi CMP420V1 manuals
Add to My Manuals
Save this manual to your list of manuals |
Page 16 highlights
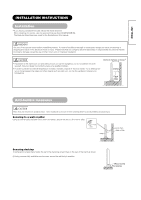
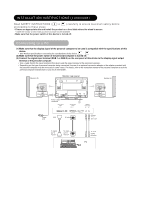
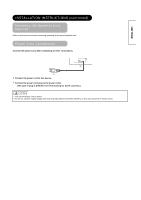
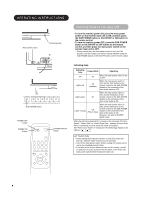
INSTALLATION INSTRUCTIONS (continued) Read SAFETY INSTRUCTIONS ( to ) carefully to ensure maximum safety before proceeding to these steps: • Choose an appropriate site and install the product on a level table where the stand is secure. • Install the monitor to have ready access to a power socket available. • Make sure that the power switch of this device is turned off. Connecting to a PC (1) Make sure that the display signal of the personal computer to be used is compatible with the specifications of this device. • See "Product Specifications" concerning the specifications of this device. (2) Make sure that the power switch of the personal computer is turned off. (3) Connect the signal input terminal (RGB 1 or RGB 2) on the rear panel of this device to the display signal output terminal of the personal computer. • Use a cable that fits the input terminal of this device and the output terminal of the personal computer. • Depending on the type of personal computer being connected, the use of an optional conversion adapter or the adapter provided with the personal computer may be necessary in some cases. For details, refer to the instruction manual of the personal computer or ask the personal computer manufacturer or your local retail dealer. Speaker (R) Monitor rear panel Speaker (L) Power cable connector Power cord (DVI) (D-sub) To signal output terminal To signal output terminal 3.5mm Stereo mini jack To audio output terminal PC
-
 1
1 -
2
-
3
-
4
-
5
-
6
-
7
-
8
-
9
-
10
-
 11
11 -
 12
12 -
 13
13 -
 14
14 -
 15
15 -
 16
16 -
 17
17 -
 18
18 -
 19
19 -
 20
20 -
 21
21 -
22
-
23
-
24
-
25
-
26
-
27
-
28
-
29
-
30
-
31
-
32
-
33
-
34
-
35
-
36
-
37
-
38
-
39
-
40
-
41
-
42
-
43
-
44
-
45
-
46
-
47
-
48
-
49
-
50
-
51
-
52
-
53
-
54
-
55
-
56
-
57
-
58
-
59
-
60
-
61
-
62
-
63
-
64
-
65
-
66
-
67
-
68
-
69
-
70
-
71
-
72
-
73
-
74
-
75
-
76
-
77
-
78
-
79
-
80
-
81
-
82
-
83
-
84
-
85
-
86
-
87
-
88
-
89
-
90
-
91
-
92
-
93
-
94
-
95
-
96
-
97
-
98
-
99
-
100
-
101
-
102
-
103
-
104
-
105
-
106
-
107
-
108
-
109
-
110
-
111
-
112
-
113
-
114
-
115
-
116
-
117
-
118
-
119
-
120
-
121
-
122
-
123
-
124
-
125
-
126
-
127
-
128
-
129
-
130
-
131
-
132
-
133
-
134
-
135
-
136
-
137
-
138
-
139
-
140
-
141
-
142
 |
 |
