JVC GY-DV500U GY-DV500 User Manual - PDF (4,089KB) - Page 42
Setting And Adjustments Before Shooting - adapter
 |
View all JVC GY-DV500U manuals
Add to My Manuals
Save this manual to your list of manuals |
Page 42 highlights
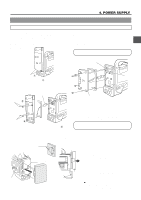
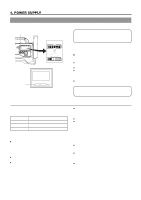
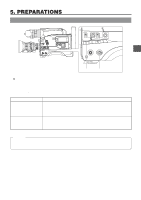
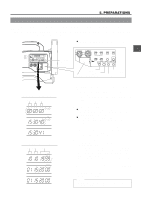
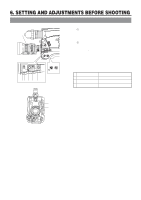
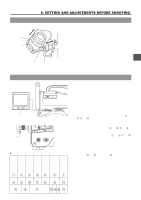
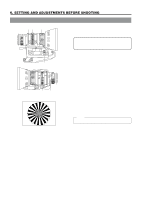
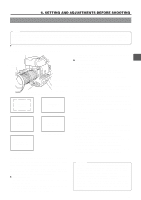
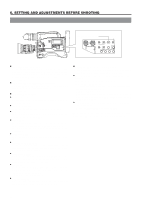
6. SETTING AND ADJUSTMENTS BEFORE SHOOTING 6-1 Camera Settings 3. FILTER 1 3200k 2 5600k 3 5600k+ND SHUTTER STATUS MENU ALARM MONITOR AUTO IRIS FULL AUTO BLACK BACK L NORMAL SPOT L STRETCH NORMAL COMPRESS LOLUX PRST A B ON KNEE OFF AUTO BARS CAM HML SAVE STBY VTR GAIN OUTPUT WHT.BAL NG POWER ON OFF OPERATE/WARNING RESET MONITOR SELECT CH-1 AUDIO CH-2 LEVEL 2. AUTO IRIS FULL AUTO BLACK BACK L NORMAL SPOT L STRETCH NORMAL COMPRESS LOLUX 1. NG POWER ON OFF PRST A B ON KNEE OFF AUTO BARS CAM HML SAVE STBY VTR GAIN OUTPUT WHT.BAL BA C D E 1. POWER ON 1 First place a charged battery pack in the battery case on the rear section of the unit. If battery pack is not used, connect DC power to the DC INPUT connector on the rear section of the unit using the AC power adapter (AA- LIGHT ON OFF P250) to supply DC 12 V current. COUNTER CTL TC UB 2 Set the POWER switch on the unit to ON. 2. SWITCH positions A. Set the VTR switch to STBY. B. AUTO IRIS switch; set to NORMAL. C. GAIN switch; set to L. The L position is 0 dB. D. OUTPUT switch; set to CAM\AUTO KNEE OFF. E. WHT. BAL (Auto White Balance) switch; set to A or B. 3. Set the lens' iris mode switch to "A" (AUTO IRIS side) 4. Choose the proper color temperature conversion filter. FILTER 1 3200K 2 5600K 3 5600K+ND Suitable Location Indoors, dark outdoors Outdoors Outdoors under clear sky 5. Using the SHUTTER dial, set the shutter speed to OFF. VF OFF ZEBRA SKIN ON AREA AUTO WHITE ACCU FOCUS VTR AUDIO LEVEL CH-1 TAKE 4. 5. 42
-
 1
1 -
2
-
3
-
4
-
5
-
6
-
7
-
8
-
9
-
10
-
11
-
12
-
13
-
14
-
15
-
16
-
17
-
18
-
19
-
20
-
21
-
22
-
23
-
24
-
25
-
26
-
27
-
28
-
29
-
30
-
31
-
32
-
33
-
34
-
35
-
36
-
 37
37 -
 38
38 -
 39
39 -
 40
40 -
 41
41 -
 42
42 -
 43
43 -
 44
44 -
 45
45 -
 46
46 -
 47
47 -
48
-
49
-
50
-
51
-
52
-
53
-
54
-
55
-
56
-
57
-
58
-
59
-
60
-
61
-
62
-
63
-
64
-
65
-
66
-
67
-
68
-
69
-
70
-
71
-
72
-
73
-
74
-
75
-
76
-
77
-
78
-
79
-
80
-
81
-
82
-
83
-
84
-
85
-
86
-
87
-
88
-
89
-
90
-
91
-
92
-
93
-
94
-
95
-
96
 |
 |
